Linkskey LDV-DM722AUSK User Manual
Quick installation guide
Quick Reference Sheet Applicable models: LDV-DM722AUSK / LDV-DM724AUSK Dual Monitor Dual Link DVI KVM Switch w/ Audio&Mic
Copyright© All rights reserved Rev. 1.1
1
True Transparent USB Emulation Technology
Dual Link DVI Large Size Dual Monitor support
HDCP Support
7.1 surround sound support
2560 x 1600 digital resolution support
2 x USB 2.0 hub ports + 1 X DEVICE port with full driver support for
any advanced USB 2.0 device
LDV-DM722AUSK / LDV-DM724AUSK
2/4-port Dual Monitor Dual Link DVI KVM Switch
w/ 7.1 surround sound support
Quick Installation Guide
Thank you for purchasing the LDV-DM722AUSK/LDV-DM724AUSK
Dual Monitor Dual Link DVI KVM Switch w/ 7.1 surround sound
support! With our highly reliable and quality product, user can enjoy
countless benefits from using this KVM Switch.
LDV-DM722AUSK LDV-DM724AUSK
Introduction
The LDV-DM722AUSK/LDV-DM724AUSK Dual Monitor Dual Link DVI
KVM Switch is a 2/4-port TMDS-compliant Dual Monitor DVI USB KVM
Switch designed for sharing two Dual Link DVI monitors/Flat Panel
Displays between multiple multimedia computers with Dual Head display
[2 x DVI]. Its 7.1 channel surround sound renders a theater digital audio
experience that greatly enlivens your DVD playbacks or gaming sessions.
You can sit back and enjoy to the full with live audio/video output from
this KVM switch.
This Dual Monitor DVI USB KVM Switch supports digital video with up to
2560 x 1600 resolution for your maximum convenience in adapting to
your display requirements. It is TMDS-compliant to support DDC2B
emulation and HDCP compliant for digital contents protection.
This Dual Monitor DVI USB KVM Switch features the latest True
Transparent USB (TTU) Emulation Technology for full compatibility to
all types of keyboards and mice. It also supports All Time Full DDC
Emulation for ultimate video compatibility with all graphic display
scenarios with the latest operating system.
The two USB 2.0 Hub Ports and one
USB 2.0 Device Port (topmost
one, marked Device Port)
are for sharing high-speed USB 2.0
devices.
The USB Device Port and the rest of the two USB Hub
Ports actually belong to two independently operating groups, and
can configure separately for independent/simultaneous switching
with the PC channel. These three USB ports can well offer full
driver support to more advanced USB 2.0 gadgets, since they are
having no emulation and can facilitate a direct signal pass-
through required for these advanced devices. For example, you
can connect a transceiver of your advanced wireless/Bluetooth
keyboard/mouse to either of the three USB 2.0 ports, enabling its
full driver and functional support.
In addition to the keyboard hotkey operation, it provides
a full set of
keyboard hotkeys to facilitate your KVM switching operations
such as PC selection and hotkey sequence programming,
autoscanning, autoscan delay time programming, independent/
simultaneous audio&PC switching, etc.
Out-of-the-box Installation
Take the KVM Switch out of the box and begin installation….
Step 1. Power up you KVM Switch by connecting the external power
adapter to it.
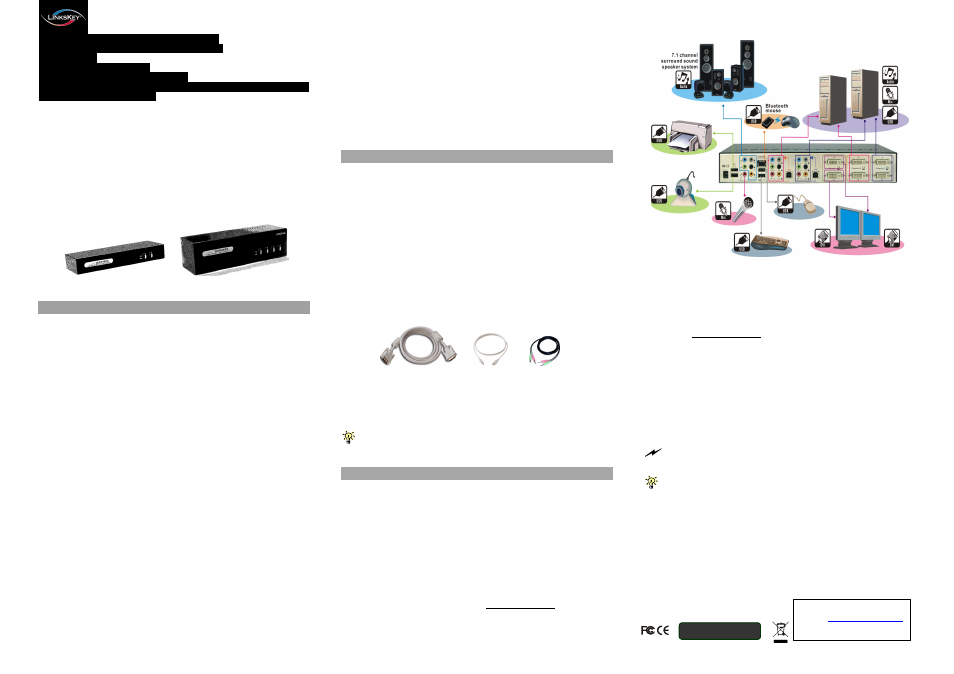
Step 2. Connect the shared USB keyboard, mouse, two monitors and
the 7.1 channel speaker system and microphone as well as
other shared USB devices to the KVM switch. If you use an
advanced USB device (such as wireless/Bluetooth mouse, etc)
that needs its own driver for full function, you can connect it to
either the Device port or the Hub port.
Step 3. Connect each of your computers to the KVM switch, using the
DVI-D video cable, USB (Type A -to- Type B) cable and audio &
Mic cables (see the pictures below).
DVI - D USB cable Audio/Mic
Video Cable
(TypeA-to-TypeB)
Step 4. (Now your KVM Switch should have been powered-up…..)
Power up the connected computers one by one. After your
computers are powered up, the keyboard and mouse will be
recognized and now you can begin operating the KVM switch.
And also you should verify the USB devices on your Hub ports and Device
port are fully functioning after installation of its driver on both connected PCs
Easy Operation
There are two methods to control your KVM Switch for PC, USB hub port
as well as audio/mic channel selection: using the front-panel push
buttons and a hotkey sequence.
Front-panel buttons
The front-panel buttons let you have direct control over KVM switch
operation and channel switching. Simply press the PC button for PC port
switching (and if binding is enabled between PC / USB hub port control /
audio & mic switching, they will be jointly selected at the same time). If
you want to enable the binding of PC / Hub port control / Audio&Mic
switching, use the hotkey sequences.
See Quick Reference Sheet
Basic configuration (showing only LDV-DM722AUSK)
Keyboard hotkey
A keyboard hotkey sequence consists of at least three specific
keystrokes:
See Quick Reference Sheet
Hotkey sequence = [ScrLk]
*
+ [ScrLk]
*
+ Command key(s)
* User-definable = SCROLL LOCK, CAPS, ESC, F12 or NUM LOCK
Hotkey preceding sequence configuration: For users who want to use a
preceding sequence other than two consecutive Scroll Locks, there is also one
convenient way to configure it. (1)Hit ScrollLock + ScrollLock + H, then two beeps
will signal readiness for new preceding sequence selection [or Press and hold
down the last front-panel button (Button 2) until you hear two beeps, then release
the button.] (2) Select and press the key you would like to use as your preceding
sequence (SCROLL LOCK, CAPS, ESC, F12 or NUM LOCK keys are available
for selection) and you’ll hear a beep for selection confirmation. Now you can use
the new preceding sequence to execute your hotkey commands.
Each keystroke within a hotkey sequence should be pressed within 2
seconds. Otherwise, the hotkey sequence will not be validated.
For detailed Hotkey sequences and their corresponding functional commands,
please refer to the Quick reference sheet.
RoHS Compliant
Technical Support
E-mail:
Website: www.linkskey.com