Auriol 4-LD3091 User Manual
Page 8
- 12 -
Display description
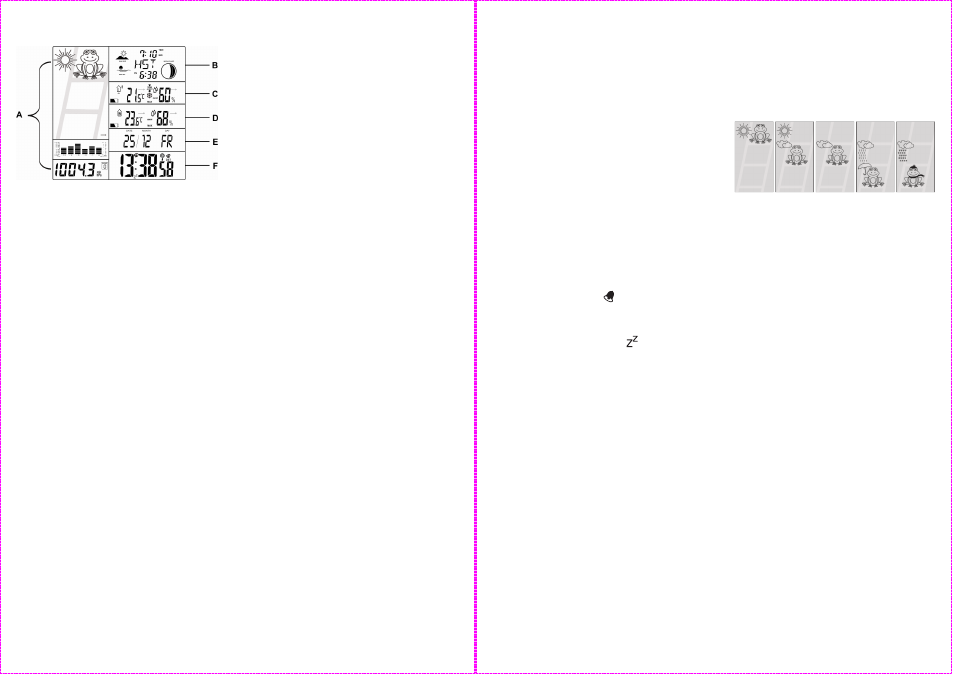
A
weather forecast (weather frog),
graphical air pressure of the last
12 hours, air pressure trend, numerical
air pressure
B
Sunrise and sunset times, tide display
(spring and neap tides), location
display, moon phase display
C
Display of the current outdoor sensor
(1,2 or 3), outdoor temperature,
temperature and frost alert, temperature
trend, outdoor humidity, humidity trend,
battery low indicator for outdoor sensor
D
Indoor temperature, temperature trend,
indoor humidity, humidity trend, battery
low indicator for weather station
E
Date and day of the week
F
Time and reception indicator, snooze
symbol, 2 alarm symbols, daylight
saving time indicator
Setup
Open the battery compartment at the back of the
weather station. Insert the batteries in the correct
polarity and close the battery compartment.
Remove the protective film from the weather
station display.
Position the station and the sensor directly next to
one another. Insert the batteries into the sensor
within the next 2 minutes.
The weather station now starts to receive the time
signal and the radio tower flashes in the display
next to the time. While receiving the signal, none
of the weather station's other functions can be
used. If signal reception is successful the weather
station's time and date are set automatically.
If the reception is not successful after 7 minutes
please move the weather station to a different
location at your site. Restart the reception by
pressing "+" and "-" together briefly. The weather
station will restart the reception attempt.
If the reception is not possible at all please set the
time manually.
While the weather station tries to receive the time
signal, it simultaneously searches for the signal
from the outside sensor and the red light on the
front of the sensor flashes.
If the transmission signal is received successfully
the current outside temperature appears on the
display of the weather station. Signal reception
and exact synchronisation with the sensor can
take up to 2 hours.
Replace the batteries if the battery icon appears
on the display.
Inside Hygrometer
Your weather station measures the humidity in the
range of 25-95% relative humidity.
Outside Hygrometer
Your weather station measures the humidity in the
range of 25-95% relative humidity from the
outside sensor.
Manual time setting, 12/24 hour
display, day of the week language,
time zone, °C/°F selection
Press and hold MODE. The 12/24 hours indicator
will blink on the display.
Press "+" or "-" to select the time format and
confirm your setting by pressing MODE.
The °C or °F indicator will now blink on the
display. Press "+" or "-" to select the temperature
unit and confirm your setting by pressing MODE.
The time zone adjustment will now blink on the
display. The time zone adjustment can be set
when using the weather station in a different time
zone.
Set the time zone difference to your home time
zone by pressing "+" or "-". An adjustment of -2 to
+2 hours is possible. Confirm your setting by
pressing MODE.
Set the hours, minutes, year, month, day and
language of the day of the week display in the
same way.
The day of the week language abbreviations are
as follows: EN=English, GE=German,
SP=Spanish, FR=French, IT=italian.
- 13 -
Setting the alarm (2 alarm times)
Briefly press MODE. Now press and hold MODE.
The hour indicator of the first alarm time (A1) will
blink on the display.
Press "+" or "-" to set the hours and confirm your
setting by pressing MODE.
Set the minutes in the same way and confirm your
setting by pressing MODE.
Briefly press MODE 2x. Now press and hold
MODE.
The hours display of the second alarm time (A2)
will now blink on the display.
Press "+" or "-" to set the hours and confirm your
setting by pressing MODE.
Set the minutes in the same way and confirm your
setting by pressing MODE.
Pressing MODE allows you to switch between A1,
A2 and the normal time display.
Activating the alarms and the snooze
feature
Briefly press "+" while viewing A1 or A2 to
activate or deactivate the currently viewed alarm
time.
If the alarm is activated the
symbol will appear.
The alarm will sound for 2 minutes when the set
time is reached.
The alarm can be interrupted by pressing
LIGHT/SNZ. The snooze symbol
will appear
on the display. The alarm will sound again after 5
minutes.
Press MODE to deactivate snooze and the alarm
sound.
Moon phase indicator
The weather station has a moon phase indicator
which automatically displays the current moon
phase.
Weather forecast
The weather symbols show the weather tendency
(sun, slightly cloudy, cloudy, rain, snow) for the
next hour and not the current weather.
The weather forecast is calculated by evaluating
the fluctuations in air pressure and can deviate
from actual weather changes.
sunny
slightly
cloudy
cloudy
rain
snow
Barometer
The graphical barometer display shows the air
pressure during the last 12 hours. Press and hold
HISTORY to show the air pressure in mb/hPA or
in HG. Press HISTORY briefly to show the air
pressure values for the last 12 hours. After each
press of the HISTORY button the air pressure will
advance one hour into the past. After hour 12 the
current air pressure will be shown (hour 0).
Calibrating the barometer
The barometer can be calibrated to show the
relative air pressure at your location. The air
pressure for your location can be found on
different sites on the internet. Press and hold
MODE and HISTORY. The air pressure will blink
on the display. Now immediately press "+" or "-" to
set the air pressure. After a few seconds with no
button pressed, the set value will be saved and
the weather station will exit setting mode.
Maximum and minimum values
The maximum and minimum values of
temperature and hygrometer are stored
automatically.
Repeatedly press "+" to view the maximum and
minimum values. Press and hold "+" to reset the
stored values.