Casio TSQ-1200 User Manual
Operation guide tsq-1200
Operation Guide TSQ-1200
1
MA0310-EA
• A sticker is affixed to the glass of this clock when you purchase it. Be sure to remove the sticker before using the
clock.
• Depending on the clock model, the configuration of your clock may differ somewhat from that shown in the
illustration.
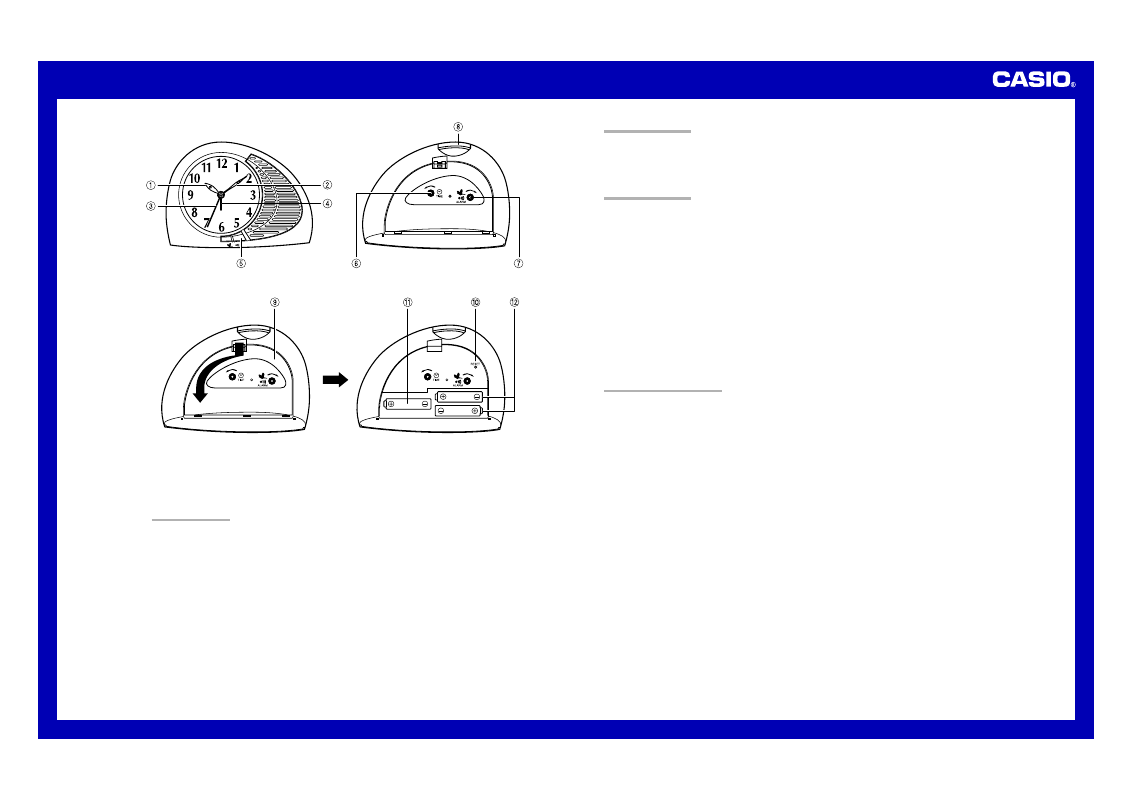
GENERAL GUIDE
1
1
1
1
1 Hour hand
2
2
2
2
2 Minutes hand
3
3
3
3
3 Second hand
4
4
4
4
4 Alarm hand
5
5
5
5
5 Tone selector (Select beeper or bird call)
6
6
6
6
6 Time setting dial
7
7
7
7
7 Alarm setting dial
8
8
8
8
8 Alarm ON/OFF switch
9
9
9
9
9 Back cover
;
;
;
;
; RESET button
A
A
A
A
A Clock battery
B
B
B
B
B Bird call batteries
SETTING THE TIME
1. Remove the batteries to stop the Second hand (3
3
3
3
3) at 12 o’clock position.
2. Rotate the Time setting dial (6
6
6
6
6) to change the time setting.
• Note that this clock does not distinguish between AM and PM times.
3. Replace the batteries at a time signal to restart the Second hand (3
3
3
3
3) on the correct second.
• The start of Second hand (3
3
3
3
3) may be delayed depending on when you load the batteries.
USING THE ALARM
When the alarm is turned on, the alarm sounds for 40 minutes at the preset time each day. Once the alarm starts
to sound, you can switch it off by pressing the Alarm ON/OFF switch (8
8
8
8
8).
Setting the Alarm Time
1. Rotate the Alarm setting dial (7
7
7
7
7) in the direction indicated by the arrow marked on clock to move the Alarm
hand (4
4
4
4
4) to the alarm time setting you want.
2. Raise the Alarm ON/OFF switch (8
8
8
8
8) to turn on the alarm.
• Note that this clock does not distinguish between AM and PM times. If you set an alarm to wake up to in the
morning, the alarm will sound again at the same time in the evening if you leave the Alarm ON/OFF switch (8
8
8
8
8)
raised.
Stopping the Alarm
To stop the alarm after it starts to sound, press the Alarm ON/OFF switch (8
8
8
8
8).
About the alarm sound
This clock lets you select either a standard beeper tone or bird calls as the alarm sound. When you select
birdcalls, an alarm operation produces one of 7 different birdcalls, changing automatically to a different one with
each alarm operation.
The alarm sounds for about 90 seconds or until you stop it. When bird call is selected with the Tone selector (5
5
5
5
5),
the first 40 seconds uses a bird call, while the final 50 seconds the alarm sound is an electronic beeper.
BATTERY REPLACEMENT
Low battery power is indicated when timekeeping slows or stops completely. Should either of these symptoms
occur, replace the batteries immediately. Do not leave low or dead batteries in the clock.
1. Open the Back cover (9
9
9
9
9) as shown in the illustration.
2. Remove all of the old batteries.
3. Load a full set of new batteries. Make sure that their positive (+) and negative (–) ends face in the correct
directions. If you load batteries incorrectly, they can burst and damage the clock.
4. Press the RESET button (;
;
;
;
;). Be sure to press the RESET button (;
;
;
;
;) after replacing batteries.
5. Replace the Back cover (9
9
9
9
9).
Battery precautions
• Keep batteries out of the reach of small children. If a battery is accidentally swallowed, contact your physician
immediately.
• Be sure to load the batteries with their positive (+) and negative (–) ends facing correctly.
• Never mix old and new batteries, or batteries of different brands.
• Never charge the batteries that come with the clock.
• Should batteries ever leak while in the clock, wipe out the fluid with a cloth, taking care not to let any get onto
your skin.
• Replace the batteries at least once a year, even if the current batteries are working properly.
• The batteries that come with the clock lose some of their power during transport and storage.