Fig. 1, Specification & mounting, Adjustments – Sealey TC180 User Manual
Page 2
speed . . . . . . . . . . . . . . . . . . . . . . . . . . . . . 2800rpm
Max. Depth of 90° cut . . . . . . . . . . . . . . . . . . 35mm
Max. Depth of 45° cut . . . . . . . . . . . . . . . . . . 25mm
table size. . . . . . . . . . . . . . . . . . . . . . 395 x 385mm
Motor . . . . . . . . . . . . . . . . . . . . . . . . . 230V - 500W
Blade Ø . . . . . . . . . . . . . . . . . . . . . . . . . . . . 180mm
Blade Bore Ø . . . . . . . . . . . . . . . . . . . . . . . . . 22mm
2. SPECIFICATION & MOUNTING
Maintain correct balance and footing. Ensure the floor is not slippery and wear non-slip shoes.
Keep children and unauthorised persons away from the work area.
Avoid unintentional starting and never leave the cutter running unattended.
DO NOT use the cutter for a task for which it is not designed.
DO NOT get cutter wet or use in damp or wet locations or areas where there is condensation.
DO NOT use cutter where there are flammable liquids, solids or gases such as paint solvents and including waste wiping or cleaning rags etc.
DO NOT operate the cutter if any parts are damaged or missing as this may cause failure and/or personal injury.
DO NOT operate the cutter when you are tired or under the influence of alcohol, drugs or intoxicating medication.
1.3.
SPECIFIC SAFETY RULES
WARNING! Before each use, check that the blade
is secure and not worn or damaged.
Hold the workpiece firmly against the fence.
only feed the workpiece into the blade against the rotation of the blade.
Avoid subjecting the blade to excessive strain, never force the workpiece. Maintain a controlled progression.
should the blade jam switch the power off immediately to prevent damage to the motor.
to AVoID WorKPIEcE “KIcKBAcK” (when a workpiece is violently thrown back towards you):
a) Keep the blade in good condition.
b) Keep fence parallel to the blade.
c) DO NOT release workpiece until it is clear of the blade.
d) DO NOT attempt to cut a workpiece that does not have a straight edge to guide along the fence.
use a push stick when cutting narrow workpieces.
DO NOT use your hands (“free-hand”) to guide the workpiece. Hold the workpiece firmly against the fence to guide it into the blade.
DO NOT place yourself in an awkward operating position where a slip could cause your hand to move into the cutting blade.
DO NOT stand, or have any part of your body, in line with the plane of the blade.
DO NOT hold what will become the off-cut (the waste part of the workpiece).
WARNING! DO NOT reach over or behind the blade.
WARNING! DO NOT attempt to free a jammed blade without first switching off or removing the plug from the mains power supply.
DO NOT cut any materials other than ceramic tile.
DO NOT use solvents to clean plastic parts as they may be damaged. use a soft damp cloth only.
store blades in a safe, dry, childproof location.
When not in use, switch off the cutter and remove the plug from the power supply.
3. ADJUSTMENTS
2.2.
MOUNTING
the cutter should be used on a sturdy workbench (or similar). Ensure that the supporting surface is strong enough to take the weight of the
cutter and the workpiece during operation.
WARNING! Dust can be harmful if inhaled. Ensure that there is adequate ventilation and wear respiratory protection.
3.1.
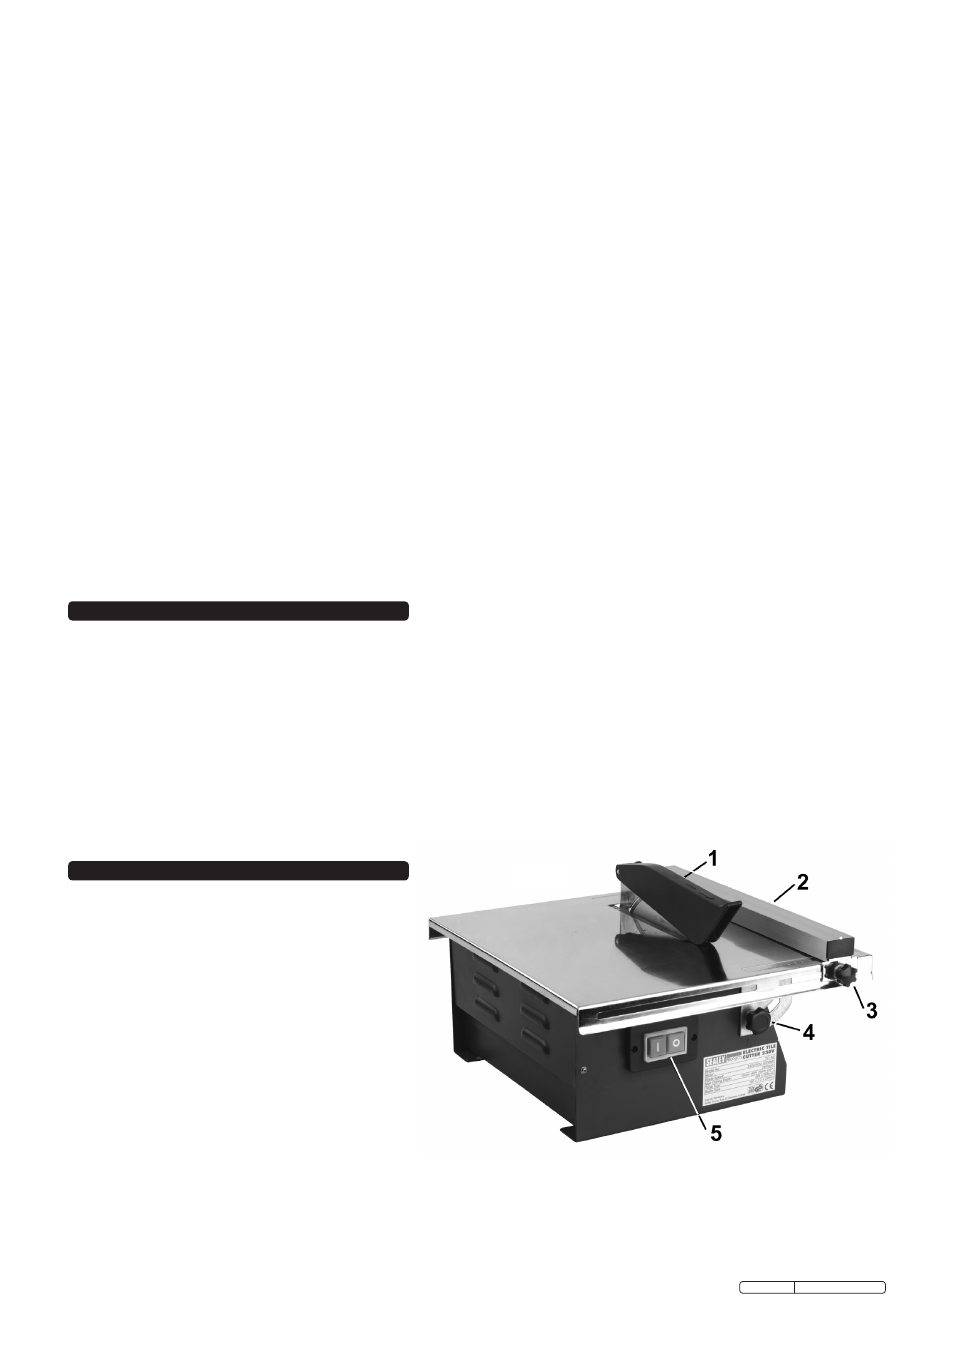
ON/OFF SWITCH
the cutter has an magnetic switch (fig.1.5) located
on front of the machine. Push the “
I
“
button for on
and the “
O
“ for off.
WARNING!
ENsuRE CuTTER Is sWITChED Off AND
DIsCONNECTED fROM ThE MAINs POWER BEfORE
MAkING ADjusTMENTs.
3.2.
TABLE TILT (for bevel cutting)
to tilt the table, loosen both front and rear tilting lock
knobs (fig. 1.4) and adjust table to the required angle.
re-tighten the locking knobs.
WARNING! Ensure the lock knobs are securely
tightened to prevent table movement during cutting.
3.3.
FENCE
3.3.1. Loosen the clamp screw (fig. 1.3) and adjust the fence (fig. 1.2)
so that the required cut line on the tile aligns with the blade when
the tile is held firmly against the fence face.
3.3.2. After adjusting the fence always ensure that it is parallel to the blade by measuring the position of each end from the “0”
graduations on the table. tighten the clamp screws.
fig. 1
2.1.
SPECIFICATION
Original Language Version
tc180.V2 Issue: 2 - 24/11/09