Fig.1, Fig.2, Assembly – Sealey SSC450 User Manual
Page 2: Operating instructions
page
2
3
Keep a sound footing and balance, and ensure the floor is not slippery, and wear non-slip footwear.
3
Ensure boom extension locking pin and 'R' pin are in position before lifting.
3
Ensure the centre of gravity always remains inside the crane base.
7
DO NOT harness the load at an angle or use any attachments not verified as fit for purpose.
7
DO NOT allow the load to swing during lifting.
7
DO NOT allow the load to drop suddenly. Lower load with care, ensuring that you are fully aware of the condition of the surface onto
which the load is to be placed.
7
DO NOT load crane beyond its rated capacity for each specified boom extension position as indicated in Section 2.1 page 2.
The capacity of the crane reduces as the boom is extended.
7
DO NOT position any part of your body beneath the load.
7
DO NOT attempt to adjust the safety valve, which has been set and sealed by the manufacturer.
7
DO NOT use this crane to perform a task for which it is not designed.
7
DO NOT use whilst under the influence of drugs, alcohol or intoxicating medication.
7
DO NOT climb on the crane.
3
When not in use store in a safe, childproof area.
WARNING! Failure to heed safety and warning instructions may result in damage and/or personal injury and will invalidate the
warranty.
4. ASSEMBLY
250mm
+
+
105mm
ø
17mm
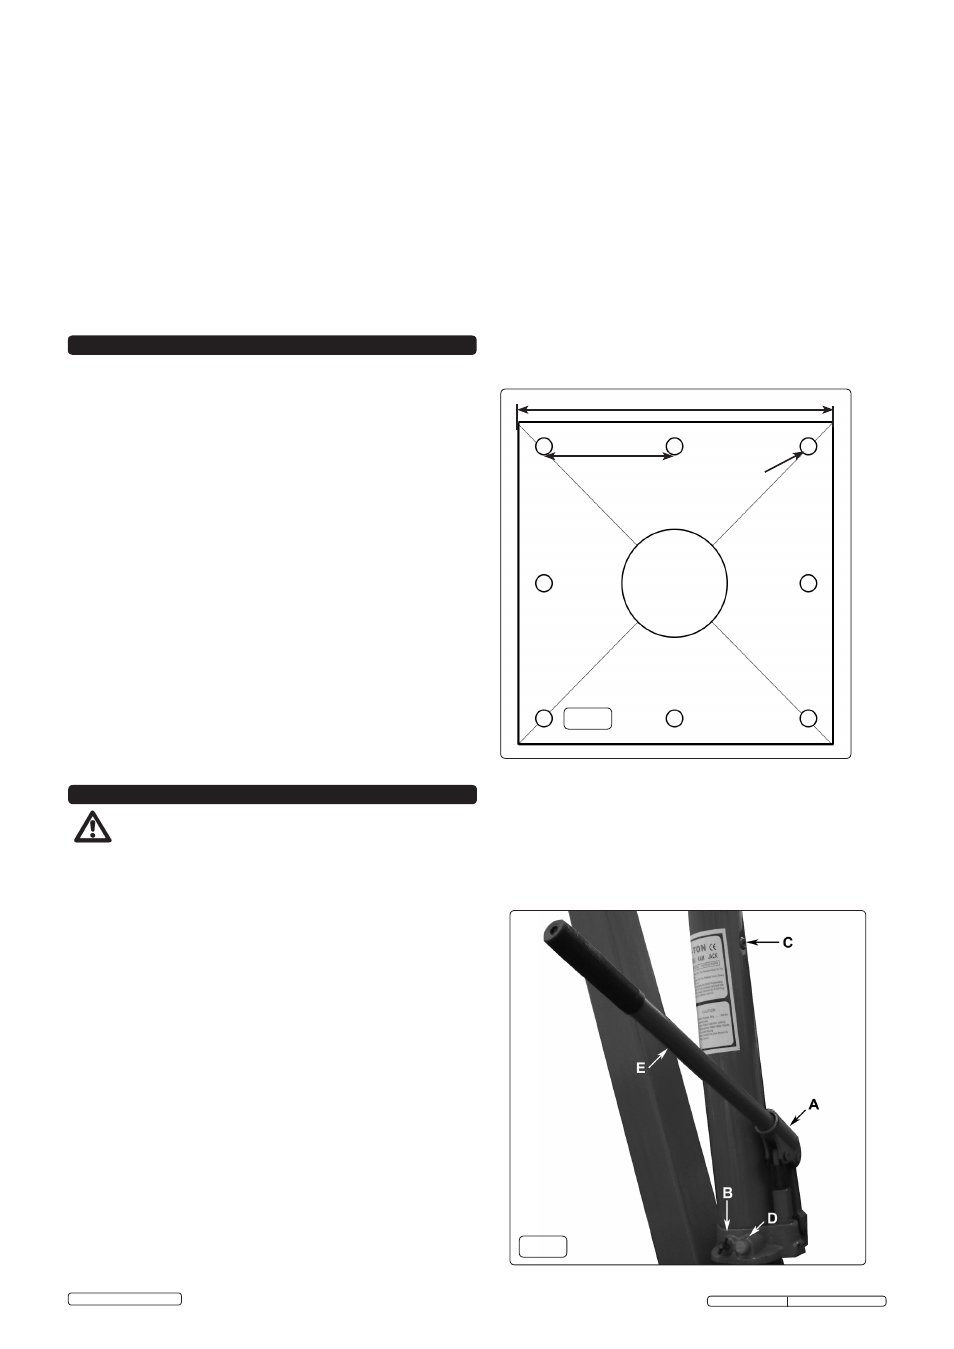
WARNING! The base (fig.1) must be fastened securely to
the surface or vehicle on which it is to be mounted. Owing
to the design of this crane, the mounting is subject to
substantial leverage.
4.1.
Solid Mounting: Use anchor bolts of suitable size and design to
secure the base. If in any doubt, consult a specialist with the
relevant knowledge.
4.2.
Vehicle Mounting: When mounting on a vehicle, consult the
vehicle manufacturer and/or bodybuider to determine a suitable
location on which to mount the crane. Incorrect mounting could
affect the stability of the vehicle when using the crane.
4.3.
Crane Assembly. (Part numbers refer to the parts drawing).
4.3.1. If required, bolt wheel hub (part 2) onto post (part 9) using
bolts (part 3), securing with washers and nuts.
4.3.2. Attach boom (part 12) to post using bolt (part 10), securing with
washers and nut.
4.3.3. Attach lower end of jack (part 8) to post using bolt (part 6),
washers and nut.
4.3.4. Similarly, attach upper end of jack to boom using bolt (part 11),
washers and nut.
4.3.5. Slide boom extension into boom and secure with pin (part 13).
4.3.6. Attach hook and chain (part 16) using bolt (part 15),
washers and nut.
4.4.
Before use, purge the hydraulic system by opening the release
valve (fig 2.B) slightly and operating the pump for about 20
strokes. Close the release valve and check oil level as in
section 6.1.b.
fig.1
5. OPERATING INSTRUCTIONS
NOTE:
ENSURE YOU HAVE READ AND UNDERSTOOD THE SAFETY INSTRUCTIONS AT THE BEGINNING OF THIS SECTION BEFORE YOU
OPERATE THE CRANE.
5.1.
OPERATION. (Refer to Section 6.2 regarding inspection before each and every use).
5.1.1. Loosen locking arm (fig.2) allowing mast to rotate.
5.1.2. Place pumping handle (figs.2.E & 4) into pump socket (fig.2.A) and pump, the boom will raise. Continue to pump until the boom reaches the
height at which the load can be secured.
fig.2
5.1.3. Connect the crane hook to the load using a suitable
sling or support beam. Ensure you are aware of the load
weight, and check that it is within the capacity of the crane
(at the boom extension you are using) and the sling or
support beam.
5.1.4. Lift only from directly above the load.
WARNING! DO NOT
LIFT THE LOAD AT AN ANGLE!
5.1.5. To slew the crane and its load, place the slewing handle
(fig.4) into the socket and use as a lever, taking care not to
place yourself or any other person in the path of the load. If
vehicle mounted, monitor the attitude of the vehicle and stop
lifting if any sign of instability becomes apparent.
5.1.6. To lower load, place the notches in the end of the pump
handle over the lugs on the release valve (fig.2.B) and turn
WARNING! DO NOT allow the load to drop suddenly.
5.1.7. When load has been secured, remove lifting sling, support
beam etc. Secure the crane with boom fully lowered and the
locking arm tightened.
Original Language Version
© Jack Sealey Limited
SSC450,SSC900 Issue 2 - 18/12/14