Fi g.4 fi g.5, Fi g.7, Fi g.6 – Sealey RS1 User Manual
Page 3: Charging instructions
3. CHARGING INSTRUCTIONS
WARNING! YOU MUST FOLLOW
THE SAFETY INSTRUCTIONS
3.1 Charging methods for Roadstart mobile power systems
3.1.1 The first method is to use the AC chargers provided for each
unit. This is the preferred method as it is automatic and does
not require the user to monitor the progress of the charge.
Furthermore whenever the unit is not in use it can safely be left
connected to the charger.
3.1.2 The second method is to charge the units from the vehicle
accessory socket of a vehicle when the engine is running. This
method is not automatic and could result in the unit being
overcharged if the user fails to monitor the charge and
disconnect the power source when full charge is reached.
Overcharging could result in permanent damage to the unit.
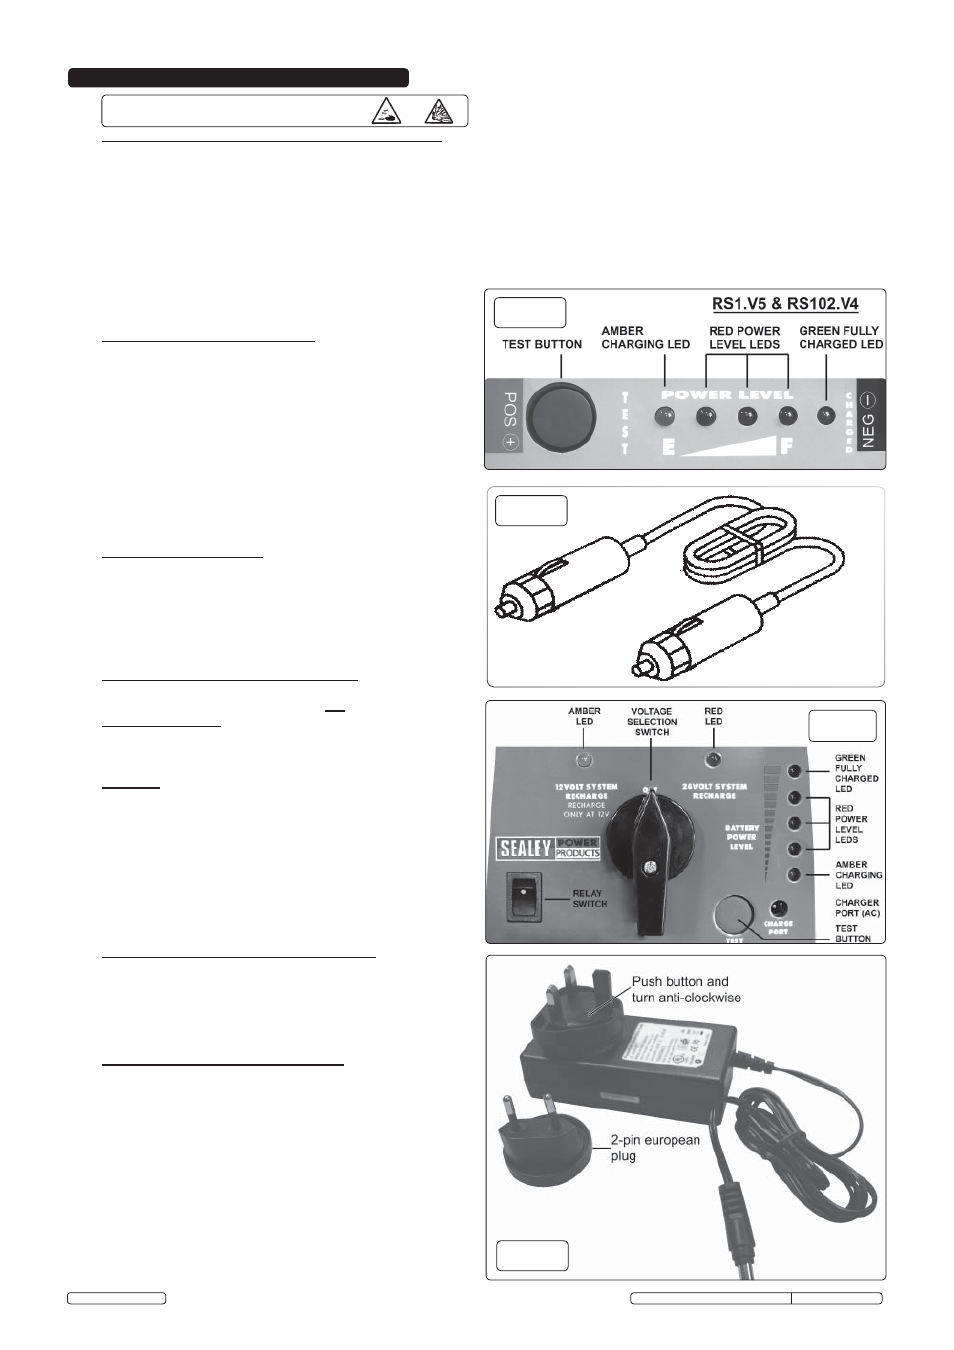
3.2 Reading the power level indicators (See figs.4 & 6)
The charge level of each unit can be seen at any time by
pressing the test button and noting the number of red power
level lights that are illuminated. When all three power level
lights are illuminated the unit is fully charged and is ready to be
used. If only two red lights are illuminated the unit is in a 50%
charge status and could be used to operate most 12 volt
accessories. If the unit is required for starting it should be
charged until all three red lights are illuminated. If there is only
one red light illuminated the unit is low and must be recharged.
If the amber charging light begins to flash on 12V models this
means that the battery voltage has dropped to 7.25V or below
and the unit will not work until it is fully recharged.
3.3 Initial Charging Procedure
3.3.1 Before first use, these roadstart units should be charged for a
minimum of 72 hours.
WARNING! Use supplied adaptor, cables and connectors.
Unauthorised parts may damage the unit and will invalidate the
warranty. Ensure you strictly apply the safety regulations as
stated in Section 1.
3.4 To recharge with the AC charging adaptor
Only charge with the adaptor supplied with your specific
model. See below. The adaptors are not interchangeable.
3.4.1 RS1.V5 & RS102.V4 Use the charger supplied, see fig.7.
Plug the AC charger cable into the charge input socket of the
unit. This socket is situated on the back of the unit at the top
of the label. See fig.1.
3.4.2 RS103.V3 Use the charger supplied, see fig.7. The adaptor
charging jack is inserted into the charge port, located beneath
the LED power indicators. See fig.6.
3.4.3 Ensure the power clamps are in the appropriate holsters.
3.4.4 Plug the charger itself into any 230 Volt AC wall outlet. The
amber ‘Charging’ indicator will illuminate, see figs.4 & 6.The
unit will now charge automatically and the power level lights will
indicate the level of charge. When the green ‘Charged’ LED
comes on (see figs.4 & 6) charge for a further 3 to 6 hours to
achieve full capacity. When not in use these Roadstart can be
left connected to the charger.
3.4.5 Recharging with the 2-pin European adapter.
When using the Roadstarts in a European country remove
the 3-pin UK plug by pushing the button on the adapter
and turning anti-clockwise, replace with the 2-pin plug,
placing it on the transformer and turning clockwise until
fully home. See fig.7.
3.5 To recharge with the DC charging cable
NOTE: This method of charging is not automatically
protected against overcharging and must be constantly
monitored by the user as described below.
IMPORTANT: Always ensure that the vehicle voltage
matches the voltage of the Roadstart unit.
3.5.1 Ensure that the power clamps are in the appropriate holsters.
3.5.2 With the vehicle engine running plug the DC charging cable
into the charge input socket on the unit (refer to 4 in figs.1 & 2)
and then the other end into the vehicle accessory socket.
The unit will be charged by the alternator. It will be necessary
to press the test button once every hour to monitor the level of
charge. When all of the red lights are illuminated plus the green
‘charged’ light, continue to charge for another 1 to 2 hours and
then disconnect the unit from the vehicle lighter socket to avoid
fi g.6
fi g.4
fi g.5
DC CHARGING
CABLE
ALL
MODELS
fi g.7
overcharging which could damage the unit.
Note:
If the amber charging light begins to flash or the
battery becomes completely flat, then a 72 hour charge will be
necessary using the AC charger.
© Jack Sealey
Original Language Version
RS1.V5, RS102.V4, RS103.V3 Issue: 2W - 08/12/14