Operating instructions – Sealey START240 User Manual
Page 3
4. OPEratING INstrUCtIONs
WarNING! Ensure that you read and understand all safety instructions before attempting to
use the charger.
4.1.
PrEParatION
It is important to correctly prepare for charging ensuring that you follow section 1 safety requirements carefully. check that the capacity
of the battery is compatible with charger output. follow any vehicle manufacturer’s instructions regarding battery charging. note special
instructions for the charging of non-removable vehicle batteries.
4.1.1. check battery to ensure that the PosItIVe and negatIVe terminals are clearly identifiable before removing the battery from the vehicle.
4.1.2. Disconnect and remove the battery from the vehicle and place in an appropriate safe area ready for charging.
4.1.3. remove the battery electrolyte cover or caps to allow the gases produced by charging to escape.
4.1.4. check that the electrolyte fluid level in the battery is above the plates. If not, add distilled water to cover them by 5-10mm.
DO NOt touch the battery fluid as it is corrosive.
4.1.5. the correct charging status of the battery may be determined by using a hydrometer which will measure the specific density of the electrolyte.
the following figures (kg/ltr) apply at 20°c:
1.28 = Fully charged, 1.21 = Half charged, 1.14 = Fully discharged.
WARNING! Be cautious and vigilant as the electrolyte is highly corrosive sulphuric acid.
4.2.
CONNECtING CHarGEr tO battErY
4.2.1. ensure that the battery charger is unplugged from the mains power supply before connecting power leads to the battery.
4.2.2. for chargers with dual voltage output, set the charger voltage to match that of the battery (i.e. 12 or 24Volts) by connecting the positive
(red) clamp lead to either the 12Volt + output terminal or the 24Volt + output terminal as appropriate.
4.2.3. check the charger clamps and battery terminals to ensure that they are clean and free from oxidisation.
4.2.4. connect the charger PosItIVe (red or +) lead to the PosItIVe (+) terminal of the battery and the negatIVe (Black or -) lead to
the negatIVe (-) terminal of the battery.
4.3.
CHarGING tHE battErY
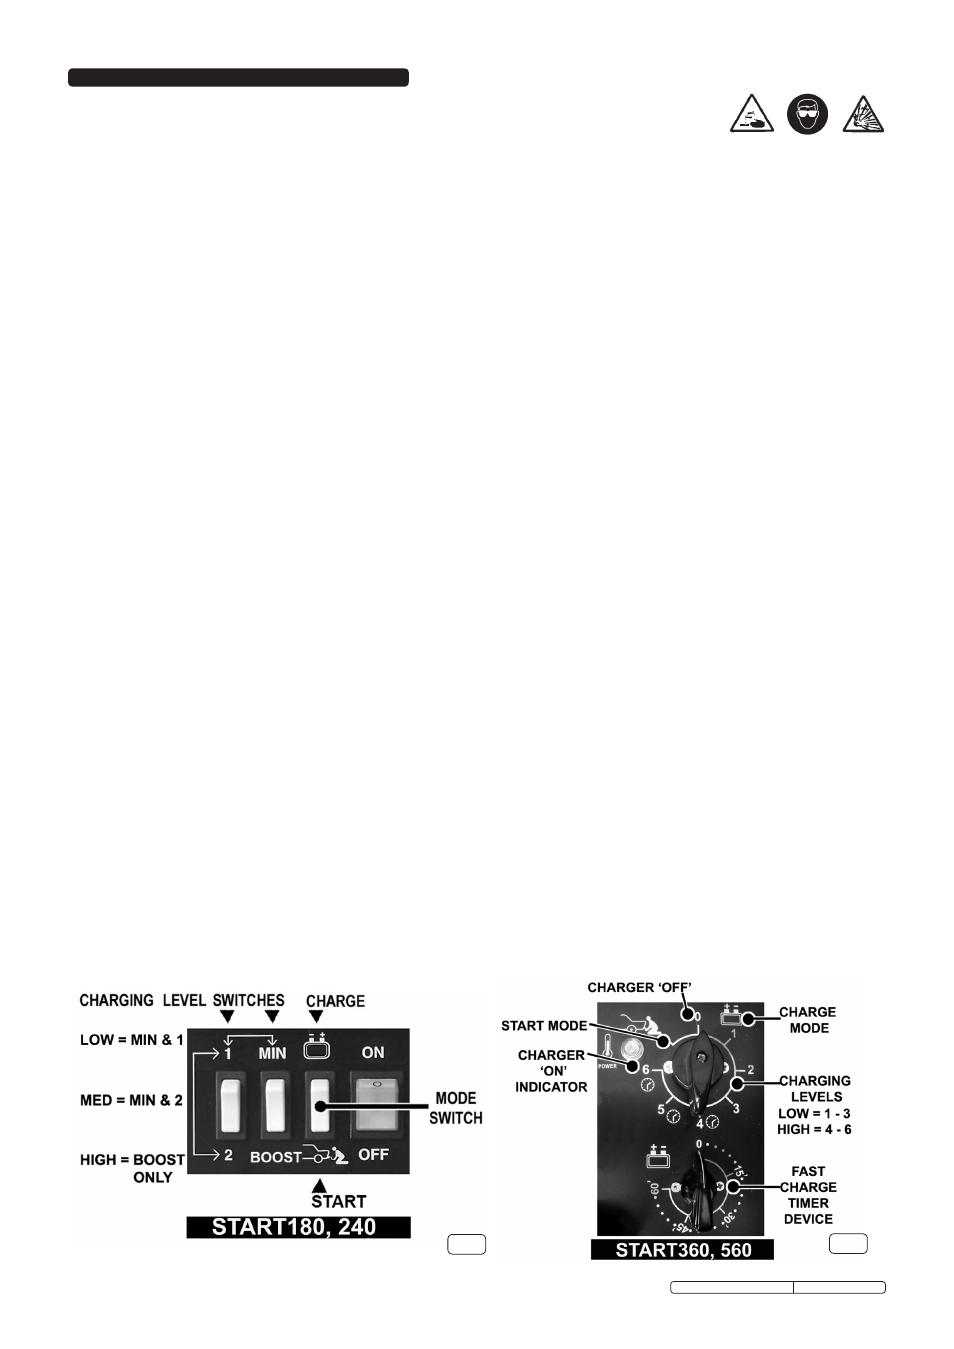
4.3.1. connect the charger to the mains power supply and set the rate of charge according to your model type as follows:
4.3.2.
start180 & start240 (see fig.2) set the mode switch to the 'charge' function indicated by the battery symbol.
low rate charging rate:-
select mIn & 1
med charging rate:-
select mIn & 2
high charging rate:-
select Boost only (please note that when Boost is selected the switch marked 1 & 2 is over-ridden)
start 360 & start560 (see fig.3). select charge level 1,2,3,4,5, or 6 using the rotary switch above the timer.
4.3.3. check the current delivery to the battery by reading the ammeter on the front of the battery charger (fig.4, ammeter face may vary by
model). Initially, there will be a high rate of charge which will slowly decrease according to the capacity and condition of the battery.
NOTE: If the charger is connected to a fully charged battery the ammeter will show a low output. no charging is necessary.
4.4.
sEaLED battErIEs
4.4.1. charge a sealed battery very slowly, carefully monitoring the voltage across the battery terminals using a normal tester.
4.4.2. When the battery terminal voltage reaches 14.4V for 12V batteries or 28.8V for 24V batteries, stop charging.
4.5.
MULtIPLE CHarGING
WarNING! DO NOt simultaneously charge different types of battery or batteries with different capacities or levels of discharge.
4.5.1. simultaneous multiple charging should be carried out in series, since this enables monitoring of the current circulating in each battery.
see fig.5.
NOTE: If two batteries with rated voltages of 12V are connected in series, set the battery voltage selection key on the front panel to 24V
and move the positive cable to the 24V terminal.
4.5.2. When fully charged, the ammeter reading should be close to “0” and the electrolyte in the battery should begin to gas. stop charging to
protect the battery plates from damage.
DO NOt continue to charge a fully charged battery, as this will damage the battery. DO NOt leave a battery on charge unattended.
4.6.
END OF CHarGING
4.6.1. switch the charger off and unplug from mains power. Disconnect the power clamps, clean the charger and store in a safe, dry area.
4.6.2. replace the battery electrolyte cover or caps. Wipe up any splashes or spillage (remember that the electrolyte is a corrosive acid).
return the battery to the vehicle, secure according to the manufacturer’s instructions and re-connect. check to ensure that all tools are
removed before closing the bonnet or boot.
4.7.
raPID CHarGING
4.7.1. the start360 and the start560 both have a rapid charge function which is controlled by the fast-charge timer device to a
maximum of 60 minutes.
4.7.2. to initiate rapid charging turn the fast-charge timer device to the required charging time in minutes and turn the charging level rotary
switch to one of the fast-charge charging levels of either 4,5 or 6. When the pre-set time has elapsed the current is automatically
switched off. turn the charging level rotary switch to the 'off' position.
Original Language Version
start180, 240, 360, 560 Issue: 1 - 09/08/11
fig.2
fig.3