Fig.4, Starting 5. simultaneous charging 6. safety fuse – Sealey SUPERBOOST140 User Manual
Page 3
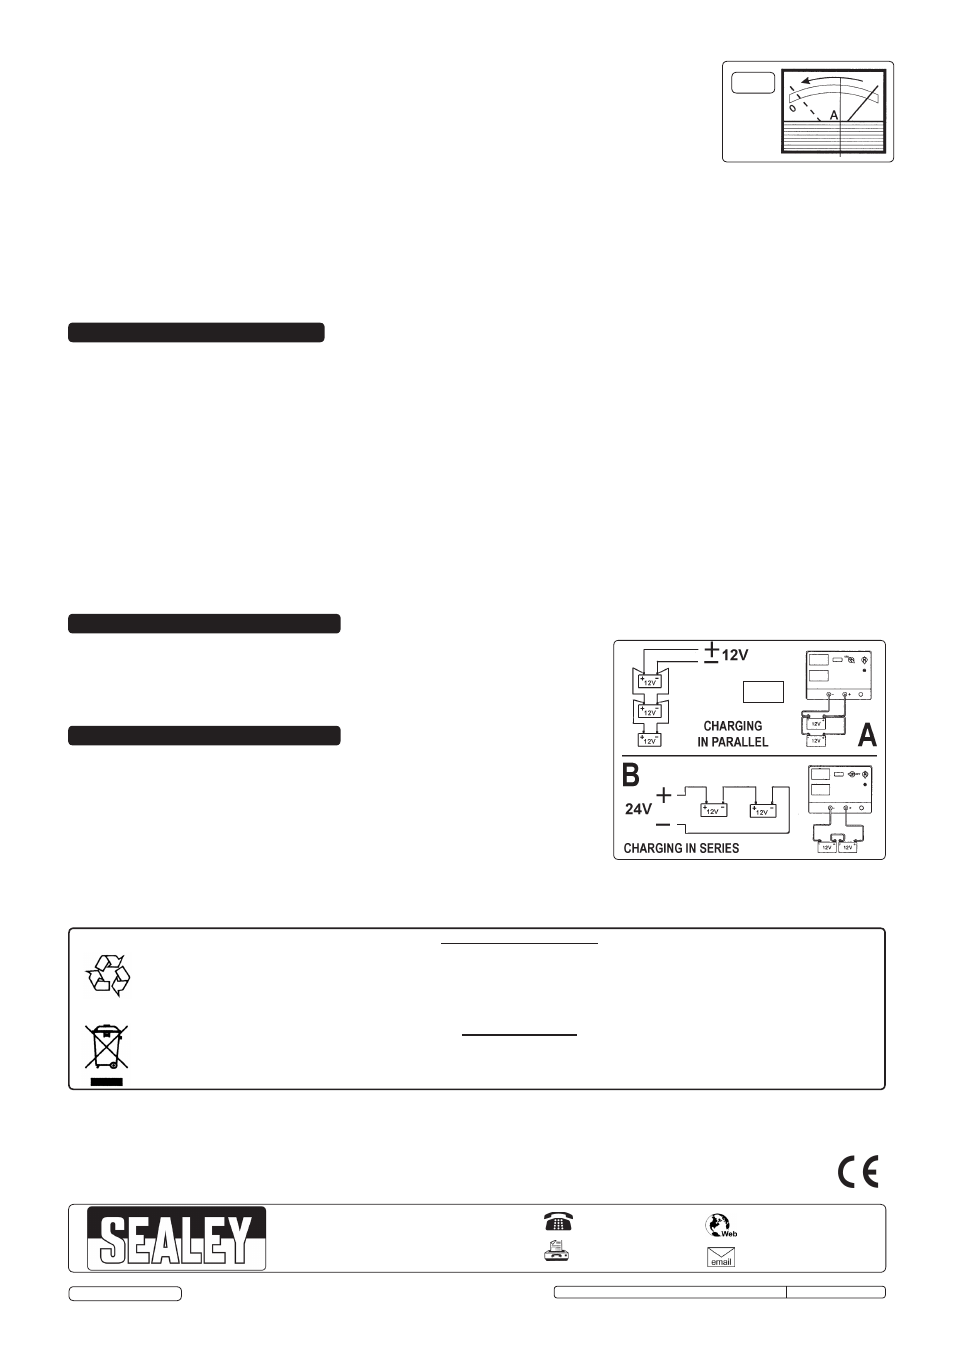
5.1. A number of batteries may be charged at the same time. To do so we recommend
parallel connection as shown in fig.4A.
5.2. Two 12 volt batteries may be charged simultaneously in series using a 24 volt output
charger as shown in fig.4B. This is only recommended if both batteries are of similar
capacity and in a similar state of discharge.
The charger is equipped with a fuse which will protect the unit in the following circumstances:
a) Overload: Too high a current to the battery.
b) Short circuit: Clamps touch, or cross-connection to battery.
c) Prolonged starting attempts.
If the fuse blows take the following action:
6.1. Turn the unit off and disconnect from the mains power supply.
6.2. Allow the unit to cool down, establish the reason for failure and correct the situation.
6.3. Replace the fuse (behind cover below ammeter), using only Sealey replacement parts.
DO NOT use a fuse with a copper bridge or similar as this will damage the equipment. Refer to Section 2 for fuse part numbers.
fig.4
Superboost chargers are combination units capable of both charging batteries and providing boost power to start vehicles with flat
batteries.
To charge a battery under normal circumstances refer to Section 3. To start a vehicle which has a flat battery follow the steps below.
4.1. Check the vehicle manufacturer’s handbook and follow any special instructions and check that the battery is in good condition.
4.2. Ensure the charger is disconnected from the power supply and set the mode switch (fig.1 or 2) to “Charge”, indicated by the battery
symbol.
4.3. For chargers with dual voltage output set the charger voltage to match that of the battery voltage (i.e. 12 or 24 volts) by connecting the
positive (red) clamp lead to either the 12 volt output terminal or the 24 volt output terminal as appropriate.
4.4. Check the charger clamps and battery terminals to ensure they are clean and free from oxidation.
4.5. Without removing the power leads that connect the battery to the vehicle, connect the Superboost POSITIVE (red) lead to the POSITIVE
(+) battery terminal and the NEGATIVE (black) lead to NEGATIVE (-) battery terminal.
4.6. Plug the charger into mains power supply and turn it on. Allow the battery to charge for 2-3 minutes.
4.7. When the quick charge has been completed, change the mode switch from “Charge” to “Boost” (see fig. 1 or 2).
4.8. Turn on the vehicle ignition and crank the engine for a MAXIMUM of 10 seconds.
WARNING! If the vehicle does not start within this time DO NOT continue as vehicle battery and electrical circuit may be damaged and
the fuse in the charger will blow. If the vehicle fails to start, disconnect the charger and investigate.
4.9. When the engine is running, switch the Superboost off, unplug from the mains power and disconnect the clamps from the battery.
3.3. Charging the battery
3.3.1. Connect the charger to the mains power supply and switch on.
3.3.2. Check the current delivery to the battery by reading the ammeter on the front of the battery charger. During
charging the pointer on the ammeter will slowly decrease (move to the left) according to the capacity and
condition of the battery (see fig. 3, dial face may vary according to model of charger).
3.3.3. When the battery is fully charged the reading on the ammeter should be at the “0” output indicator. At this
point the electrolyte in the battery will begin to bubble. Stop charging at this point in order to protect the battery
plates from oxidisation and to keep the battery in good condition.
3.3.4. Switch the charger off and unplug from the mains power supply. Disconnect the power clamps, clean and store the charger in a safe,
dry area.
3.3.5. Replace the battery electrolyte cover or caps. Wipe up any splashes or spillage (remember that the electrolyte is a corrosive acid).
Return the battery to the vehicle and secure according the manufacturer’s instructions. Reconnect the power leads. Check to ensure all
tools etc. are removed before closing the bonnet or boot.
3.4. LOW or NO MAINTENANCE batteries
3.4.1. When charging a low, or no maintenance battery take very special care to use only a “LOW” charge setting. Use a battery tester to
continually check the voltage across the clamps. When 14.4 volts is reached stop the charging process.
fig. 3
Original Language Version
SUPERBOOST140.V3, 160.V4, 180.V4, 200.V3 Issue: 4(I) - 06/10/14
Environmental Protection
Recycle unwanted materials instead of disposing of them as waste. All tools, accessories and packaging should be
sorted, taken to a recycling centre and disposed of in a manner which is compatible with the environment.
When the product becomes completely unserviceable and requires disposal, drain off any fluids (if applicable)
into approved containers and dispose of the product and the fluids according to local regulations.
WEEE Regulations
Dispose of this product at the end of its working life in compliance with the EU Directive on
Waste Electrical and Electronic Equipment (WEEE). When the product is no longer required, it must be disposed
of in an environmentally protective way. Contact your local solid waste authority for recycling information.
NOTE: It is our policy to continually improve products and as such we reserve the right to alter data, specifications and component parts without prior notice.
IMPORTANT: No liability is accepted for incorrect use of this product.
WARRANTY: Guarantee is 12 months from purchase date, proof of which will be required for any claim.
INFORMATION: For a copy of our latest catalogue and promotions call us on 01284 757525 and leave your full name and address, including postcode.
01284 757500
01284 703534
Sole UK Distributor, Sealey Group,
Kempson Way, Suffolk Business Park
,
Bury St. Edmunds, Suffolk,
IP32 7AR
www.sealey.co.uk
© Jack Sealey Limited
4. STARTING
5. SIMULTANEOUS CHARGING
6. SAFETY FUSE