Fig. 3, Fig.3 – Medal Sports SH1355409 User Manual
Page 8
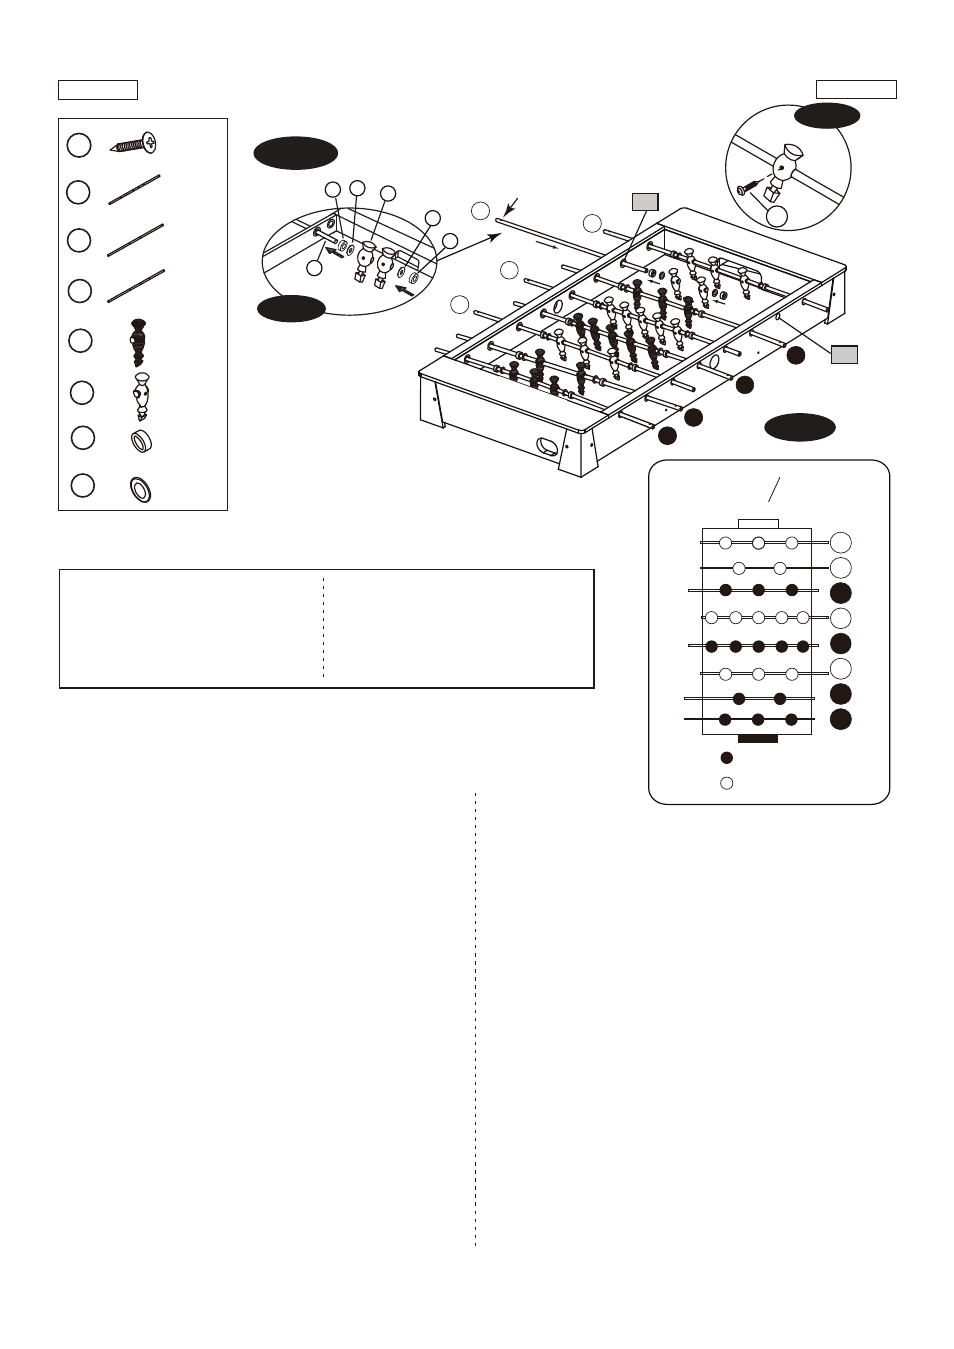
FIG.3
FIG.3
7.
8.
9.
10.
7. Por favor invierta el Marco Principal (pre-instalado)
como mostrado en la FIG2, Y luego deslice las Barras
(#12-14) por Los Cojinetes de Barra (#P1) sobre un
Delantal Lateral (#1) según el orden como mostrado
en la Fig. 3 y 3A.
Nota:Las Barras de Jugador hay un agujero en su
parte final donde están los Mangos (#20).
8. Coloque los Bómperes de Barra (#17), Arandelas de
Barra (#18) y Jugadores (#15 & 16) sobre las Barras
de Jugador (#12, #13 & #14) según el orden como
mostrado en la Fig. 3, 3A & 3B.
9.
Ahora inserte las Barras por los Cojinentes de Barra
(#P1) sobre los Delantales Lateral opuesto (#1).
10. Adjunte los Jugadores (#15 o #16) a las Barras
(#12-14) usando 1 Tornillo (#A12) por Jugador.
Vea la FIG. 3C.
Nota:El portero debería estar en la izquierda de
cada jugador.
Please reverse the main frame (pre-installed) as
shown in FIG.2 ,and then
Slide the Rods (#12-14)
through the Rod Bushings(#P1) on one Side Apron
(#1) in the order as shown in Fig.3 and 3A.
Note: The player Rods have a hole at their end
where the Handles (#20) will go.
Place the Rod Bumpers (#17), Rod Washers (#18)
and Players (#15 and #16) onto the Player Rods
(#12, #13 and #14)
in the order as shown in Fig.3,
3A and 3B.
Now insert the Rods through the Rod Bushings
(#P1) on the opposite Side Apron (#1).
Attach the Players (#15 or #16) to the Rods
(#12-14) using one Screw (#A12) per Player.
See FIG.3C.
Note: The goalie should be at the left side of
each player.
Note: The handles (#20) should
be on the same side of the
rods for the same team, and
each team's players will be
facing their opponent.
Nota: Los Mangos (#20) deberían
estar sobre el mismo lado de las
barras para el mismo equipo, y
los jugadores de cada
equipo
enfrentarse a sus opositores.
www.themdsports.com
1355409
7
(Continúe en la siguiente página.)
(Continued on the next page.)
Español
English
14
14
14
14
12
12
13
13
= BLACK / NEGRO
= IVORY / MARFIL
ORDER OF PLAYERS
(Overhead View)
Orden de Jugadores
(Vista en General)
FIG. 3A
FIG. 3
X 2
12
X 2
13
X 4
14
15
X 13
16
X 13
17
X 16
18
X 16
X 26
A12
A12
16
18
18
17
17
13
FIG. 3B
14
14
14
14
12
12
13
13
P1
The Hole / El Agujero
P1
FIG. 3C