Fig.2 billiard table assembly, Fig.2, Montaje de la mesa de billar – Medal Sports SH1454820 User Manual
Page 7
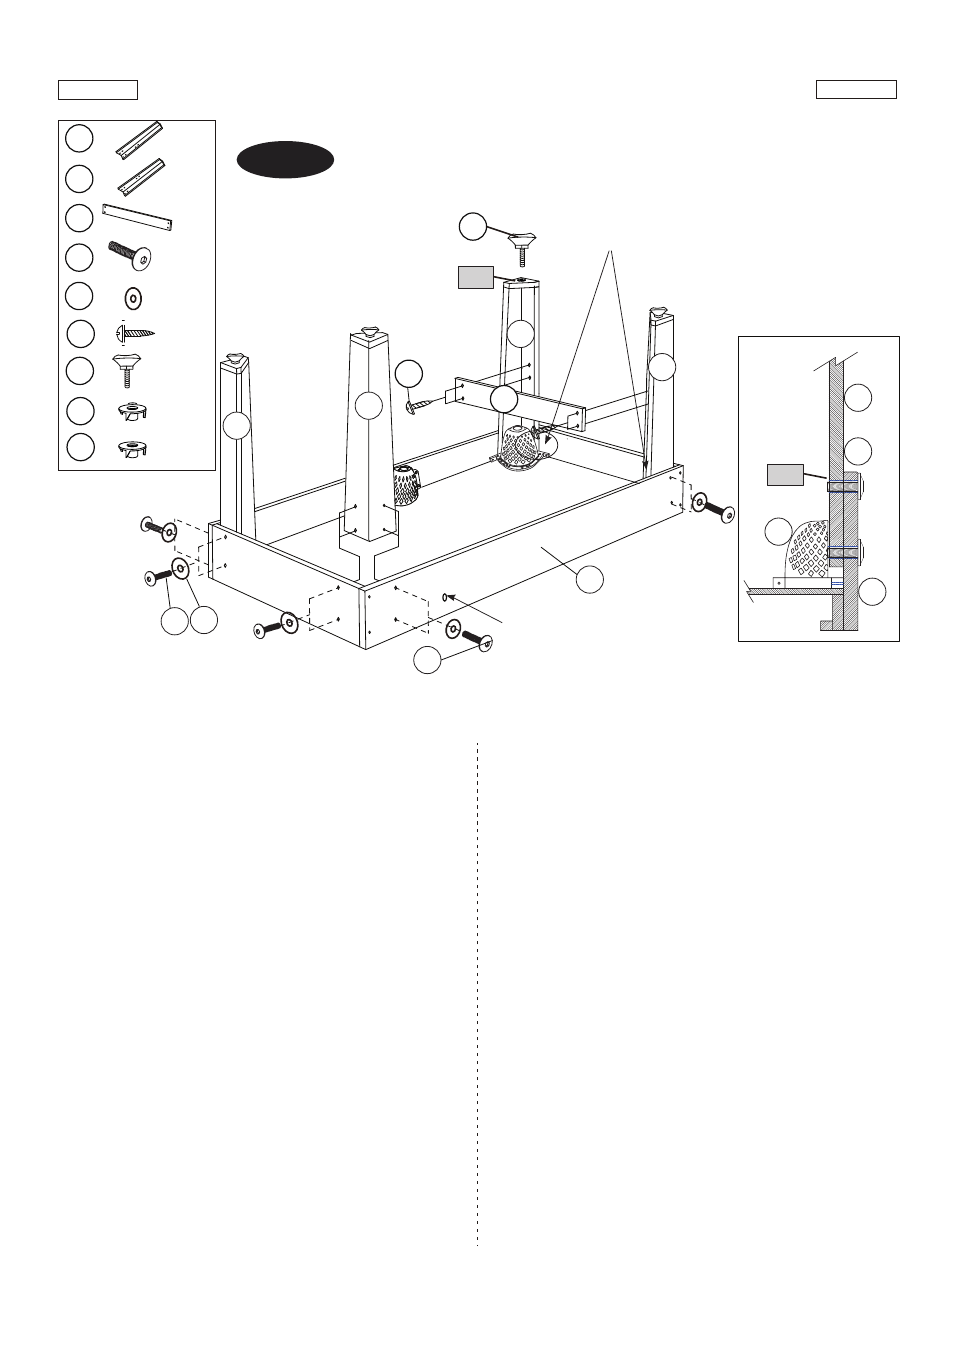
FIG.2 BILLIARD TABLE ASSEMBLY
6. Attach two pre-assembled Legs (#4 and #5) to the end of
Billiard Mainframe (#1) using four Bolts (#8) and four
Washers (#10) per Leg.
See FIG. 3.
7. Attach the other two pre-assembled Legs (#4 and #5) to
the other end of Billiard Mainframe (#1) but using only
two Bolts (#8) and two Washers (#10) on the sides of
each Leg.
See FIG. 3.
Note: Please do not use any screws on the holes in
the end apron of Billiard at this step. The bolts will
be added later for the crooked Pole (#19).
See FIG. 4A.
8. Attach the Leg Side Panel (#6) between the inside of
Left and Right Legs using four Screws (#17) per Leg
Side Panel.
See FIG. 3.
9. Next, screw the Leg Leveler (#30) into the top of the
Leg Base.
See FIG. 2.
10. Lift the table assembly from the floor with two strong
adults, turn it over, and set table on its legs in the
location where you play. Go back and make sure
that all connections are tight.
FIG.2
MONTAJE DE LA MESA DE
BILLAR
6. Fije las Patas pre-montada (#4 y #5) en la parte final
del Unidad Principal de Billar (#1) usando cuatro
Tornillos (#8) y cuatro Arandelas (#10) por Pata.
Véa FIG. 3.
7. Adjunte otras dos piernas pre-montadas (#4 y #5) a la
otra final del Unidad Principal de Billar (#1) pero use
solamente dos Tornillos (#8) y dos Arandelas (#10)
sobre los lados de cada pierna.
Vea la FIG. 3.
Nota: Que no uses tornillos sobre los agujeros al
delantal final de Billar en este paso. El tornillo será
agregado luego de ser doblado el Poste (#19).
Vea la FIG. 4A.
8. Fije el Panel del Lateral de la Pata (#6) entre la parte
interior de la Pata Izquierda y Derecha usando cuatro
Tornillos (#17) por cada Panel del Lateral de la Pata.
Véa FIG. 3.
9. Luego, atornille el Nivelador de la Pata (#30) encima
de la Base de la Pata.
Véa FIG. 2.
10. Levante la mesa montada desde el piso con dos
adultos fuertes, voltéalo, y ponga las patas en el lugar
donde Ud. juega. Vuelva a asegurar que todas las
www.themdsports.com
1454820
6
(Continúe en la siguiente página.)
(Continued on the next page.)
Español
English
FIG.2
6
8
17
X 2
X 12
X 8
30
X 4
P2
X16
10
X 12
5
X 2
4
X 2
P3
X 4
30
8
8
5
1
4
4
5
10
22
1
4
5
&
No Bolts This Side
/ No atornille en este lado
This is the hole for Rivet Plug (#25).
/ Este es el agujero para el Enchufe
de remache (#25).
17
6
P2
P3