Outputting a loaded video, Playing back a video (with the video player), Assigning videos to the video switcher buttons – Roland VR-120HD Direct Streaming AV Mixer User Manual
Page 32: Inserting a video in the final output, Video operations
32
Video Operations
Outputting a Loaded Video
You can assign videos to the VIDEO SWITCHER [1]–[8] buttons and output
them in the same way as with video, or momentarily stop the final output
to output the video.
Playing Back a Video (with the Video Player)
Use the video player to play back the videos you’ve loaded.
Assigning a USER button
To use the video player, you must assign the video player function to
the USER buttons. This lets you play back/stop video using the assigned
buttons, and operate the video from the setup screen.
The video player function is not assigned to the USER buttons by factory
default.
1 .
Assign the “Video Player” function to a USER button by
following the steps in “Assigning Functions to the USER
Buttons” (p. 90).
Set “Category” to “Video Player”, and set “Value” to “Setup”.
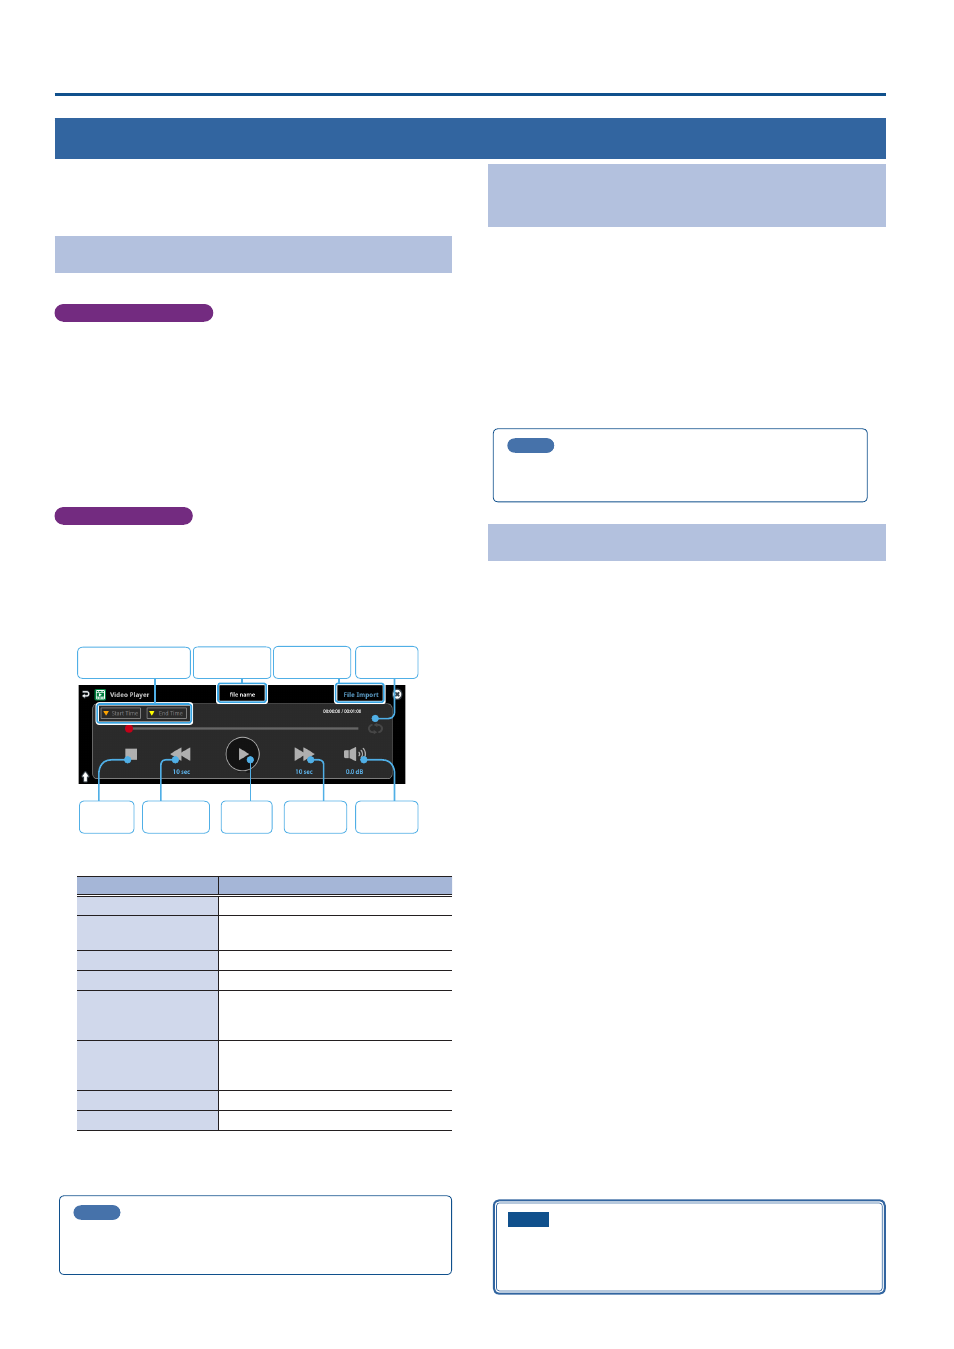
Video player settings
2 .
Press the USER [SETUP] button.
The User Assign screen appears.
3 .
Touch <Setup> for the USER button to which you assigned
the video player function.
The Video Player setup screen appears.
play
stop
backward
forward
mute
repeat
import
file name
start time/ end time
4 .
Touch the screen to configure the video player.
Menu item
Explanation
File Import
Loads the video.
File Name
Shows the filename of the video that was
loaded.
Start Time
Sets the playback start point of the video.
End Time
Sets the playback end point of the video.
Skip Forward Time
Sets how much the video fast-forwards
(the amount of time) when you touch
<
ËË
>.
Skip Backward Time
Sets how much the video fast-forwards
(the amount of time) when you touch
<
ÍÍ
>.
Level
Adjusts the playback volume of the video.
Repeat
Switches repeat playback on/off.
5 .
Touch <
Ë
>.
The video plays back according to the settings.
MEMO
You can also access the setup screen by pressing the [MENU] button
and then pressing “Video Player”
Ó
“Jump to Setup”.
Assigning Videos to the VIDEO
SWITCHER Buttons
Here’s how to assign a still image loaded into this unit to the VIDEO
SWITCHER [1]–[8] buttons, and output the image in the same way as
video.
1 .
Follow the steps in “Importing a Video” (p. 31) to load the
video into this unit.
2 .
Assign the video to a VIDEO SWITCHER button by following
the steps in “Assigning Video Sources” (p. 15).
3 .
Follow the steps in “Switching the Video” (p. 20) to output
the video.
MEMO
You can also directly touch the Multi-View, Input-View or Still-
View screens to select a video signal.
Inserting a Video in the Final Output
You can pause the final output, and output a video of your choice as a cut.
Video can be directly output without being assigned to the VIDEO
SWITCHER [1]–[8] buttons.
* The same video as the final output is also output to the preview.
Use the following methods to output video.
Using the USER buttons
Ø
“Assigning Functions to the USER Buttons” (p. 90)
Using a footswitch
Ø
Using an expression pedal
Ø
“Using an Expression Pedal” (p. 94)
Inputting an external control signal (GPI)
Ø
“Inputting a Control Signal” (p. 95)
NOTE
If the bitrate setting for Streaming and Recording and the bitrate of
the file played on Video Player exceeds 20,000 kbps, Streaming and
Recording and Video player cannot be used simultaneously.