Operating guide, Selecting a tone, Adjusting the overall volume – Roland GO:KEYS 61-Key Touch-Sensitive Portable Keyboard User Manual
Page 2: Applying an effect to the performance, Playing back / recording
2
Operating Guide
Adjusting the Overall Volume
You can adjust the volume of the speakers
if you’re using the built-in speakers, or the
volume of the headphones if headphones
are connected.
Adjusting the volume
0–20
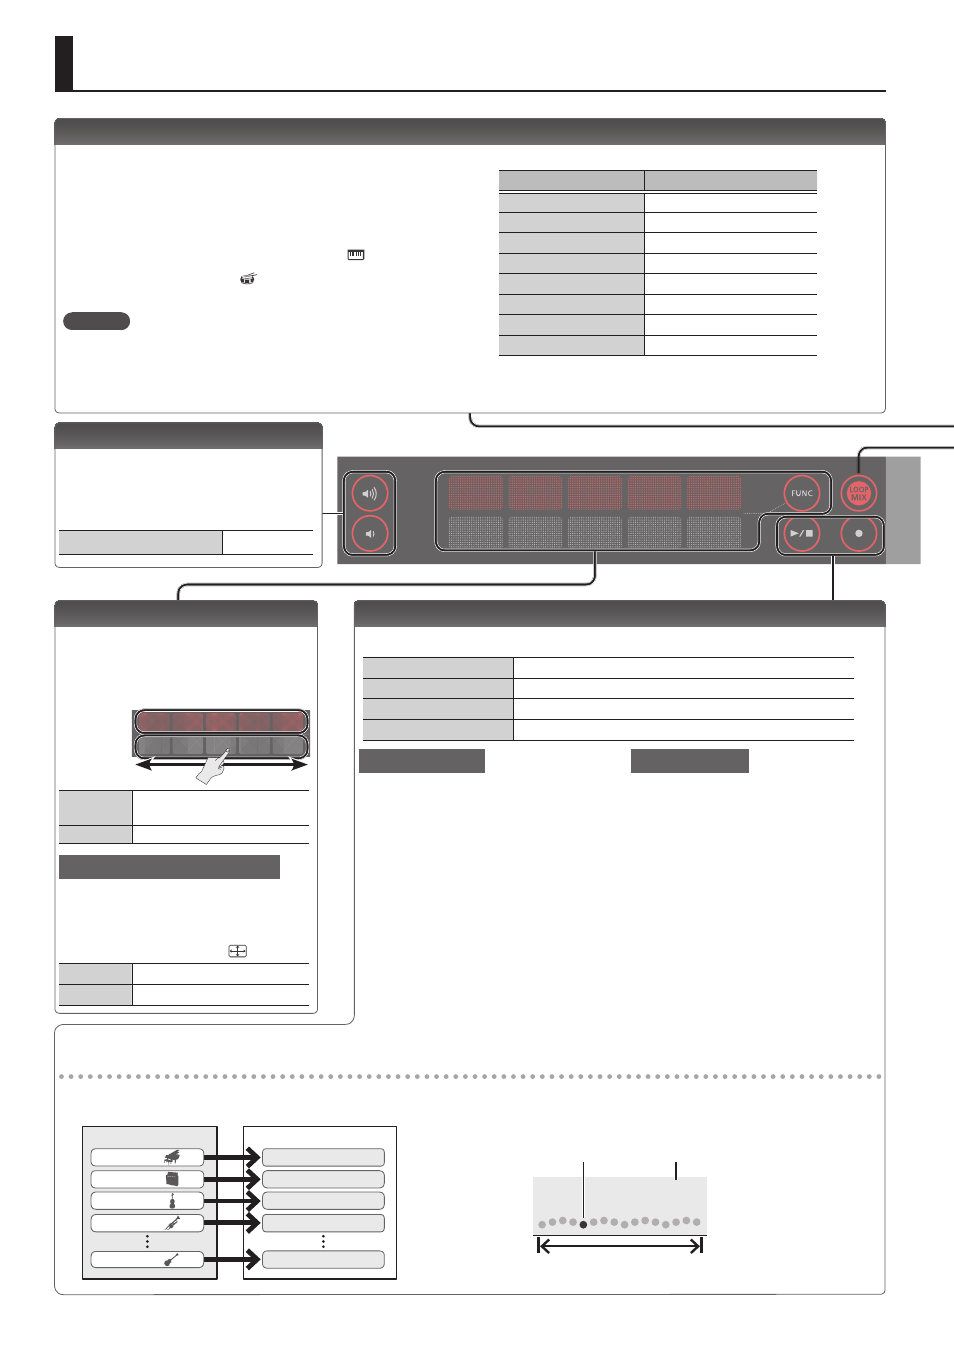
Applying an Effect to the Performance
While performing, you can vary the
pitch or apply vibrato by touching your
fingertip to the performance pad and
moving it left or right.
Upper row
Lower row
Upper row
Vary the pitch or apply
vibrato, etc.
Lower row
Pitch change
Applying a roll or filter effect
The effect that’s applied when you touch
the performance pad can be switched
between roll and filter.
1
Press the [FUNC] button (“
” is lit)
Upper row
Filter effect
Lower row
Roll effect
Selecting a Tone
This instrument lets you enjoy performing with a variety of tones.
The tones are organized into eight groups, and are assigned to the
corresponding tone buttons.
1
Press a tone button such as [PIANO], and then use the [–] [+]
buttons.
If a tone other than a drum tone is selected: “ ” is lit
If a drum tone is selected: “ ” is lit
Reference
For details on the tones, refer to “Tone List” at the end of this
manual.
Tone groups
Button
Explanation
[PIANO] button
Piano tones
[ORGAN] button
Organ tones
[STRINGS] button
Strings tones
[BRASS] button
Brass tones
[DRUM] button
Drum tones
[BASS] button
Bass tones
[SYNTH] button
Synthesizer tones
[FX/GUITAR] button
Sound effects/Guitar tones
Playing Back / Recording
Here’s how to play back or record a song.
Play/Stop
Press the [
s
] button.
Record-standby
While stopped, press the [
t
] button.
Record
From record-standby, press the [
s
] button.
Load a different song
Loading a saved song (Load) (p. 7).
New recording
1
Select the sound (part) that you want
to record.
2
Press the [
t
] button (“
t
” blinks).
A count is heard in time with the
3
Play the keyboard to start recording
(“
t
” is lit).
4
Press the [
s
] button to stop
(“
t
” is unlit).
A confirmation message appears.
5
To save, press the [ENTER] button.
If you decide to cancel, press the
[EXIT] button.
Overdubbing
1
Select a different sound (part) than
you recorded in “New recording.”
Alternatively, you can select the same
sound and overdub it.
2
Press the [
t
] button (“
t
” blinks).
3
Play the keyboard to start recording
(“
t
” is lit).
4
Press the [
s
] button to stop
(“
t
” is unlit).
A confirmation message appears.
5
To save, press the [ENTER] button.
If you decide to cancel, press the
[EXIT] button.
About the recording function
This instrument lets you overdub, where a performance using one of
the tone buttons is considered as one part.
Tone button
Song
Piano part
Organ part
Brass tones
Strings part
FX/Guitar tones
PIANO
ORGAN
BRASS
STRINGS
FX/GUITAR
When playing back or recording, the screen shows the current
measure, and the status of play/record progress within one measure.
Current measure
001
Play/record position
One measure