Sony ZV-1 Digital Camera (Black) User Manual
Rear speaker, Precautions, About compatible models for the rear speaker
Rear Speaker
Operating Instructions
SA-RS5
5-034-500-
11
(1)
©2022 Sony Corporation Printed in China
Owner’s Record
The model and serial numbers are located on the
bottom of the speakers.
Record the serial numbers in the space provided
below. Refer to them whenever you call upon your
Sony dealer regarding the speakers.
Model No. SA-RS5
Serial No.
WARNING
The AC adaptor is not disconnected from the mains
as long as it is connected to the AC outlet, even if the
speakers themselves have been turned off.
To reduce the risk of fire, do not cover the ventilation
opening of the speakers with newspapers,
tablecloths, curtains, etc.
Do not expose the speakers to naked flame sources
(for example, lighted candles).
To reduce the risk of fire or electric shock, do not
expose these speakers to dripping or splashing, and
do not place objects filled with liquids, such as vases,
on the speakers.
As the mains plug of AC power adaptor is used to
disconnect the AC power adaptor from the mains,
connect it to an easily accessible AC outlet. Should
you notice an abnormality in it, disconnect it from
the AC outlet immediately.
Do not install the speakers in a confined space, such
as a bookcase or built-in cabinet.
Do not expose batteries or appliances with battery-
installed to excessive heat, such as sunshine and fire.
Do not place this product close to medical
devices.
This product (including accessories) has magnet(s)
which may interfere with pacemakers, programmable
shunt valves for hydrocephalus treatment, or other
medical devices. Do not place this product close to
persons who use such medical devices. Consult your
doctor before using this product if you use any such
medical device.
RECYCLING RECHARGEABLE BATTERIES
Rechargeable batteries are recyclable.
You can help preserve our environment by returning
your used rechargeable batteries to the collection
and recycling location nearest you.
For more information regarding recycling of
rechargeable batteries, visit
Caution: Do not handle damaged or leaking
rechargeable batteries.
Indoor use only.
For the speakers
The nameplates are located on the bottom of the
speakers.
For the AC adaptor
Labels for AC adaptor model No. and Serial No. are
located at the bottom of the AC adaptor.
• Do not dismantle, open or shred secondary cells or
batteries.
• In the event of a cell leaking, do not allow the
liquid to come in contact with the skin or eyes. If
contact has been made, wash the affected area
with copious amounts of water and seek medical
advice.
• Do not use any charger other than that specifically
provided for use with the equipment.
• Secondary cells and batteries need to be charged
before use. Always use the correctcharger and refer
to the manufacturer’s instructions or equipment
manual for proper charging instructions.
• After extended periods of storage, it may be
necessary to charge and discharge the cells
batteries several times to obtain maximum
performance.
• Dispose of properly.
• Retain the original product literature for future
reference.
• Do not expose the batteries (battery pack or
batteries installed) to excessive heat such as
sunshine, fire or the like for a long time.
• Do not subject the batteries to extreme low
temperature conditions that may result in
overheating and thermal runaway.
For customers in the U.S.A.
NOTE:
These speakers have been tested and found to
comply with the limits for a Class B digital device,
pursuant to Part 15 of the FCC Rules. These limits are
designed to provide reasonable protection against
harmful interference in a residential installation.
These speakers generate, use and can radiate radio
frequency energy and, if not installed and used in
accordance with the instructions, may cause harmful
interference to radio communications.
However, there is no guarantee that interference will
not occur in a particular installation. If these speakers
do cause harmful interference to radio or television
reception, which can be determined by turning the
speakers off and on, the user is encouraged to try to
correct the interference by one or more of the
following measures:
– Reorient or relocate the receiving antenna.
– Increase the separation between the speakers and
receiver.
– Connect the speakers into outlets on a circuit
different from that to which the receiver is
connected.
– Consult the dealer or an experienced radio/TV
technician for help.
If you have any questions about this rear speaker:
Visit: https://www.sony.com/electronics/support
Contact: Sony Customer Information Service Center
at 1-800-222-Sony (7669)
Write: Sony Customer Information Service Center
12451 Gateway Blvd., Fort Myers, FL 33913
Supplier’s Declaration of Conformity
Trade Name: SONY
Model No.: SA-RS5
Responsible Party: Sony Electronics Inc.
Address: 16535 Via Esprillo, San Diego, CA 92127
U.S.A.
Telephone No.: 858-942-2230
This device complies with part 15 of the FCC rules.
Operation is subject to the following two conditions:
(1) This device may not cause harmful interference,
and (2) this device must accept any interference
received, including interference that may cause
undesired operation.
CAUTION
You are cautioned that any changes or modifications
not expressly approved in this manual could void
your authority to operate these speakers.
These speakers must not be co-located or operated
in conjunction with any other antenna or transmitter.
These speakers comply with FCC radiation exposure
limits set forth for an uncontrolled environment and
meet the FCC radio frequency (RF) Exposure
Guidelines. These speakers should be installed and
operated keeping the radiator at least 20cm or more
away from person’s body.
Compliance with FCC requirement 15.407(c)
Data transmission is always initiated by software,
which is the passed down through the MAC, through
the digital and analog baseband, and finally to the
RF chip. Several special packets are initiated by the
MAC. These are the only ways the digital baseband
portion will turn on the RF transmitter, which it then
turns off at the end of the packet. Therefore, the
transmitter will be on only while one of the
aforementioned packets is being transmitted. In
other words, this device automatically discontinue
transmission in case of either absence of information
to transmit or operational failure.
Frequency Tolerance: ±20 ppm or less
For customers in Canada
These speakers contain licence-exempt
transmitter(s)/receiver(s) that comply with
Innovation, Science and Economic Development
Canada’s license-exempt RSS(s).
Operation is subject to the following two conditions:
(1) These speakers may not cause interference; and
(2) These speakers must accept any interference,
including interference that may cause undesired
operation of the speakers.
These speakers complies with ISED radiation
exposure limits set forth for an uncontrolled
environment and meets RSS-102 of the ISED radio
frequency (RF) Exposure rules. These speakers should
be installed and operated keeping the radiator at
least 20cm or more away from person’s body.
5.15 - 5.35 GHz band is restricted to indoor operations
only.
Data transmission is always initiated by software,
which is the passed down through the MAC, through
the digital and analog baseband, and finally to the
RF chip. Several special packets are initiated by the
MAC. These are the only ways the digital baseband
portion will turn on the RF transmitter, which it then
turns off at the end of the packet. Therefore, the
transmitter will be on only while one of the
aforementioned packets is being transmitted. In
other words, this device automatically discontinue
transmission in case of either absence of information
to transmit or operational failure.
Precautions
On safety
• Should any solid object or liquid fall into the rear speaker,
unplug the rear speaker and have it checked by qualified
personnel before operating it any further.
• Do not climb on the rear speaker, as you may fall down and
injure yourself, or the rear speaker damage may result.
On the AC adaptor
Use only the supplied AC adaptor. To avoid damaging the
unit, do not use any other AC adaptor.
On power sources
• Before operating the rear speaker, check that the operating
voltage is identical to your local power supply. The
operating voltage is indicated on the nameplate at the
bottom of the rear speaker.
• If you are not going to use the rear speaker for a long time,
be sure to disconnect the rear speaker from the wall outlet
(mains). To disconnect the AC power cord (mains lead),
grasp the plug itself; never pull the cord.
• One blade of the plug is wider than the other for the
purpose of safety and will fit into the wall outlet (mains) in
only one way. If you are unable to insert the plug fully into
the outlet, contact your dealer.
• The AC power cord (mains lead) must be changed only at a
qualified service shop.
On heat buildup
• Although the rear speaker heats up during operation, this
is not a malfunction. If you continuously use this rear
speaker at high volume, the rear speaker temperature at
the rear and bottom rises considerably. To avoid burning
yourself, do not touch the rear speaker.
On placement
• Do not place the rear speaker near heat sources or in a
place subject to direct sunlight, excessive dust, or
mechanical shock.
• Do not place metal objects other than a TV around the rear
speaker. Wireless functions may be unstable.
• If the rear speaker is being used in combination with a TV,
VCR, or tape deck, noise may result and picture quality may
suffer. In such a case, place the rear speaker away from the
TV, VCR, or tape deck.
• Use caution when placing the rear speaker on a surface
that has been specially treated (with wax, oil, polish, etc.),
as staining or discoloration of the surface may result.
• The speakers of this rear speaker are not of magnetically
shielded type. Do not place magnetic cards on the rear
speaker or near it.
If you encounter color irregularity on a
nearby TV screen
Color irregularities may be observed on certain types of TV
sets.
On cleaning
Clean the rear speaker with a soft, dry cloth. Do not use any
type of abrasive pad, scouring powder, or solvent such as
alcohol or benzine.
Others
• At high temperature, the charging may stop or the volume
may reduce to protect the battery.
• Even if you do not intend to use the rear speaker for a long
time, charge the battery to its full capacity once every 6
months to maintain its performance.
• When the amount of time that the built-in battery can be
used seems significantly shorter, it could mean that the
rechargeable built-in battery has expired.
If you have any question or problem concerning your rear
speaker, please consult your nearest Sony dealer.
About Compatible
Models for the Rear
Speaker
The SA-RS5 rear speaker works only with the
specified model. For information about compatible
models, visit Sony's website.
In these Operating Instructions, the operations are
described for speakers used with the compatible
model HT-A7000.
Note
You may need to update the software depending on
the connected device. To update the rear speaker,
you need to connect the rear speaker to the AC
outlet (mains) using the AC adaptor (supplied). For
details about updating, refer to Operating
Instructions of the compatible model.
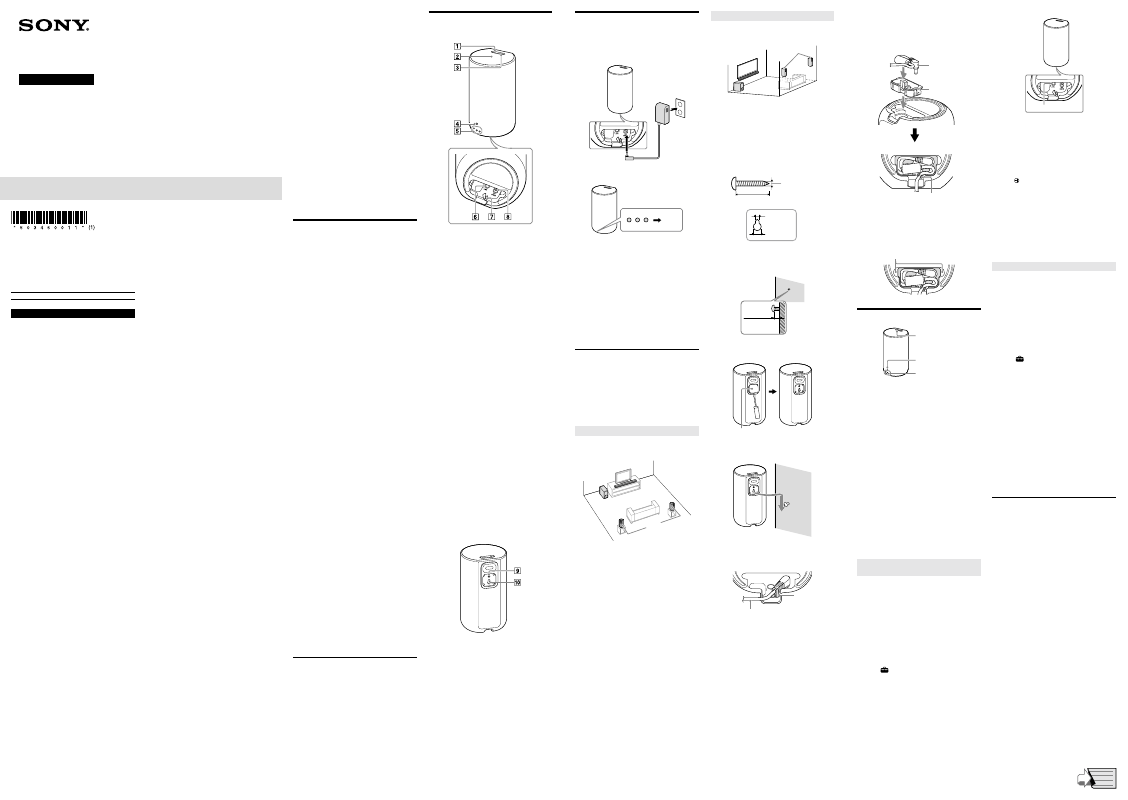
Parts and Controls
Top, front, and bottom
(power) button
Turns on or off the rear speaker.
Up-firing speaker
Outputs the sound upward.
OPTIMIZE button
You can perform Sound Field Optimization of a
connected device. When both of the rear speakers
turn on, you can perform Sound Field
Optimization by pressing OPTIMIZE on either rear
speaker without operation on the connected
device.
Sound Field Optimization may not be performed
depending on the status of the connected device.
This function works only with specified models.
For information about compatible models,
confirm on the Sony website.
Power indicator
– Flashes slowly (green): The rear speaker is
attempting to automatically connect to a
compatible model.
– Lights up (green): The rear speaker is connected
to a compatible model.
– Flashes twice repeatedly (green): The rear
speaker is attempting to manually connect to a
compatible model.
– Flashes/lights up (amber): The software is
updating.
– Lights up (red): The rear speaker is in standby
mode.
– Turns off: The rear speaker is turned off.
Battery indicators
During charging
– Flash slowly: The built-in battery is charging.
– Turn off: Charging is completed.
During use (without power source connection)
– Light up: The remaining battery level is
indicated.
– The left most indicator flashes: The remaining
battery level is low. Charge the built-in battery.
LINK button
Cable holder
DC IN terminal
Note
• Do not put anything on the up-firing speaker or
touch the up-firing speaker carelessly.
• The brightness of the power and battery indicators
sync with the DIMMER settings of a compatible
model.
Rear
Mounting hole for the general speaker stand
Wall mounting hole
Note
When using the mounting hole for the general
speaker stand (
) or wall mounting hole (
), peel
off the cover on the rear of the speaker by inserting a
flathead screwdriver, etc. into a groove on the lower
side of the cover.
Charging the Rear
Speaker
1
Connect the AC adaptor (supplied) to the rear
speaker, then connect the AC adaptor to the AC
outlet (mains).
The battery indicators flash during charging.
The battery indicators turn off after completion of
charging.
Off
Note
Do not remove the plug part from the AC adaptor
and connect the plug to the AC outlet (mains)
alone. There may be a risk of electric shock or fire.
2
After completion of charging, disconnect the AC
adaptor from the AC outlet (mains), then
disconnect the AC adaptor from the rear
speaker.
Tip
You can use the rear speaker during charging. In this
case, it may take longer to charge the built-in battery
compared to when the speaker is turned off
depending on the conditions of use. Therefore, it is
recommended to turn off the speaker when
charging.
Installation
To enjoy the surround sound effectively, install the
rear speakers so that their height positions match
the position of your ear.
Note
• Do not install the rear speakers in a shelf or right
below a ceiling.
• Do not install the rear speakers in an inclined state
or unstable place.
Installing on a Shelf/Stand
The following illustration is an installation example to
use the rear speakers with the compatible model
HT-A7000 and an optional subwoofer.
REAR R
SA-RS5
REAR L
1
Check the right and left rear speakers using the
labels on the bottom.
“REAR R” is for right, “REAR L” is for left.
2
Install the rear speakers behind your listening
position.
Install the rear speakers by turning them to your
listening position.
Note
Lay the bottom (the face on which there is a label)
down to install the rear speaker. Installations other
than the above are not supported.
Tip
To obtain a good surround sound, perform Sound
Field Optimization or speaker distance setting. The
function/operation differs depending on compatible
models. For details, refer to the operating
instructions or Help Guide of the compatible model.
Mounting on the Wall
The following illustration is an installation example to
use the rear speakers with the compatible model
HT-A7000 and an optional subwoofer.
REAR R
SA-RS5
REAR L
Note
• Have the installation done by a Sony dealer or
licensed contractor and pay special attention to
safety during the installation.
• Sony shall not be held responsible for accidents or
damage caused by improper installation,
insufficient wall strength, improper screw
installation or natural disaster, etc.
1
Prepare a screw (not supplied) that is suitable
for the wall mounting hole on the rear of the
speakers.
4 mm (3/16 in)
More than 30 mm (1 3/16 in)
Wall mounting hole on the rear of
the rear speaker
5 mm
(13/64 in)
10 mm
(13/32 in)
2
Decide the wall mounting position of the
speaker and fasten the screw there.
Approx.
7.5 mm
(approx.
5/16 in)
3
Peel off the cover on the rear of the speaker by
inserting a flathead screwdriver, etc. into a
groove on the lower side of the cover.
Cover
4
Hang the wall mounting hole on the screw.
Check the labels on the bottom of the speakers.
“REAR R” is for right, “REAR L” is for left.
5
When mounting the rear speaker on the wall
with the AC adaptor connected, fix the cable of
the AC adaptor in the cable holder on the
bottom of the rear speaker.
Cable
holder
Cable of the AC adaptor
Note
• Prepare screws (not supplied) that are suitable for
the wall material and strength. As a plasterboard
wall is especially fragile, attach the screws securely
in the wall beam. Mount the speakers onto a
reinforced wall making sure that the heights of the
right and left speakers are equal.
• Keep the cover that was peeled off in step 3 for use
when you do not mount the rear speaker on a wall.
Tip
You can store the cable of the AC adaptor compactly
with the cable guide (supplied).
Store the cable and DC plug of the AC adaptor in the
cable guide, attach the cable guide to the bottom of
the rear speaker while connecting the DC plug to the
DC IN terminal, then fix the cable in the cable holder.
Cable guide
Top view of the bottom of the rear speaker
Cable and DC
plug of the AC
adaptor
Cable holder
• Attach the cable guide and cable of the AC adaptor
firmly by inserting it deeply when using the cable
guide.
• When pressing LINK on the bottom of the rear
speaker, remove the cable guide.
• To remove the cable guide, remove the cable from
the cable holder, then pull the cable guide out by
inserting your finger into the hollows.
Hollows
Connection
Power indicator
(green)
(power)
Battery indicators
Tip
You can connect the optional subwoofer with
compatible models in the following way when
installing it too.
1
Turn on the compatible model.
2
Press
(power) to turn the rear speaker on.
The power indicator lights or flashes when the
rear speaker turns on.
Turn on both left and right rear speakers.
You can use the rear speaker during charging.
3
Make sure that the power indicators on the rear
speakers light in green.
When the power indicators light in green, the
connection between the rear speakers and a
compatible model is established.
If the connection is not established, connect the
rear speakers to the compatible model manually.
For details, see “If the Connection is not
Established Automatically.”
Note
If a compatible model is in standby mode while the
AC adaptor is not connected to the rear speaker, the
rear speaker turns off automatically after 5 minutes.
In this case, turn on both left and right rear speakers
to use the rear speakers.
If the Connection is not Established
Automatically
If you cannot connect the rear speakers to the
compatible model automatically or you use multiple
compatible models and want to specify the
compatible model for connecting the rear speakers,
perform manual connection.
The following operation is described for rear
speakers used with the compatible model HT-A7000.
Use the remote control supplied with the compatible
model HT-A7000 when performing this operation.
If you use other compatible models, refer to their
Operating Instructions.
1
Press HOME.
The home menu appears on the TV screen.
2
Select
[Setup] - [Advanced Settings] on the
home menu.
3
Select [Speaker Settings] - [Wireless Speaker
Settings] - [Start manual linking].
The [Start manual linking] screen appears on the
TV screen.
4
Press LINK on the rear speaker.
LINK
The power indicator of the rear speaker that had
LINK pressed flashes twice repeatedly in green.
5
Select [Start].
The manual link starts.
The connecting process appears on the TV screen.
To cancel the manual link, select [Cancel].
6
When [Rear Speaker (R)] and [Rear Speaker (L)]
display [Connected], select [Finish].
7
Press (enter).
The link is established and the power indicator of
the rear speaker lights in green.
Note
• If you perform [Start manual linking], [Link mode]
of [Wireless Speaker Settings] is set to [Manual]
automatically.
• Only the rear speakers for which [Connected] has
been displayed in Step 6 connect to a compatible
model. If the connection of the rear speakers
cannot be established, perform the manual
connection again.
If Wireless Transmission is Unstable
If you use multiple wireless systems, such as a
wireless LAN, the wireless signals may become
unstable. In this case, the transmission may be
improved by changing the following setting.
The following operation is described for rear
speakers used with the compatible model HT-A7000.
Use the remote control supplied with the compatible
model HT-A7000 when performing this operation.
If you use other compatible models, refer to their
Operating Instructions.
1
Press HOME.
The home menu appears on the TV screen.
2
Select
[Setup] - [Advanced Settings] on the
home menu.
3
Select [Speaker Settings] - [Wireless
Speaker Settings] - [RF Channel].
4
Select the setting you want.
• [On] (default setting): Normally select this. The
compatible model automatically selects the
better channel for transmission. Stronger mode
for wireless interference.
• [Off]: The compatible model selects a channel
from the limited frequency band to prevent
external wireless interference. If sound
dropping occurs while [On] is selected, it may
be improved by selecting [Off].
Note
• If you change the [RF Channel] setting from [Off] to
[On], it may take 1 minute to reconnect.
• Some compatible models may not meet this
setting depending on the countries/regions where
you purchased it.
Troubleshooting
If you experience any of the following difficulties
while using the rear speakers, use this
troubleshooting guide to help remedy the problem
before requesting repairs. Should any problem
persist, consult your nearest Sony dealer.
Be sure to bring all of your rear speakers, the
compatible model, and optional subwoofer even if it
seems as though only one has a problem when you
request a repair.
The following solutions are described for speakers
used with the compatible model HT-A7000.
If you use other compatible models, refer to their
Operating Instructions.
No sound is heard from the rear speakers.
q
Make sure the AC adaptor is connected properly or
the built-in battery is charged.
q
If the power indicator on the rear speaker does not
light, try the following.
– Make sure the AC adaptor is connected properly
or the built-in battery is charged.
– Press
(power) of the rear speaker to turn on
the power.
q
If the power indicator on the rear speaker flashes
slowly in green or lights in red, try the following.
– Move the rear speaker to a location near the
compatible model so that the power indicator on
the rear speaker lights in green.
– Follow the steps in “If the Connection is not
Established Automatically.”
– Check the wireless connection status. For details,
refer to the Operating Instructions of the
compatible model.
q
Press REAR
(rear speakers volume) + on the
remote control of the compatible model to
increase the volume of the rear speakers.
q
If you change the [RF Channel] setting of the
compatible model from [Off] to [On], it may take 1
minute for the sound to be output.
Continued on back page