Sony DWRS03DSKIT Kit with DWR-S03D Receiver and 15-Pin Slot Mount Adapter User Manual
Remote commander télécommande, Rm-1bp
2-660-175-41 (1)
Remote Commander
Télécommande
Operating Instructions
Mode d’emploi
Bedienungsanleitung
Manual de instrucciones
Gebruiksaanwijzing
©2017 Sony Corporation
RM-1BP
1
FOCUS
2
REC REVIEW
3
REC START/STOP
4
5
6
7
8
9
10
11
12
1
2
OFF
LANC
REC START/STOP
1
2
NORMAL
REVERSE
SLOW
MID
4
FAST
8
FOCUS
REC REVIEW
HDV
DV
REC
REVIEW
REC START/STOP
FOCUS
REC REVIEW
62 80 105 mm
/
/
1,000 mm
100 g
1
ˎ
ˎ
1
ˎ
RM-1BP
ˎ
ˎ
ˎ
3
2
1
7
8
9
10
4
6
5
11
12
For the customers in Europe
This product with the CE marking complies with the EMC Directive
(89/336/EEC) issued by the Commission of the European Community.
Compliance with this directive implies conformity to the following
European standards:
EN55103-1: Electromagnetic Interference (Emission)
ˎ
EN55103-2: Electromagnetic Susceptibility (Immunity)
ˎ
This product is intended for use in the following Electromagnetic
Environment(s): E1 (residential), E2 (commercial and light industrial),
E3 (urban outdoors), and E4 (controlled EMC environment, ex. TV
studio).
For the customers in the U.S.A.
THIS DEVICE COMPLIES WITH PART 15 OF THE FCC RULES. OPERATION
IS SUBJECT TO THE FOLLOWING TWO CONDITIONS:
(1) THIS DEVICE MAY NOT CAUSE HARMFUL INTERFERENCE, AND
(2) THIS DEVICE MUST ACCEPT ANY INTERFERENCE RECEIVED,
INCLUDING INTERFERENCE THAT MAY CAUSE UNDESIRED
OPERATION.
CAUTION
You are cautioned that any changes or modifications not expressly
approved in this manual could void your authority to operate this
equipment.
Note:
This equipment has been tested and found to comply with the limits
for a Class B digital device, pursuant to Part 15 of the FCC Rules. These
limits are designed to provide reasonable protection against harmful
interference in a residential installation. This equipment generates, uses,
and can radiate radio frequency energy and, if not installed and used
in accordance with the instructions, may cause harmful interference to
radio communications. However, there is no guarantee that interference
will not occur in a particular installation. If this equipment does cause
harmful interference to radio or television reception, which can be
determined by turning the equipment off and on, the user is encouraged
to try to correct the interference by one or more of the following
measures:
Reorient or relocate the receiving antenna.
–
Increase the separation between the equipment and receiver.
–
Connect the equipment into an outlet on a circuit different from that
–
to which the receiver is connected.
Consult the dealer or an experienced radio/TV technician for help.
–
For the customers in Canada
This Class B digital apparatus complies with Canadian ICES-003.
Notice for the customers in the countries applying
EU Directives
Manufacturer: Sony Corporation, 1-7-1 Konan Minato-ku Tokyo, 108-
0075 Japan
For EU product compliance: Sony Belgium, bijkantoor van Sony Europe
Limited, Da Vincilaan 7-D1, 1935 Zaventem, Belgium
Features
The RM-1BP Remote Commander can be connected to a Sony video
ˎ
camera equipped with a LANC terminal.
It can be operated by attaching it to the pan handle on the tripod
ˎ
using the cramp provided.
The zoom direction of the zoom lever can be switched using the
ˎ
ZOOM DIRECTION change over switch.
The zoom speed can be switched to one of three levels using the
ˎ
ZOOM SPEED change over switch.
Notes
Be sure not to drop the Remote Commander or spill liquid on it.
ˎ
Do not leave the Remote Commander in direct sunlight, near heaters,
ˎ
or in locations with high humidity.
When inserting or pulling the Remote plug, be sure to do so in a
ˎ
straight line. Performing this operation forcibly may damage either
the remote plug or the unit connected.
Do not overly tighten the cramp. Doing so may cause damage.
ˎ
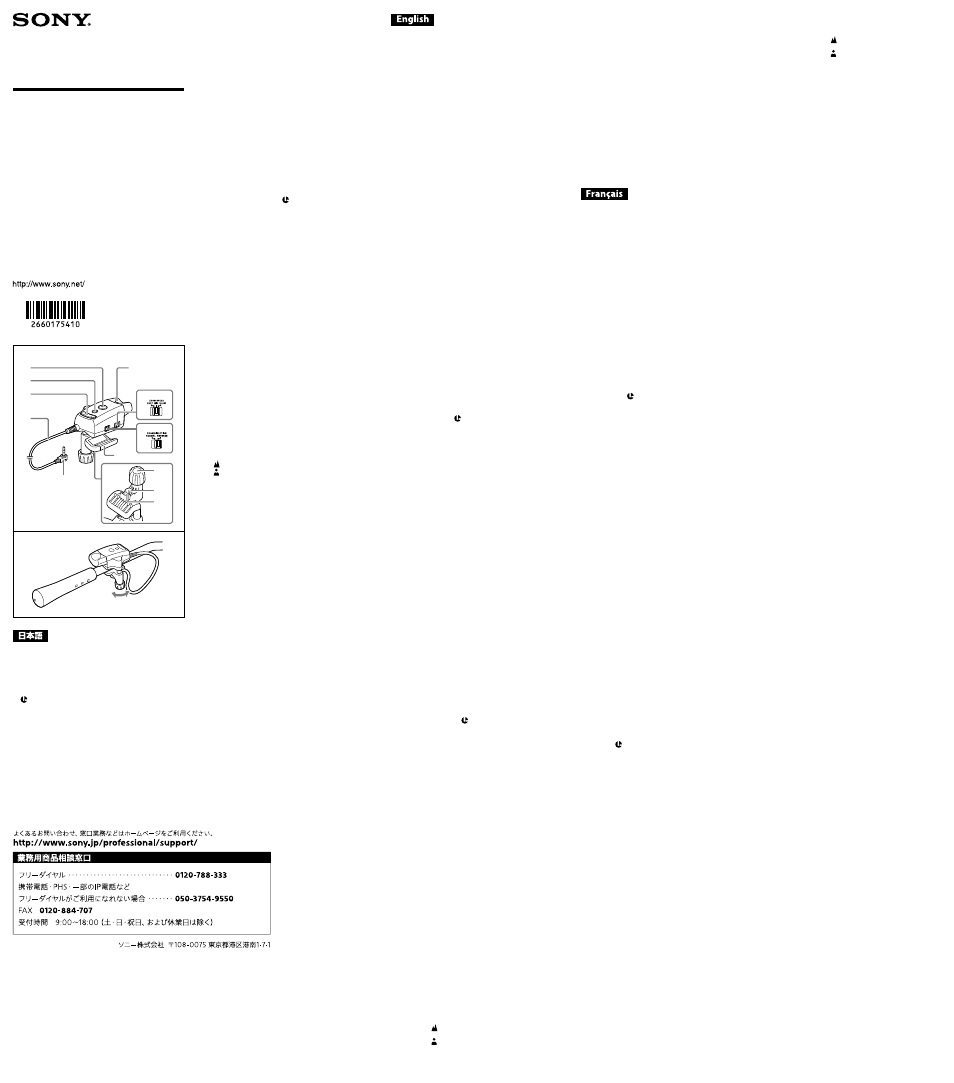
Identifying the parts (See illustration
)
1 FOCUS button
2 REC REVIEW button
3 REC START/STOP button
4 Zoom lever
5 ZOOM DIRECTION change over switch
6 ZOOM SPEED change over switch
7 Remote cord
8 Remote plug
9 Cramp
10 Cramp knob
11 Remote plug holder
12 Remote cord holder
Attaching the Remote Commander (See
illustration
)
1 Attaching the Remote Commander to the pan handle on the
tripod with the cramp.
Rotate the cramp knob on the Remote Commander
counterclockwise as far as required to insert the pan handle.
Align the center of the pan handle with the V groove on the
cramp, and rotate the cramp knob clockwise to lock it firmly.
* Depending on the pan handle attached, the Remote
Commander may make contact with the grip of the pan
handle when it is in use. Set the Remote Commander a
little apart from the grip.
2 Be sure the video camera is turned off, then insert the remote
plug straight into the LANC terminal.
Setting the video camera to record images
Refer to the operating instructions of the unit used with the
Remote Commander for further information.
Using the Remote Commander to record
Press the REC START/STOP button to start recording.
Press it again to stop recording. (Standby mode)
* You cannot record still images with the Remote
Commander.
Using the zoom
1 Select the zoom direction with the ZOOM DIRECTION change
over switch.
2 Rotate the zoom lever of the Remote Commander.
NORMAL mode
Clockwise
Tele side (for telephoto):
subject appears closer.
Counterclockwise Wide side (for wide-angle):
subject appears farther away.
REVERSE mode
Clockwise
Wide side (for wide-angle):
subject appears farther away.
Counterclockwise Tele side (for telephoto):
subject appears closer.
Depending on your video camera, zooming can be accelerated
by using the ZOOM SPEED change over switch together with
the amount the zoom lever is rotated.
SLOW mode
In SLOW mode, the video camera zooms at the slowest speed,
regardless of how much the zoom lever is rotated.
MID mode
In MID mode, the video camera zooms quickly, depending on
how much the zoom lever is rotated. (4 stages)
FAST mode
In FAST mode, the video camera zooms even faster, depending
on how much the zoom lever is rotated. (8 stages)
Focusing the video camera manually
Switch the focus switch of the video camera to “Manual” and press
the FOCUS button on the Remote Commander.
Press to the side: Video camera focuses on the subject at the
rear.
Press to the side: Video camera focuses on the subject at the
front.
Reviewing the most recently recorded scenes
While in standby mode, press the REC REVIEW button.
The last several seconds of recorded images before the tape was
stopped will be played on the LCD screen, and then the video
camera will return to standby mode.
* If HDV standard and DV standard have been mixed on the same
tape, an image may not appear on the screen when the REC
REVIEW button is pressed. It is not malfunction.
Specifications
Remote Control
Function
REC START/STOP button, FOCUS button,
REC REVIEW button, Zoom lever, ZOOM
DIRECTION change over switch, ZOOM SPEED
change over switch
Dimensions
Approx. 62 Ч 80 Ч 105 mm (w/h/d)
(2 1/2 Ч 3 1/4 Ч 4 1/4 inches)
Code length
Approx. 1,000 mm (39 3/8 feet)
Mass
Approx. 100 g (3.6 oz)
Included items
Remote Commander (1), Set of printed
documentation
Design and specifications are subject to change without notice.
Refer to the operating instructions of the video camera for further
information as well.
Pour les clients européens
Ce produit portant la marque CE est conforme à la Directive sur la
compatibilité électromagnétique (EMC) (89/336/CEE) émise par la
Commission de la Communauté européenne.
La conformité à cette directive implique la conformité aux normes
européennes suivantes:
EN55103-1: Interférences électromagnétiques (émission)
ˎ
EN55103-2: Sensibilité électromagnétique (immunité)
ˎ
Ce produit est prévu pour être utilisé dans les environnements
électromagnétiques suivants: E1 (résidentiel), E2 (commercial et
industrie légère), E3 (urbain extérieur) et E4 (environnement EMC
contrôlé, ex. studio de télévision).
Pour les clients au Canada
CET APPAREIL NUMÉRIQUE DE LA CLASSE B EST CONFORME À LA
NORME NMB-003 DU CANADA.
Avis aux consommateurs des pays appliquant les
Directives UE
Fabricant: Sony Corporation, 1-7-1 Konan Minato-ku Tokyo, 108-0075
Japon
Pour toute question relative à la conformité des produits dans l’UE: Sony
Belgium, bijkantoor van Sony Europe Limited, Da Vincilaan 7-D1, 1935
Zaventem, Belgique
Caractéristiques
La télécommande RM-1BP peut être raccordée à un caméscope Sony
ˎ
doté d’une borne LANC.
Il est possible de l’utiliser en la raccordant à la poignée panoramique
ˎ
du trépied à l’aide du crampon fourni.
La direction du levier du zoom peut être commutée à l’aide du
ˎ
commutateur ZOOM DIRECTION.
La vitesse du zoom peut être réglée sur l’un des trois niveaux à l’aide
ˎ
du commutateur ZOOM SPEED.
Remarques
Veillez à ne pas faire tomber la télécommande et à ne pas renverser de
ˎ
liquide dessus.
Ne laissez pas la télécommande dans un endroit exposé aux rayons
ˎ
directs du soleil, à proximité d’un chauffage ou dans des endroits très
humides.
Lors du branchement ou du débranchement de la fiche de
ˎ
la télécommande, assurez-vous de bien pousser ou tirer
horizontalement. Si vous branchez ou débranchez la fiche de
force, la fiche de la télécommande ou l’appareil raccordé peut être
endommagé(e).
Ne serrez pas trop le crampon. Ceci risquerait de provoquer des
ˎ
dommages.
Identification des pièces (voir illustration
)
1 Touche FOCUS
2 Touche REC REVIEW
3 Touche REC START/STOP
4 Levier du zoom
5 Commutateur ZOOM DIRECTION
6 Commutateur ZOOM SPEED
7 Cordon de la télécommande
8 Fiche de la télécommande
9 Crampon
10 Bouton du crampon
11 Support de fiche de la télécommande
12 Support du cordon de la télécommande
Fixation de la télécommande (voir illustration
)
1 Fixez la télécommande sur la poignée panoramique du trépied à
l’aide du crampon.
Tournez le bouton du crampon de la télécommande dans
le sens anti-horaire jusqu’à ce que vous puissiez insérer la
poignée panoramique.
Alignez le centre de la poignée panoramique sur la fente V
du crampon et tournez le bouton du crampon dans le sens
horaire afin de le verrouiller fermement.
* Selon la poignée panoramique, il est possible que la
télécommande entre en contact avec la manette de la
poignée lorsqu’elle est utilisée. Eloignez légèrement la
télécommande de la manette.
2 Vérifiez bien que le caméscope est hors tension, puis insérez
la fiche de la télécommande en la poussant bien droit dans la
borne LANC.
Réglage du caméscope pour la prise de vue
Pour de plus amples informations, reportez-vous au mode
d’emploi de l’appareil utilisé avec la télécommande.
Utilisation de la télécommande pour une prise de
vue
Appuyez sur la touche REC START/STOP pour lancer la prise
de vue. Appuyez de nouveau sur cette touche pour arrêter
l’enregistrement. (Mode d’attente)
* Vous ne pouvez pas enregistrer d’images fixes avec la
télécommande.
Utilisation du zoom
1 Sélectionnez la direction du zoom avec le commutateur ZOOM
DIRECTION.
2 Tournez le levier du zoom de la télécommande.
Mode NORMAL
Dans le sens horaire vers Tele (pour téléobjectif) :
le sujet semble plus proche.
Dans le sens anti-horaire vers Wide (pour grand angle) :
le sujet semble plus éloigné.
Mode REVERSE
Dans le sens horaire vers Wide (pour grand angle) :
le sujet semble plus éloigné.
Dans le sens anti-horaire vers Tele (pour téléobjectif) :
le sujet semble plus proche.
Selon votre caméscope, le zoom peut être accéléré à l’aide du
commutateur ZOOM SPEED en fonction du réglage du levier
du zoom.
Mode SLOW
En mode SLOW, le caméscope effectue un zoom à la vitesse la
plus faible quel que soit le réglage du levier du zoom.
Mode MID
En mode MID, le caméscope effectue un zoom rapide suivant la
façon dont vous tournez le levier du zoom. (4 niveaux)
Mode FAST
En mode FAST, le caméscope effectue un zoom encore plus
rapide, suivant la façon dont vous tournez le levier du zoom.
(8 niveaux)
Mise au point manuelle du caméscope
Réglez le commutateur de mise au point du caméscope sur
« Manual » et appuyez sur la touche FOCUS de la télécommande.
Appuyez vers le côté : le caméscope fait la mise au point sur le
sujet situé à l’arrière.
Appuyez vers le côté : le caméscope fait la mise au point sur le
sujet situé à l’avant.
Vérification des dernières scènes enregistrées
En mode d’attente, appuyez sur la touche REC REVIEW.
Les dernières secondes des images enregistrées avant l’arrêt de la
cassette sont lues sur l’écran LCD, puis le caméscope revient en
mode d’attente.
* Si des formats HDV et DV ont été mélangés sur une même
cassette, il est possible qu’aucune image n’apparaisse sur l’écran
lorsque vous appuyez sur la touche REC REVIEW. Il ne s’agit pas
d’un problème de fonctionnement.
Spécifications
Télécommande
Fonctions
touche REC START/STOP, touche FOCUS,
touche REC REVIEW, levier du Zoom,
commutateur ZOOM DIRECTION,
commutateur ZOOM SPEED
Dimensions
environ 62 Ч 80 Ч 105 mm (l/h/p)
(2 1/2 Ч 3 1/4 Ч 4 1/4 pouces)
Longueur du cordon
environ 1 000 mm (39 3/8 pieds)
Poids
environ 100 g (3,6 on)
Articles inclus
Télécommande (1), Jeu de documents
imprimés
La conception et les spécifications sont sujettes à modifications sans
préavis.
Pour de plus amples informations, reportez-vous également au mode
d’emploi du caméscope.
ˎ
LANC
ˎ
ˎ
3
ˎ
ˎ
ˎ
ˎ
ˎ