Celestron CGX Equatorial 800 HD Telescope User Manual
Nexstar+ hand control
NEXSTAR+ HAND CONTROL
The NexStar+ hand control features all of the functionality of the older NexStar hand control but offers the
following improvements:
• Expandable functionality through the use of the Help and Option buttons (available in future firmware updates)
• LCD is less sensitive to low temperatures
• Directional buttons have raised edges to make them easier to find without looking at the hand control
• Support for faster updating via Celestron’s new firmware management software
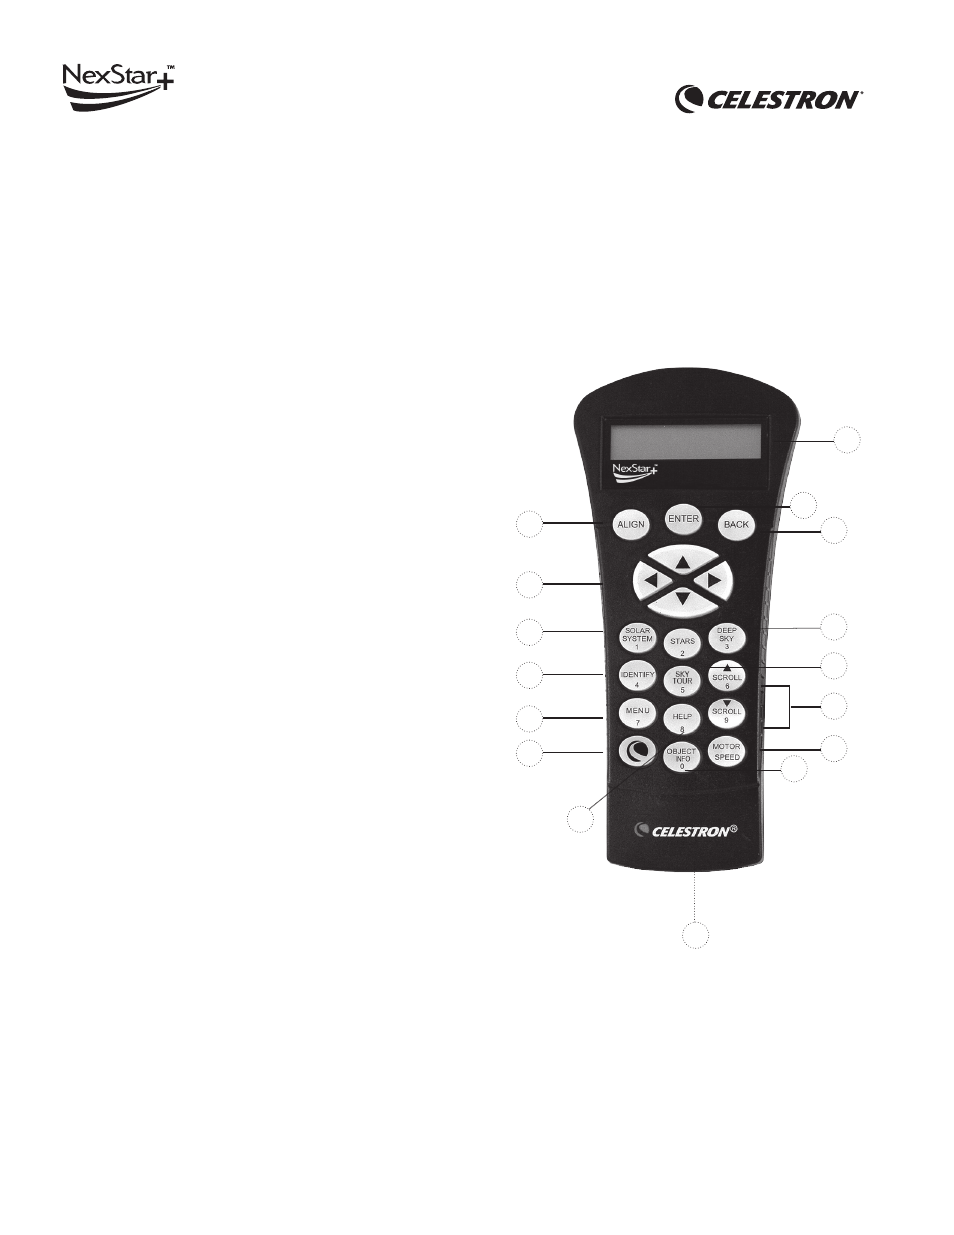
Below is a brief description of the individual components of NexStar+ hand control.
1. LIQUID CRYSTAL DISPLAY (LCD) WINDOW: Offers
improved performance in cold weather and red backlighting for
comfortable nighttime viewing of telescope information
and scrolling text.
2. ALIGN: Instructs the telescope to begin the default alignment
procedure. It is also used to select star or object as an
alignment position.
3. DIRECTION KEYS: Allow complete control of your telescope
in any direction. Use the direction keys to center objects in
the eyepiece or to manually slew your telescope.
4. CATALOG KEYS: Allow direct access to each of the main
catalogs in the database of thousands of objects.
Your telescope contains the following catalogs in its database:
•Solar System – All 7 planets in our Solar System plus the Moon,
Sun and Pluto
•Stars – Custom lists of all the brightest stars, double stars,
variable stars, constellations and asterisms
•Deep Sky – Custom lists of all the best Galaxies, Nebulae
and Clusters, as well as the complete Messier and select
NGC objects
5. IDENTIFY: Searches your telescope’s database and displays
the name and offset distances to the nearest matching objects.
6. MENU: Displays setup and utilities functions, such as
tracking rate and user defined objects and others.
7. OPTION (CELESTRON LOGO): Works similar to the SHIFT key
on a keyboard and can be used in combination with other keys to
access more advanced features and functions to be added with
later firmware updates.
8. ENTER: Pressing ENTER allows you to select any of your
telescope’s functions, accept entered parameters and slews
the telescope to displayed objects.
9. BACK: Similar to the UNDO button on the original hand
control, pressing BACK will take you out of the current menu
and display the previous level of the menu path. Press BACK
repeatedly to get back to a main menu or use to erase data
entered by mistake.
10. SKY TOUR: Activates the tour mode, which seeks out all
of the best objects in the sky and automatically slews your
telescope to those objects.
11. SCROLL KEYS: Used to scroll UP and DOWN within any of
the menu lists. A double arrow symbol on the right side of the
LCD indicates that the scroll keys can be used to view additional
information. The buttons have an angled shape to make it easier
to locate without looking.
12. MOTOR SPEED: Similar to the Rate Button on the original
NexStar hand control, it allows you to change the motor’s speed
when the direction keys are pressed.
13. OBJECT INFO: Displays coordinates and valuable information
about objects selected from your telescope’s database.
14. RS-232 JACK: For use with computer software programs for
point and click slewing capability and updating firmware via PC.
15. HELP MENU: In future firmware updates, this button will offer
troubleshooting tips. For your convenience, it currently functions
as a shortcut to the Messier Catalog.
Congratulations! You have received a newly upgraded NexStar+ hand control with your telescope.
1
9
8
13
4
12
2
3
4
5
6
7
15
14
11
10