TAMKO TAM-RAIL User Manual
Page 11
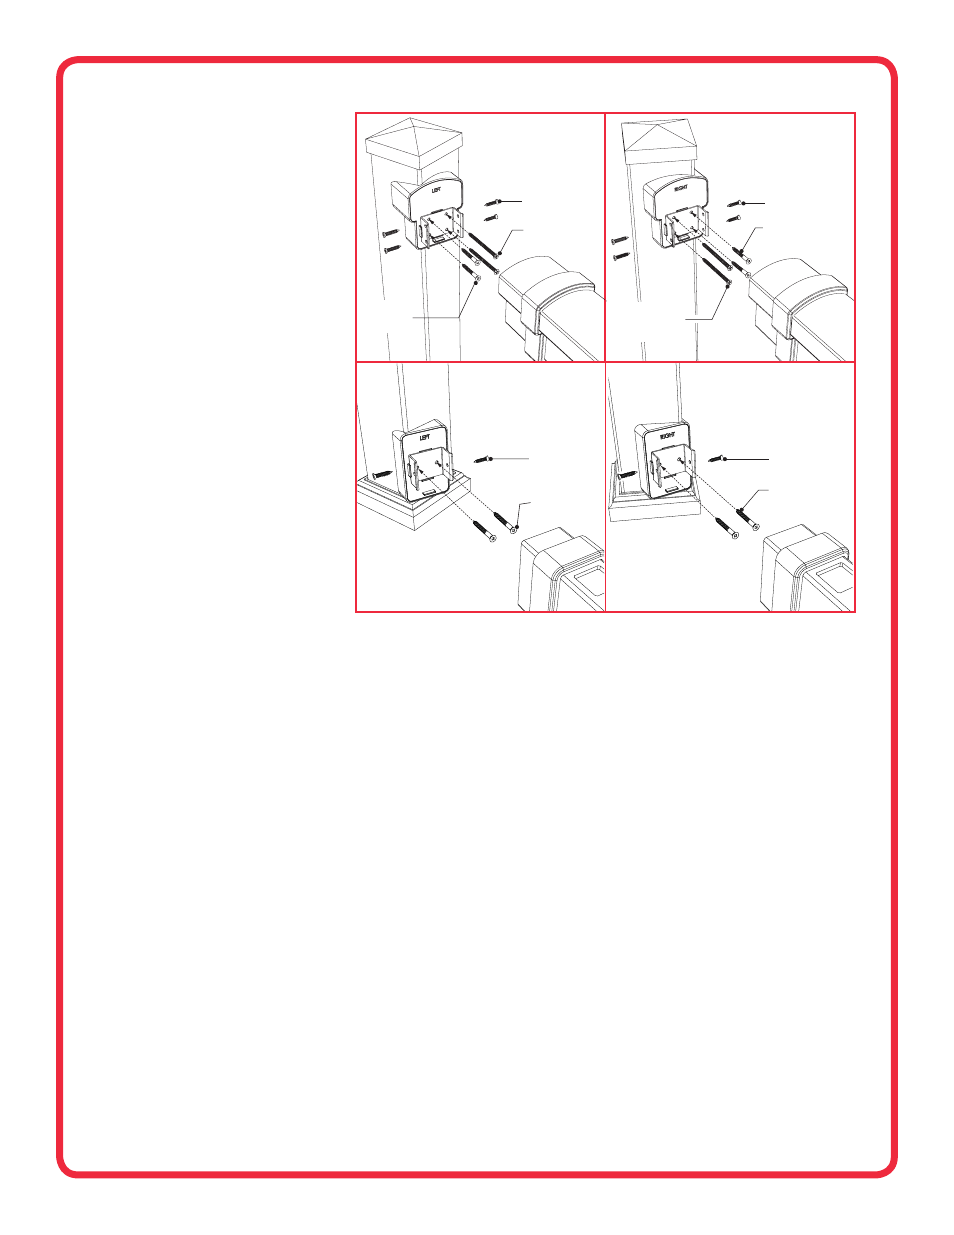
#10 × 1-3/4" SCREW
#10 × 3"
SELF-DRILLING
SCREW
#10 × 1" SCREW
#10 X 1-3/4" SCREW
#10 X 1" SCREW
InstallatIon InstrUCtIons For
Post moUnt aPPlICatIons
1. Install and prepare all mounting surfaces and
posts to which the TAM‑RAIL Railing will be
installed. Ensure the mounting surface is level and
plumb.
2. Measure and mark post 6" above the deck surface.
3. Position the bottom rail angle adapter on the post
so that the top of the adapter is 6" above the
deck surface. Place the bottom rail metal bracket
(marked “B”) included in TAM‑RAIL railing kits
onto the face of the bottom rail angle adapter.
Note: These installation instructions provide a 2"
clearance between your deck surface and bottom
rail.
Be sure to check with your local building
code officials for any bottom rail clearance or
rail height requirements. Improper rail height
and clearance can create a safety hazard.
4. Install the bottom rail metal bracket and angle
adapter to the post using two of the supplied
1‑3/4" screws. Ensure angle adapters are installed
evenly and flush to post corners.
5. For 36" height rail systems, measure 36‑1/2"
above the deck surface and mark post. For 42"
height rail systems, measure 42‑1/2" above the top
of the deck surface and mark post.
6. Position the top rail angle adapter on the post
so that the top of the adapter is aligned with the
mark. Place the top rail metal bracket (marked “T”)
included in TAM‑RAIL railing kit onto the face of
the top rail angle adapter.
7. Install the top rail metal bracket and angle adapter
to the post as illustrated and according to these
instructions:
a. When installing a
“LEFT” top rail angle adapter, install two of the supplied 1‑3/4" screws through the left‑side holes of the metal bracket and angle
adapter. Install two of the supplied 3" self‑drilling screws through the right‑side holes and into the metal post.
b. When installing a
“RIGHT” top rail angle adapter, install two of the supplied 1‑3/4" screws through the right‑side holes of the metal bracket and angle
adapter. Install two of the supplied 3" self‑drilling screws through the left‑side holes and into the metal post.
#10 × 3"
SELF DRILLING
SCREW
#10 × 1-3/4"
SCREW
#10 × 1" SCREW
#10 X 1-3/4"
SCREW
#10 X 1" SCREW
InstrUCtIons For InstallIng straIght raIl KIts
BEtWEEn a Post WIth PrE-InstallED anglE aDaPtErs anD a
Flat Post sUrFaCE:
1. Use the bracket placement template included in the TAM‑RAIL Straight Rail
Kits to position the top and bottom metal brackets on the flat post surface.
2. Secure the metal brackets to the flat post surface using six screws,
affixing four on top and two on the bottom. Use the 2" screws included
in the TAM‑RAIL Straight Rail Kits for mounting to a wood post, or the
1" screws included in TAM‑RAIL Post Mount Kit when mounting to the
TAM‑RAIL Post Mount System.
3. Measure the opening between the bottom rail metal brackets. Mark the
length on the bottom rail, ensuring that the balusters will be evenly spaced.
IMPORTANT: A minimum of 1‑7/8" rail length is required from the end of
rail to first baluster on both ends of the rail. Check end spacing and shift
the position of the rail before cutting if required.
Ensure that the gap
between posts and balusters will not exceed 4".
4. When marked properly cut the bottom rail.
Refer back to the TAM‑RAIL Straight Rail Installation Instructions for
installing TAM‑RAIL Straight Rail Kits.
InstrUCtIons For InstallIng straIght raIl KIts BEtWEEn
Posts WIth PrE-InstallED anglE aDaPtErs:
1. Measure opening between the bottom rail metal brackets. Mark the
length on the bottom rail, ensuring that the balusters will be evenly spaced
between posts.
IMPORTANT: A minimum of 1‑7/8" rail length is required from the end of
rail to first baluster on both ends of the rail. Check end spacing and shift
the position of the rail before cutting if required.
Ensure that the gap
between posts and balusters will not exceed 4".
2. When marked properly cut the bottom rail.
Refer back to the TAM‑RAIL Straight Rail Installation Instructions for
installing TAM‑RAIL Straight Rail Kits.
CONTINUED
11
BOTTOM RAIL METAL BRACKET
AND ANGLE ADAPTER
POST MOUNT APPLICATION
TOP RAIL METAL BRACKET & ANGLE ADAPTER
POST MOUNT APPLICATION
TOP RAIL METAL BRACKET & ANGLE ADAPTER
POST MOUNT APPLICATION
BOTTOM RAIL METAL BRACKET
AND ANGLE ADAPTER
POST MOUNT APPLICATION