User operation guide – ABtUS AB21234458 User Manual
Page 3
STEP 1: DETERMINING THE LOCATION, SIZE AND
DIMENSIONS OF THE SCREEN
User Operation Guide
The big advantage of ABtUS compared to a traditional projection screen is that you can now
determine exactly the right format for your projection screen. The measurements of the dark
magnetic border around your screen are determined by the length of the dark magnetic border
that comes with the paint system. This so-called MagneBorder is 10 meters long. This means
the following for the maximum size of your screen:
Screen dimensions:
Maximum screen size in cm (inch):
1 : 1
2.35 x 2.35 m / 93" x 93"
4 : 3 (= 1.33 : 1 + PAL / NTSC Video)
2.68 x 2.01 m / 106" x 79"
16 : 9 (= 1.78:1 = and Widescreen HDTV)
2.99 x 1.68 m / 118" x 66"
1.85 : 1 (Letterbox Video)
3.06 x 1.65 m / 121" x 65"
2.35 : 1 (Anamorphic)
3.30 x 1.40 m / 130" x 55"
1: Install the projector in its set location, according to the
instructions provided with the projector
2: Turn the projector on and project an image on the wall
(see illustration)
3: Select the desired dimensions on the projector (1:1, 4:3, 16:9, etc)
(see illustration)
6: To check the format of your screen, project an image from a TV channel and from a DVD
player onto the wall. While it is playing, make sure that the screen format remains the same.
Adjust the screen format as needed to fit the actual playing format.
4: Use the zoom function to determine the exact size of the screen
that you prefer. Check that the image does not extend past the
maximum dimensions given above.
5: Adjust the image until it is sharply in focus. Make the screen
exactly level using the keystone function of your projector. Now
you have determined the correct format of your screen. The next
important step is the final check.
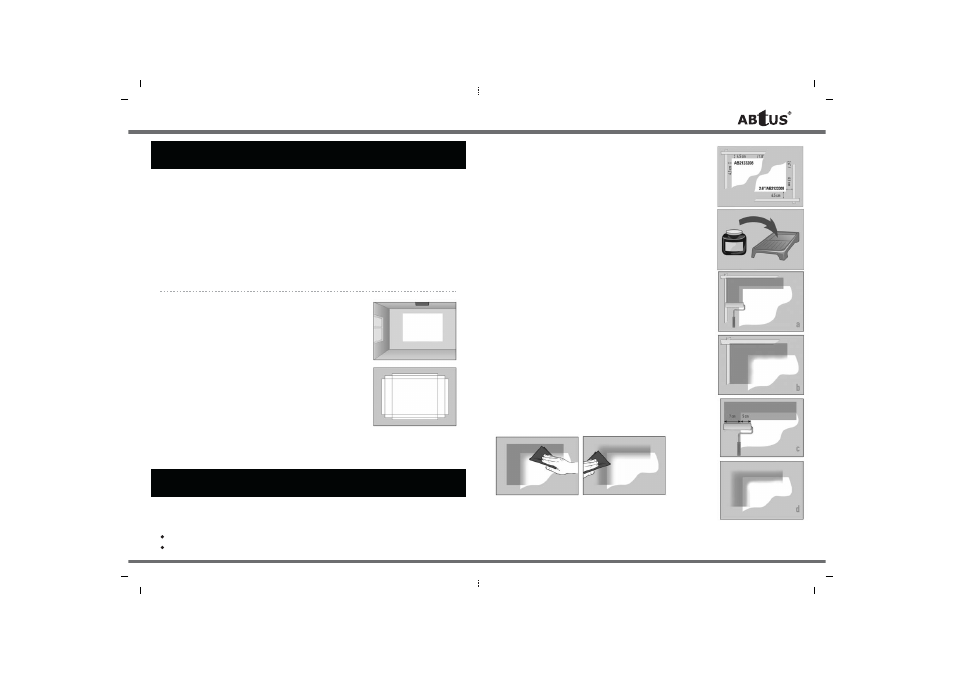
STEP 2: APPLYING THE MAGNETIC LAYER OF PAINT
(MagneCoat)
1: Cover the floor before you begin painting (carpet, parquet, etc.) to prevent damage.
2: -If you have the AB2123208, continue with step 3
-If you have the AB2123308, choose one of the following:
I want to paint one (or more) screens, but not the entire wall: continue with step 3
I want to paint my entire wall: continue with step 5
3: The projector is on so you can see the exact edge of the projection format.
Stick the yellow colored tape on the wall about 4.5 cm away from the
outside of the screen format (if you have the AB2123208 product) or exactly
6,5 cm (if you have the AB2123308 product). (See illustration). Turn the
projector off.
4: Stir the MagneCoat using the smallest stir stick for at least 3 minutes
until it is well mixed. Pour the MagneCoat into the roller pan
(see illustration). Attach the smallest roller cover (12 cm) to the roller and
use this to apply a thin layer of MagneCoat inside the yellow tape. The
band will be about 10-12 cm wide. This ensures that it covers not just the
4.5 cm / 6,5 gap, but also a few centimeters/inches inside the screen area
(see illustration a). That is the intention. That means that you can later
adjust the MagneBorder so that it always encloses the actual projected
image. Important: Make sure that no edges are created by a thick layer of paint!!!
Apply the MagneCoat so that it is smoothly distributed towards the center
of the screen. (See illustration b) Continue with step 6.
5: The projector is on so you can see the exact edge of the projection format.
Stir the MagneCoat paint with the smallest stir stick for at least 3 minutes
and then pour it in the roller pan. Attach the smallest roller cover (12 cm)
to the roller and use this to apply a thin layer of MagneCoat. The band will
be about 12 cm wide. This means that you will paint about 5 cm inside and
7 cm outside the screen area (see illustration c). This is the intention.
That means that you can later adjust the MagneBorder so that it always
encloses the actual projected image. Important: Make sure that no edges
are created by a thick layer of paint!!! Apply the MagneCoat so that it is
smoothly distributed towards the center of the screen. (see illustration d).
6: Let the MagneCoat dry for at least 45 minutes. Then apply a second layer
of MagneCoat on top of the first layer. Let this layer also dry for at least
45 minutes. Afterwards, clean all of the paint out of the roller pan.
7: When appropriate, carefully remove the yellow tape
8: Very important! - sand the inside and outside edges of the magnetic layer
lightly with sandpaper. (see illustration). Why is this so important? If you
do not sand the edges of the area off, you may see these edges on your
projection screen!
9: Turn the projector off.
**Specification are subjected to changes without notice...for detail and updated information please visit www.abtussinagpore.com
05
04
Important: Make sure that absolutely no residue of paint remains in the
roller pan!!! Paint particles can cause problems in applying the basis paint
layer (BaseCoat)! Dispose of the small roller cover and clean the roller
thoroughly. (While waiting for the MagnetCoat to dry you can determine
the contrast of the BaseCoat. See the next chapter: step 3.1).