Front panel – Alto Professional RMX1008DFX User Manual
Page 3
3
18
FRONT PANEL
1.
MIC/LINE MONO INPUTS – Connect a microphone or line level instrument to
these inputs using standard XLR or ¼” cable.
2.
MIC/LINE STEREO INPUTS- These XLR and ¼” TRS connections are organized
in stereo pairs. If you connect only the left jack, the input will operate in mono
mode, (the mono signal will appear on both input channels). You can use these
inputs with a stereo keyboard, drum machine, etc.
3.
LEVEL – Adjusts the channel audio level (pre-fader and pre-EQ gain). Adjust this
so that the PEAK LED rarely lights up during the loudest parts of the song.
4.
CHANNEL BAL – Adjusts the channel's position in the stereo field.
5.
AUX 1 Pre – This adjusts the prefader signal sent to the Monitor output and is
controllable using the Monitor Level knob. To use an external effects rack unit,
compressor, etc. with the mixer, you can use a Y-cable to connect the AUX out to
the input of your external device, and then connect the outputs of the device to the
Stereo Return of the amp.
6.
AUX 2/FX Post- This adjusts the post fader signal which is sent through the AUX
OUT and is controllable with the DSP knobs to route the signal to the MON or
MAIN outputs. You can use a 1/4" TRS cable to connect the AUX OUT to the input
of an external amplifier or active monitor to create a custom mix for onstage
musicians with the mixer’s internal effects.
7-9.
EQUALIZATION- You have three EQ controls for each mono and stereo input
channel each providing +/-15 dB of boost and cut. The signal will be unaffected
when the controls on the center position. You may use an external equalizer to
make up a mix properly but a master equalizer will not
have effect on a single channel and you may overload the signal easily. Individual
EQ will give you a much better control on single tracks.
7.
HI EQ (TREBLE) – Adjusts the high (treble) frequencies of the channel.
8.
MID EQ – Adjusts the mid-range frequencies of the channel.
9.
LOW EQ (BASS) – Adjusts the low (bass) frequencies of the channel.
10.
-20dB PAD- Pressing this button will attenuate the input signal by 20 dB. This will
give increased headroom and reduce the risk of distortion from input signal peaks.
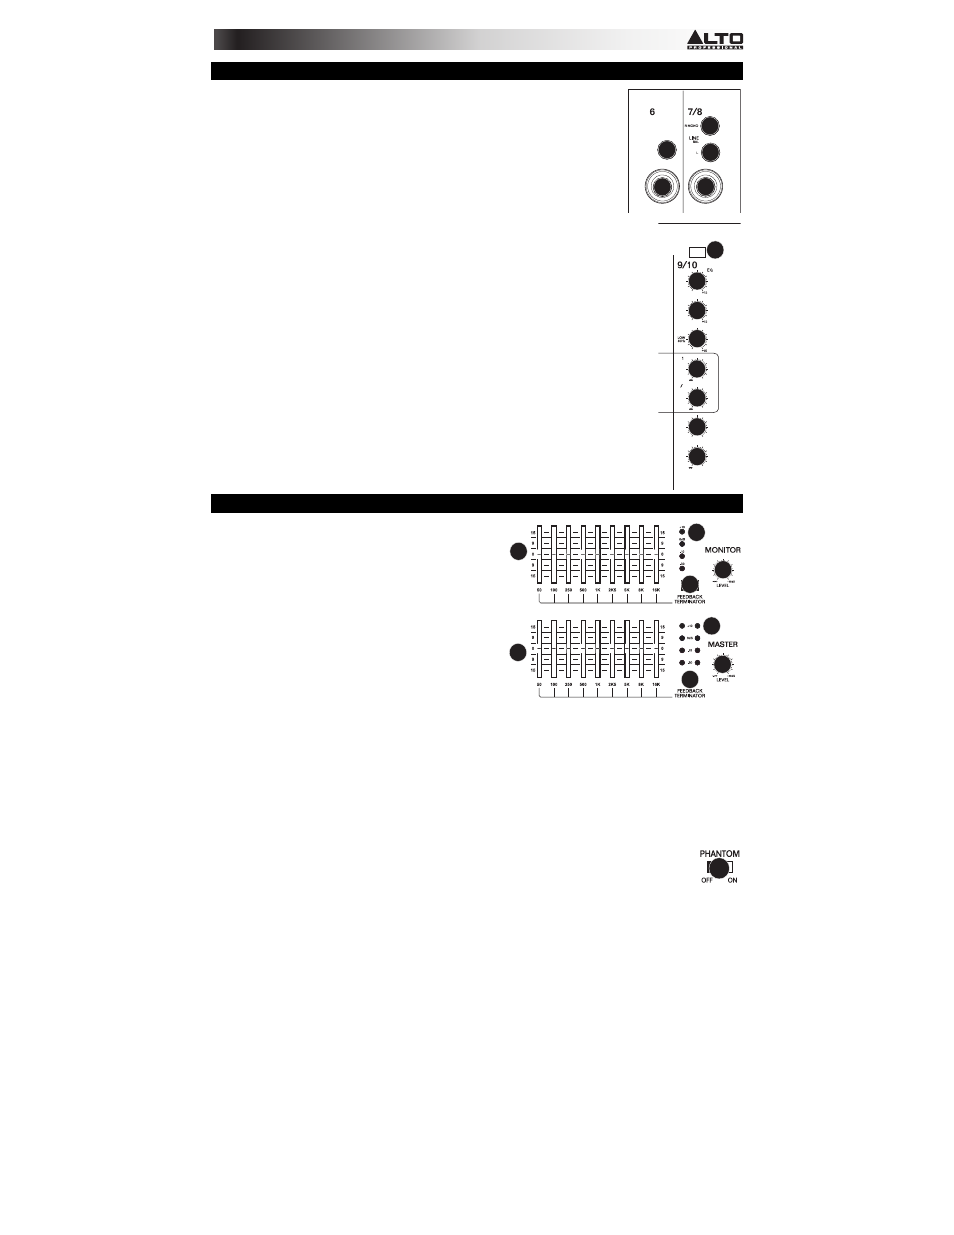
MASTER SECTION
11.
STEREO GRAPHIC EQ: There are two graphic EQs
each with 9 adjustable bands; one is for the MAIN mix
and the other is for the MONITOR mix. With the faders
you can boost or cut the selected frequency by +/-15 dB
at the indicated frequencies. When all faders are at the
center position, the equalizer is disabled.
12.
FEEDBACK TERMINATOR Button (MONITOR mix) -
This button activates the feedback detection in the
monitor signal path. Feedback will be identified at a
certain frequency when the corresponding fader LED
lights up. Feedback produces an unpleasant speaker
"howling" or "whistling". In order to eliminate feedback,
turn down the corresponding fader until feedback
disappears.
13.
MONITOR LEVEL LED Display- This LED display will
show you the monitor output level. Make sure that the +10 LED only lights up occasionally. The optimal level is
between -10 and 0 on the LED. If only the -30 LED lights up or does not come on, your S/N ratio will be
degraded.
14.
FEEDBACK TERMINATOR Button (MAIN mix)- This button activates the feedback detection function in the
Main mix signal path. Feedback will be identified at a certain frequency when the corresponding fader LED
lights up. Feedback produces an unpleasant speaker "howling" or "whistling". In order to eliminate feedback,
turn down the corresponding fader until feedback disappears.
15.
MAIN MIX LEVEL LED Display- This LED display will show you the Main mix output level. Make sure that the
+10 LED only lights up occasionally. The optimal level is between -10 and 0 on the LED. If only the -30 LED
lights up or does not come on your S/N ratio will be degraded.
16.
MONITOR LEVEL – This adjusts the volume of the Monitor output.
17.
MASTER LEVEL- This adjusts the overall volume of the MAIN output and HEADPHONE out.
18.
PHANTOM POWER – This switch activates and deactivates phantom power. When activated,
phantom power supplies +48V to the XLR mic inputs and the LED above the switch will be lit.
Please note that most dynamic microphones do not require phantom power, while most condenser
microphones do. Consult your microphone’s documentation to find out whether it needs phantom
power.
11
11
12
13
14
15
16
17
HI
HI
12kHz
12kHz
-15
MID
MID
2.5kHz
2.5kHz
-15
-15
PRE
PRE
AUX
AUX
SEND
SEND
+10dB
-
2 F X
POST
POST
-
+10dB
LEVEL
LEVEL
-
+10dB
-20dB PAD
-20dB PAD
LEFT
LEFT
RIGHT
RIGHT
BAL
BAL
10
7
8
9
5
6
4
3
LEVEL
LEVEL
LINE
LINE
BAL
BAL
MIC
MIC
BAL
BAL
MIC
MIC
BAL
BAL
LEVEL
LEVEL
1
NEW
1
NEW
1
1
1
2
2