Atlona AT LINE PRO4 User Manual
Page 5
www.atlona.com | toll free:
1-877-536-3976
For International: 1-
408-962-0515
5
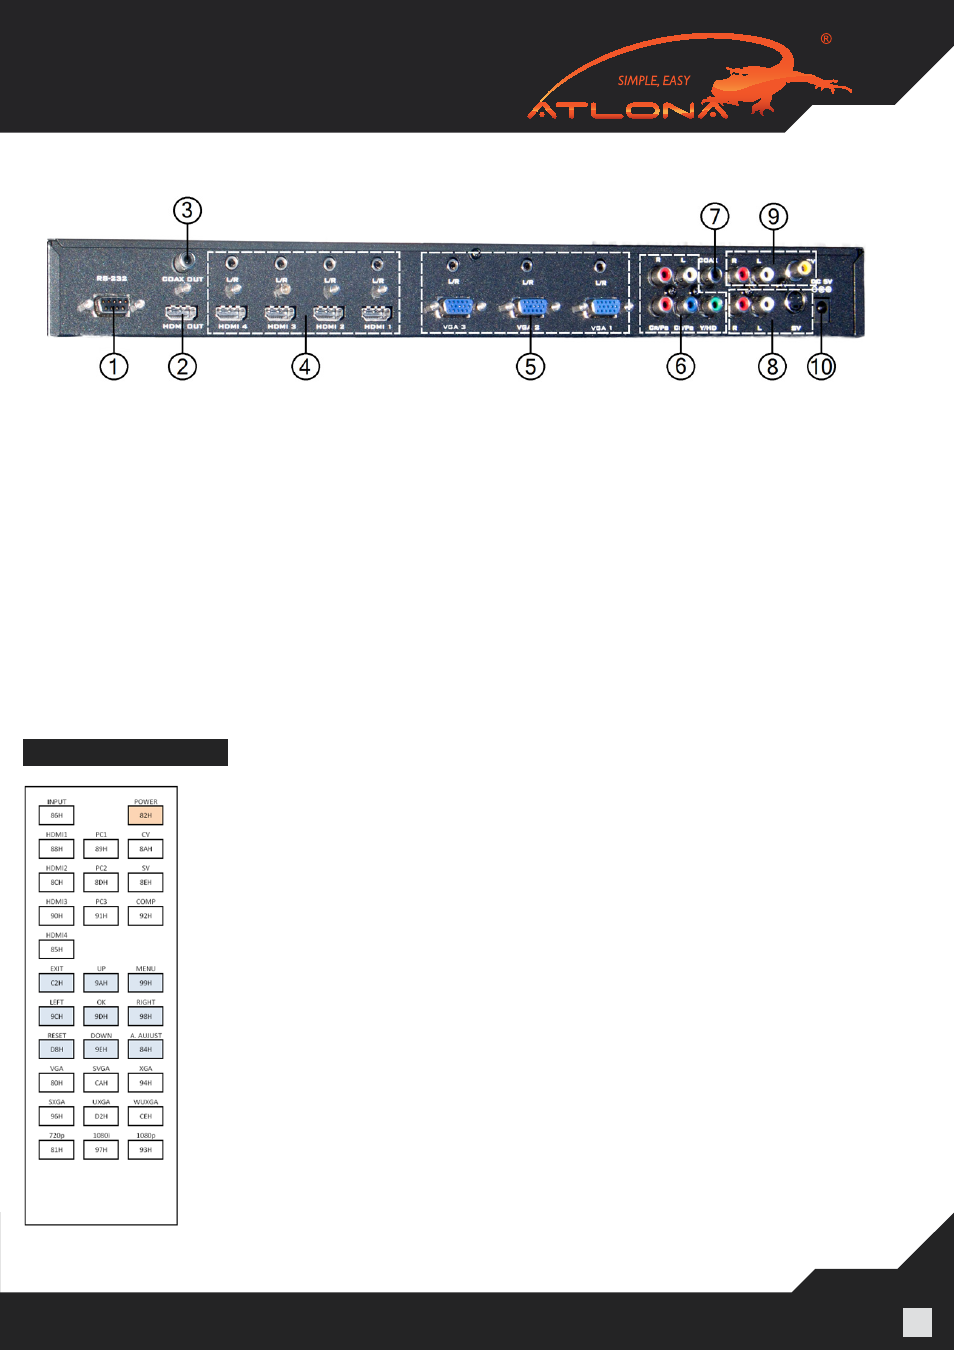
5.2. Rear Panel
1. RS-232: This port is to connect to a PC for firmware updates or a control system.
2. HDMI OUT: This port is to connect to HD Display or Projector for displaying the output signal. The DVI/HDMI
adapter can be used if the display has DVI input.
3. COAX OUT: This port is to send audio signal to a separate AV Receiver. The audio will still be present on the
HDMI Output.
4. HDMI IN 1~4 & L/R: These ports are to connect input sources such as Blu-ray players, Cable Boxes,
Computers with HDMI or DVI outputs. If user has a DVI source, the 3.5mm audio input will allow to embed
audio.
5. VGA IN 1~3 & L/R: These ports are used to connect to Computers or any other sources with VGA ports to
LINE-PRO4, while 3.5mm stereo audio inputs are used to embed audio.
6. Y/HD, CR/PB, CB/PB & L/R: These ports are to connect component video sources.
7. COAX: This port is to embed digital audio signal from any source.
8. SV & L/R: These ports are to connect S-Video source.
9. CV & L/R: These ports are to connect to composite source.
10. DC 5V
REMOTE CONTROL
• POWER: Press the button to power ON the LINE-PRO4. Press again to enter
into standby mode.
• INPUT: Press the button repeatedly to cycle through the various input sources.
Or use separate buttons for exact input selections.
• CV INPUT: Press this button to select Composite Video input directly.
• PC1, 2, 3 INPUTS: Press these buttons to select VGA 1, VGA 2, VGA 3 inputs.
• HDMI 1, HDMI 2, HDMI 3, HDMI 4 INPUTS: Press these buttons to select
HDMI 1, HDMI 2, HDMI 3, HDMI 4 inputs.
• OUTPUT RESOLUTION: Press any one of the buttons to select the output
resolution. For other output resolutions that are not covered by these buttons,
please enter into On-Screen-Display menu to select.
• MENU: Press this button to bring up On-Screen-Display main menu page.
• EXIT: Press this button to exit from a menu.
• UP/DOWN/LEFT/RIGHT: Press the Up/Down buttons to move the highlighted
bar to your desired parameter during the On-Screen-Display operation. Press
the Left/ Right buttons to increase/decrease the setting value of a selected
parameter.
• OK (Enter): Press this button to confirm your selection.
• RESET: Press this button to reset the unit’s settings to the factory default value.
• AUTO ADJUST: Press this button to optimize the position of the picture (picture
centering) on the screen.