包裝零件 包裝零件 enclosed parts 同梱部品及びアクセサリ 同梱部品及びアクセサリ – Aavara EL2010 User Manual
Page 4
Warning
包裝零件
包裝零件
Enclosed Parts
同梱部品及びアクセサリ
同梱部品及びアクセサリ
由於面板顯示器後殼壁掛螺絲孔規格不同,安裝前必須先確認本配件包所附的螺絲(E)
規格及長度,是否㊜用你所要安裝的面板顯示器,若㈲問題請與你的經銷商聯絡。
Various displays have different screw hole specifications. Please check that the
Screws (E) fits the specifications for the display to be mounted. Please contact your
dealer with any questions.
パネルディスプレイ背面ケースの壁掛けネジの規格は不同ですので、取付け前に必ず本部
品梱包に入っているネジ
(E)規格及び長さが取付けるパネルディスプレイに適用するか否か
を確認してください。問題が有る時は、お買い求めになった販売店に問合せください。
安裝步驟及方式
安裝步驟及方式
Installation Process
取付けステップ及び方式
取付けステップ及び方式
1
將壁掛架本體固定於牆㆖
Fix the Wall mount bracket to the wal
壁掛けブラケット本体を壁に固定します
壁掛けブラケット本体を壁に固定します
安裝前請先了解您要安裝位置的牆壁種類: 磚塊牆、㈬泥牆或㈭頭牆。
㊟意:如果安裝在磚塊牆時,不可將螺絲(C)鎖固於磚堆與磚堆之間的間隙。
如果安裝在㈭頭牆時,不可將螺絲(C)鎖固於裝飾的柱子或石膏板㆖。
決定您要在牆壁㆖的安裝位置,將壁掛架本體(A)靠著牆壁,使用㈬平儀校正
㈬平,然後使用鉛筆在壁掛架本體㆖的橢圓孔作記號。
Identify the wall type before installation: masonry wall, cement wall or stud
wall.
Note: For installation onto a masonry wall, avoid applying the lag bolt (C) at the gap
between bricks.
For installation on a stud wall, avoid applying the lag bolt (C) to a decorative
column or a gypsum board.
Identify the installation position, lean the Wall mount bracket (A) to the wall
and level it with a leveling device; mark, with a pencil, the oval holes of the
Wall mount bracket to the wall.
取付け前に取付け位置の壁の種類をチェックしてください:レンガ壁・セメント壁或
は木板壁。
注意:
注意:レンガ壁に取付ける時は、ネジ
(C)をレンガとレンガの間の間隙に固定しないでください。
木板壁に取付ける時は、ネジ
(C)を飾りのある柱或は石膏板上に固定しないでください。
壁の取付け位置を決定した時は、壁掛けブラケット本体
(A)を壁に寄り掛け、水平
儀を使用して水平を校正した後、鉛筆を使用して壁掛けブラケット本体上の楕円孔
に記号を付します。
1-1
1-2
1-1
1-2
1-1
1-2
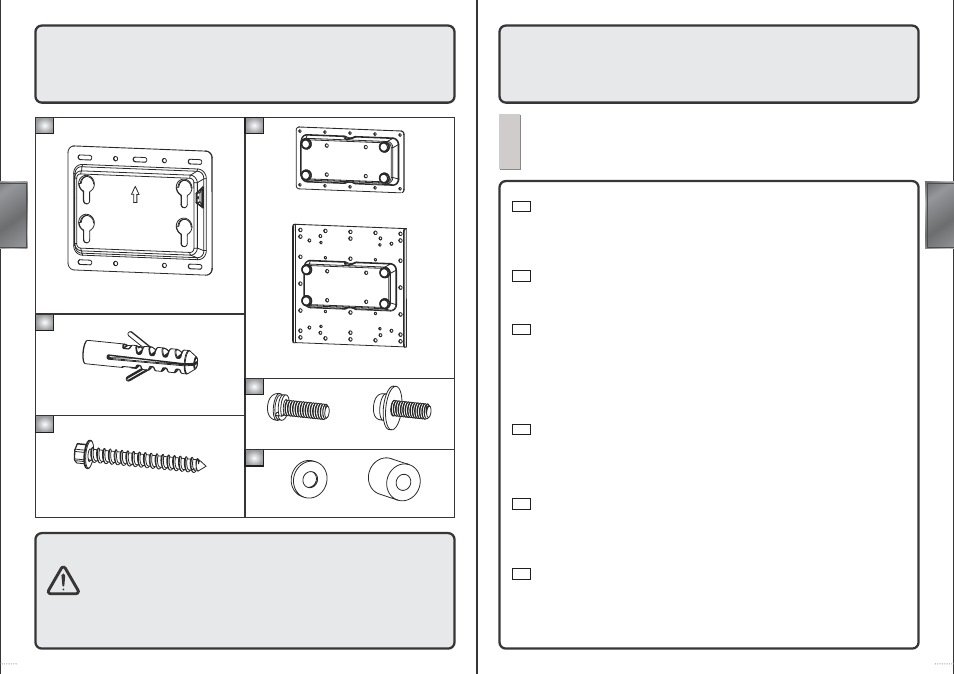
A
D
B
E
C
F
Wall mount bracket --- 1 pcs
Plastic Plug --- 5 pcs
Lag Bolt --- 5 pcs
Display bracket --- 1 pcs
Screw for display housing
Plastic Washer
or
or
or
㆗文
ENG
日本語
日本語
㆗文
ENG
日本語
日本語
8
7