Transporting the unit general maintenance – Pengo OMA-250H User Manual
Page 9
12
OMA-250H
(135473.indd)
(135473.indd)
OMA-250H
9
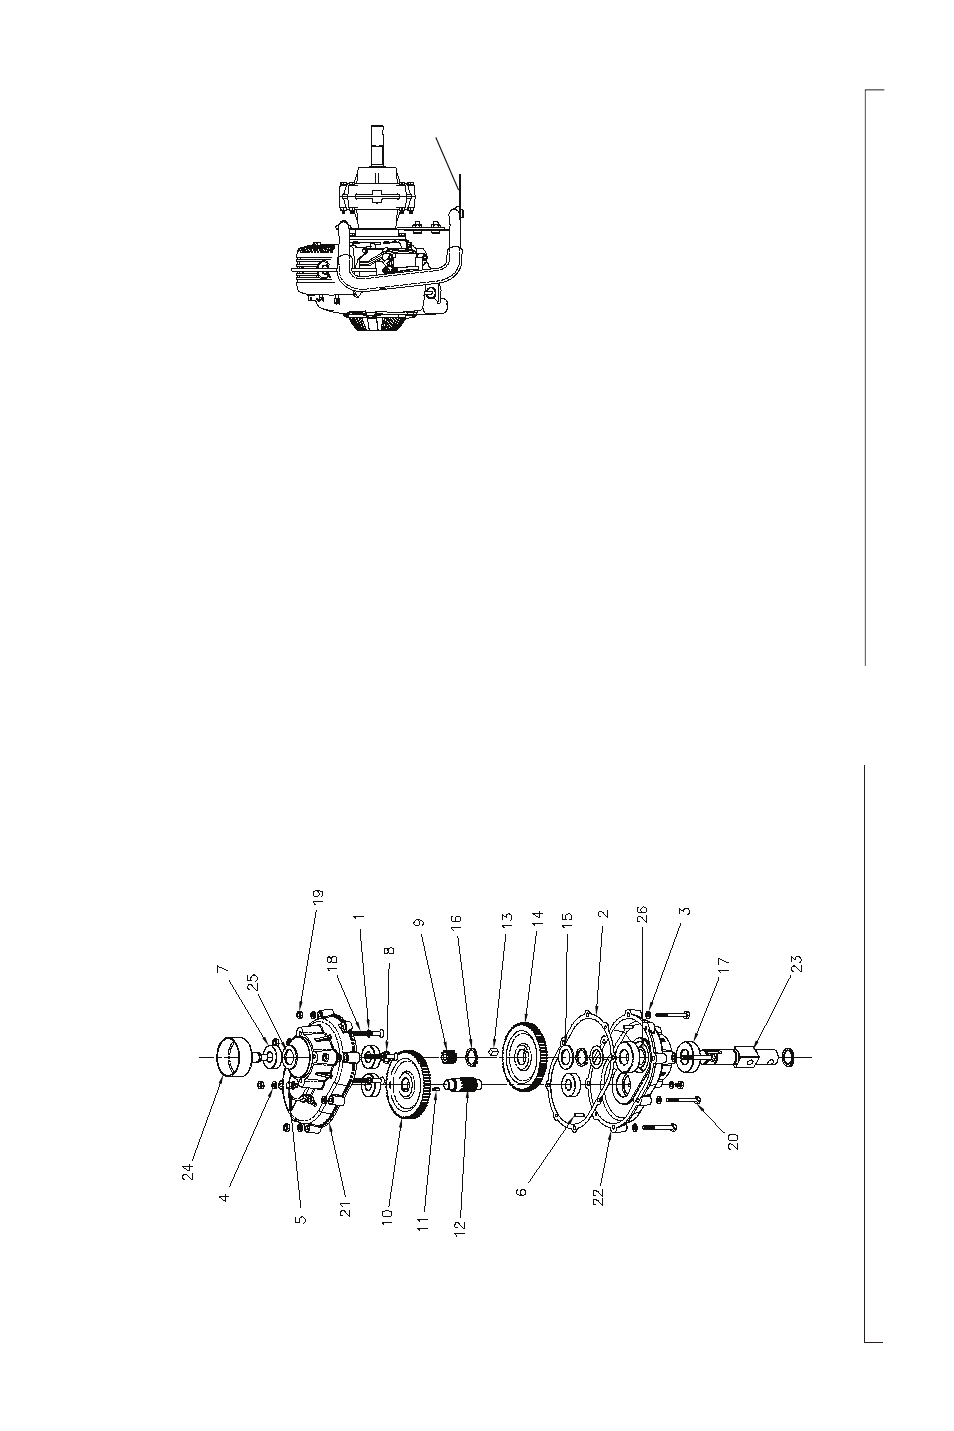
OMA-250H GEARBOX P
ARTS BREAKDOWN (260039)
When transporting the power head unit in or on a motor
vehicle, the unit must be placed as directed by
fi gure
5.
T
urn the gas supply switch to the closed position. If the
unit it not transported in the appropriate manner dif
fi culty
starting the engine and possible engine damage may
occur
.
The fuel cap must also be tight to eliminate the ac-
cidental spillage of fuel. In order to minimize any possible
damage to the unit transport the unit to the job site with the
auger bit disconnected from the unit.
All equipment must
be secured with suitable strapping or tie-downs.
A
LWA
Y
S
TRANSPORT THE UNIT IN
AN UPRIGHT POSITION OR
ON THE RESTING PLA
TE
AS SHOWN IN FIGURE 5.
TIPS FOR DRILLING - CONTINUED
It is a misconception that a larger diameter hole can be obtained by
fi rst drilling with a smaller (pilot) auger and then with
a larger diameter auger “ream” the hole to the desired size.
This method does not allow the auger to produce suf
fi cient
directional stability for the larger diameter auger during the “reaming” process.
This method can also result in damage
to both the auger and the power head unit.
Keep the auger bit in good repair
. Change the auger
’s
teeth and pilot bit to keep them sharp and avoid wear into the
tooth holder
. See your
Authorized Dealer for a complete line of auger bits and specialty teeth for use in dif
fi cult or high
wear drilling applications.
Figure 5
Resting Plate
Good maintenance is your responsibility
. Poor maintenance is an invitation to trouble.
Always use proper tools or equipment when conducting maintenance. Where replacement parts are necessary for
periodic maintenance and servicing, genuine factory replacement parts must be used to restore your attachment to
original speci
fi cations. Manufacturer will not claim responsibility for use of unapproved parts or accessories and other
damages as a result of their use. If equipment has been altered in any way from its original design, manufacturer does
not accept any liability for injury or warranty
.
CHANGING THE TRANSMISSION GREASE
Type of grease:
High temperature transmission grease classi
fi ed for extreme pressure applications.
Amount required:
6 oz (0.2 liters)
1. Change the grease every 25 hours of normal operation. Change the grease every 15 hours of operation in extremely
dusty or dirty conditions.
2. Drain the gasoline from the fuel tank into an approved container
.
3. Position the unit on a suitable work surface with the operator handle level with the surface. Wipe any dust or dirt from
the area where the gearbox separates.
4. Separate the gearbox by removing the hardware and prying the two halves apart. Use caution during separation to not
damage the dowel pins or the gasket. Remove the gasket and primary gear assembly
.
5. Clean the interior of the gearbox with an approved solvent.
TRANSPORTING THE UNIT
GENERAL
MAINTENANCE
135473-OMA.indd, Spread 9 of 10 - P
ages (12, 9) 1/9/2007 2:50 PM