TabletKiosk MediSlate MCA i1040XT User Manual
Page 3
IMPORTANT: You should allow the batteries to
charge fully before disconnecting the MediSlate
MCA and running it on battery power for the
first time. Optimal recommended charging
before first use is 12 hours. Afterward, typical
charging time is 2 - 3 hours per battery pack.
NOTE: When you first connect the MediSlate
MCA into an external power source, or the
docking station when it is plugged into an
external power source, the battery charge
indicators on the MediSlate MCA will begin
to glow red. Once battery capacity has
exceeded 10%, the indicators will change to
orange. When each battery is fully charged,
its respective indicator will turn green. When
disconnected from a power source, the battery
lights will shut off. If the indicators begin to
flash orange, that signals that the battery OTP
(over temperature protection) has activated
and you should immediately disconnect the
power, turn off the system and allow the
batteries to cool down.
Step 3: Attach a USB keyboard and any additional peripherals to the Docking Station
Plug a USB keyboard into any of the USB ports that are on either side of the docking station.
If you plan on utilizing the dock’s Ethernet port for a wired LAN, you can plug it in now. Also,
attach any other peripherals you wish to use with the dock (mouse, optical drive, etc.)
Step 4: Power on the MediSlate MCA
Locate the power ( ) button near the top of the control panel on the front of the MediSlate.
Press it until it emits a green glow (about 1second) and then release it. The MediSlate MCA will
now boot up.
Step 5: Complete the Operating System Installation
When your system powers on for the first time, you might need to wait for Windows to
configure your machine for set-up (Windows Vista only). This can take a few minutes, so be
patient. After it finishes, your system will restart and you will be prompted to accept the
licensing terms.
Windows (all versions) will then have a few questions for you to answer in order to localize
and finish your installation. Refer to your operating system’s manual for information on any of
the questions you are unsure how to answer. When done, you will be taken to the Windows
desktop (Windows Vista will first measure your system’s performance).
Step 6: Using the Stylus Pen and the Touch Screen
Unlike a standard laptop or desktop PC, navigating the operating system’s user interface on
the MediSlate MCA is performed using the stylus pen, or even your fingers.
NOTE: To place the stylus in its holder, press until it clicks into place. To remove the stylus, press down on
one end, grab the other end, and pull it away from the back of the MediSlate MCA.
Navigating with a touch screen is different from navigating with a mouse. Hold the stylus
pen as if you were writing with a standard pen. Instead of sliding the pen around the screen,
just tap on what you want to interact with. Sliding the pen while lightly touching the tip to
the screen will move the on-screen pointer around as if you were using a mouse and holding
down the left mouse button. In other words, you would be performing what is known as a
drag operation. Also, remember that since the screen is sensitive to the touch, resting your
hand on the screen while using the pen might make the pointer react unpredictably.
TIP: When trying to select or activate something on the screen with the stylus pen, pay attention to the
position of the pointer icon on the screen instead of the tip of the pen.
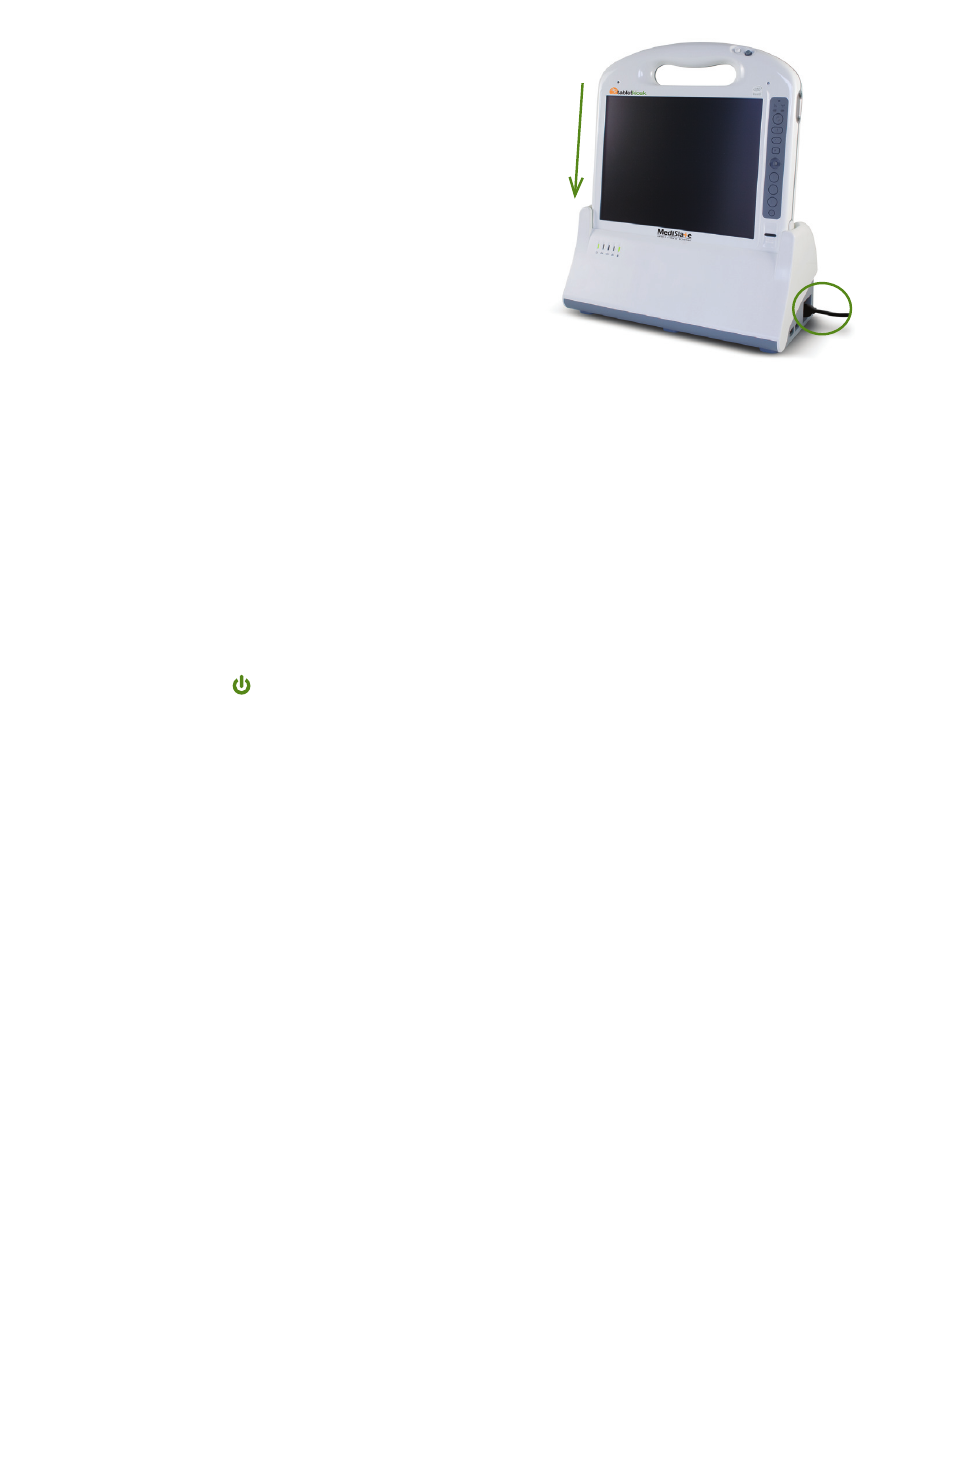
Slide the MediSlate into the docking slot and press down carefully until
you hear the electronic lock engage.
To disengage the electronic lock in order to remove the MediSlate MCA
from the docking station, press the FN button and then press the Enter
button on the D-pad.
Power cord