Rear panel – Blackstar Blackfire 200 User Manual
Page 9
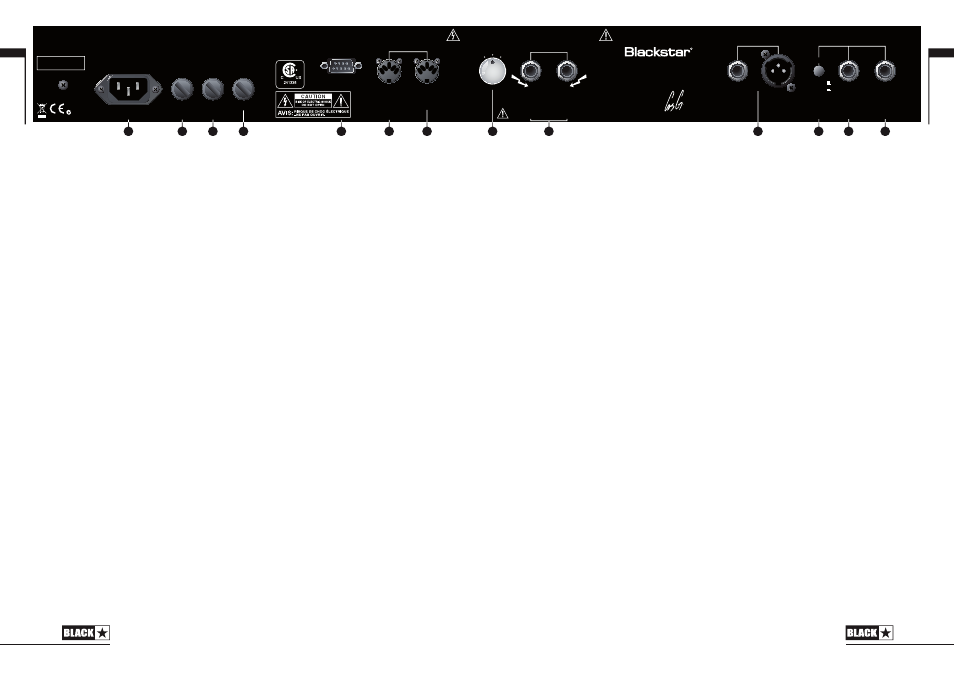
Rear Panel
1. Mains Input
The supplied detachable mains lead is connected here. The lead should only
be connected to a power outlet that is compatible with the voltage, power and
frequency requirements stated on the rear panel. If in doubt get advice from a
qualified technician.
2. Mains Fuse
The value of the Mains Fuse is specified on the rear panel. Never use a fuse of the
incorrect value or attempt to bypass it.
3. H.T. Fuse
The value of the H.T. Fuse is specified on the rear panel. Never use a fuse of the
incorrect value or attempt to bypass it.
4. Output Valves Fuse
The value of the Output Valves Fuse is specified on the rear panel. Never use a fuse
of the incorrect value or attempt to bypass it.
5. Footswitch
The supplied footswitch is connected here. The footswitch enables you to switch
between the Clean, Crunch, Fire and Fury channels.
6. MIDI Thru
Any MIDI data received at the MIDI In socket is passed out of the MIDI Thru socket
so that other MIDI devices can be placed in a chain. The MIDI Thru socket also
serves as a way of dumping Channel Select/Program Change data to a suitable
MIDI storage device. Refer to the MIDI Channel Switching section for more details.
Always use a good quality MIDI lead.
7. MIDI In
If channel switching using MIDI is required, connect the MIDI device here. Refer
to the MIDI Channel Switching section for more details. Always use a good quality
MIDI lead.
17
MIDI Dump Out
You may wish to back up the MIDI channel select settings so you can transfer them
to another amplifier, for example. To do this you will need a MIDI Sysex librarian,
which is usually a piece of software running on a PC or MAC with a suitable MIDI
interface.
1. The unit must be in standby (Power (34) on and Standby (33) off), with no
lead connected to the Input jack and the MIDI Thru on the rear of the amplifier
connected to the MIDI In of the recording device.
2. Simultaneously press and hold the Crunch (8) and FURY (21) Select switches.
After 2 seconds the LED for FIRE (16) will flash continuously to indicate that the
unit is in MIDI Dump Mode.
3. Prepare the receiving equipment for the transfer. For example, if using a MIDI
Sysex librarian this must be put into file receive mode.
4. Start the file transfer by pressing and quickly releasing the FIRE (17) Select
switch. During the file transfer the FIRE (16) Select LED will flash quickly. When
the flashing stops the transfer operation is complete and the amplifier will revert
to normal operation. The file should be saved as a MIDI System Exclusive file.
MIDI Dump In
To load in previously saved Program Change assignments:
1. Connect the MIDI Out of the MIDI recording device to the MIDI In on the rear of
the amplifier and use the MIDI Sysex librarian to send the previously stored MIDI
System Exclusive file.
The amplifier overwrites the current Program Change assignments with the new
ones. If the operation completes successfully all four channel LEDs flash quickly four
times. If the dump is unsuccessful or incomplete the four LEDs will flash slowly in an
alternating pattern and then the unit will revert to normal operation.
Note: During reception of the System Exclusive file the amplifier will temporarily
cease to pass data to the MIDI Thru socket.
Restoring Factory Settings
To return the amplifier to its factory default state:
1. With the amplifier Power off, press and hold in the Crunch (8) and FURY (21)
Select switches.
2. While holding in the switches turn on the amplifier. After 2 seconds all channel
select LEDs flash once to confirm the factory defaults have been restored.
16
EFFECTS LOOP
EMULATED OUTPUT
FOOTSWITCH
RETURN
SEND
LEVEL
+4dBV
-10dBV
4Ω
16Ω
8Ω
MIDI
THRU
IN
SPEAKER OUTPUTS
H.T. FUSE
T
U
P
T
U
O
T
U
P
N
I
S
N
I
A
M
VALVES FUSE
MAINS FUSE
T1AL 250V F1.6A 250V
230V/240V - T3.15AL 250V
100V/120V - T6.3AL 250V
100V~50/60Hz
500 WATTS
CONNECT SPEAKERS BEFORE USE
OUTPUT: 200 WATTS RMS
MODEL: BLACKFIRE 200
WARNING!:
RISK OF HAZARDOUS ENERGY
AVIS!:
ENERGIE ELECTRIQUE DANGEREUSE!
WARNING!:
SHOCK HAZARD. DO NOT OPEN. TO REDUCE THE RISK OF FIRE OR ELECTRIC SHOCK
DO NOT EXPOSE THIS EQUIPMENT TO RAIN OR MOISTURE. THIS APPARATUS MUST BE EARTHED.
AVIS!:
RISQUE DE CHOC ELECTRIQUE. NE PAS OUVRIR. POUR EVITER LES RISQUES D’INCENDIE ET
DE DECHARGES ELECTRIQUES, N’EXPOSEZ JAMAIS CET APPAREIL A L’HUMIDITE OU A LA PLUIE.
CONNECTER CET APPAREIL A LA TERRE.
This device complies with Part 15 of the FCC Rules. Operation is subject to the following two
conditions: (1) this device may not cause harmful interference, and (2) this device must accept
any interference received, including interference that may cause undesired operation.
This Class B digital apparatus complies with Canadian ICES-003.
Cet appareil numérique de la classe B est conforme à la norme NMB-003 du Canada.
CAUTION!:
TO REDUCE THE RISK OF ELECTRIC SHOCK DO NOT REMOVE COVER. NO USER
SERVICEABLE PARTS INSIDE. REFER SERVICING TO QUALIFIED SERVICE PERSONNEL.
ATTENTION!:
POUR EVITER LES RISQUES DE DECHARGES ELECTRIQUES, NE PAS OUVRIR LE
COUVERCLE. CET APPAREIL NE COMPORTE AUCUNE PIECE SUSCEPTIBLE D’ETRE REPAREE PAR
VOS SOINS. FAITES TOUJOURS APPEL A UN TECHNICIEN QUALIFIE POUR TOUTE REPARATION.
WARNING!:
DO NOT OBSTRUCT VENTILATION GRILLES
ATTENTION!:
NE PAS OBSTRUER LES GRILLES DE VENTILATION
Blackstar Amplification Ltd
Designed and Engineered by
Northampton, England
Made under license in Korea
IMPEDANCE
N16549
Developed in
partnership with
1
2
10
11
9
12
13
3
4
5
6
7
8
English
English