EM Acoustics EMS-81 compact passive loudspeaker User Manual
Page 11
11
EMS Series User Manual
www.emacoustics.co.uk
when determining the loading on the structure to include loudspeakers and rigging hardware, and the appropriate
safety factor can then be decided upon. If you are in any doubt whatsoever, please contact your EM
Acoustics dealer who will be able to refer you to an experienced rigging company. A reputable rigging organisation
should also be able to advise on legislation regarding safety factors for suspended systems of this type.
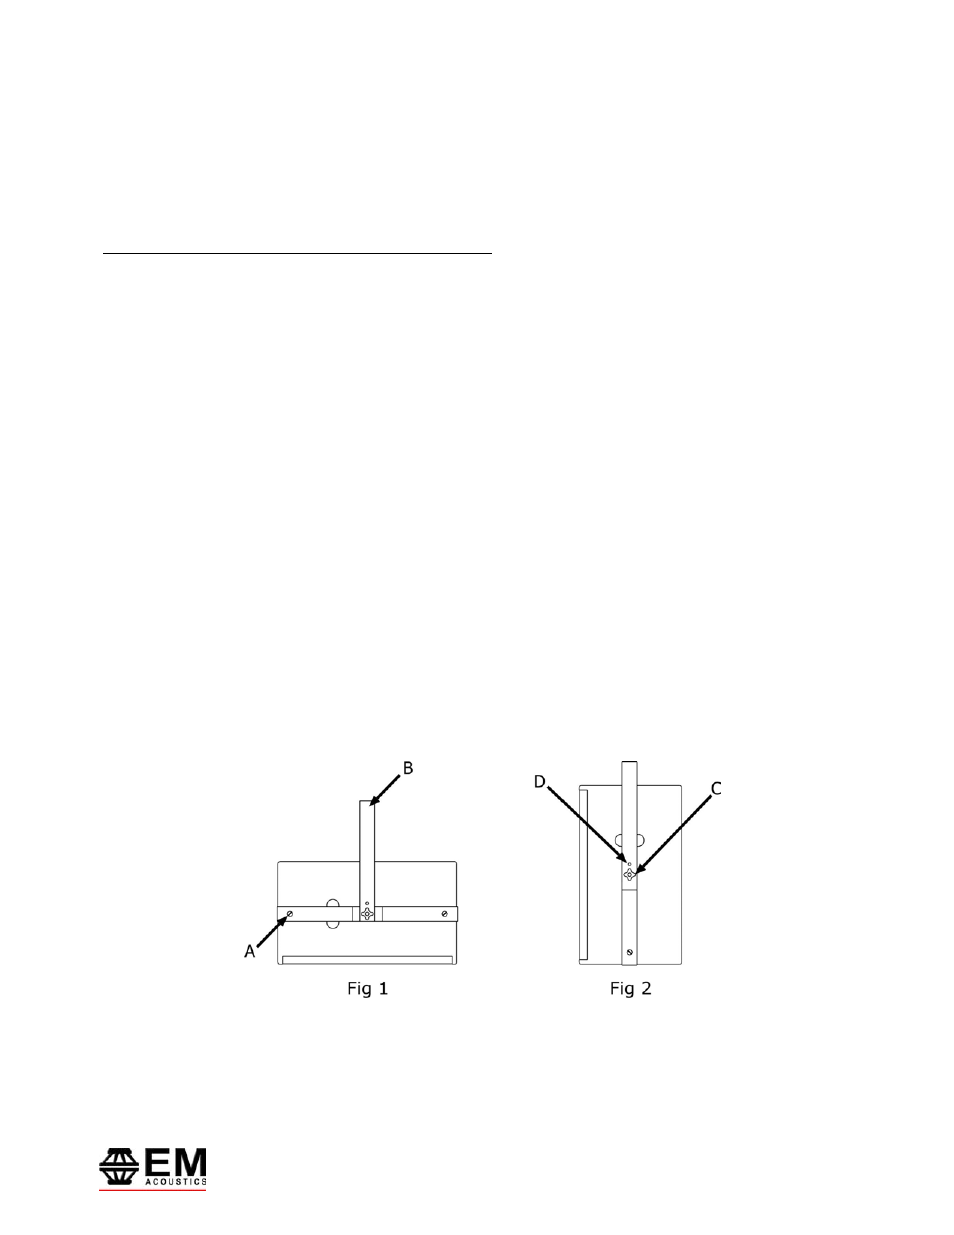
Attachment of the FC-81v or FC-121v Vertical Flying Cradles
The EMS-121 enclosure is shown in the drawings, however the technique is the same for both the EMS-81 and
EMS-121 enclosures. Lie the enclosure down on its front, and remove the two M10 countersunk bolts on each side
of the enclosure (marked “A” in Fig 1). Fit the cradle over the rear of the enclosure as shown in Fig 1 below, and
reinstate the M10 bolts into the holes.
The M12 hole at the top of the cradle can be used for either direct fixing in installations, or a hook-clamp or quick-
release scaffolding clamp to attach the enclosure to the suspension point. Fit the desired attachment device and
stand the enclosure upright, returning the cradle to the vertical orientation (Fig 2). Attach the enclosure to the
suspension point, and tighten the clamp. A secondary safety should always be used – this can be done in two
ways. Method one involves attaching an M10 forged shoulder eyebolt to the rear pull-back point of the enclosure
and then attaching a steel cable or chain between this point and your suspension point. Method two involves
wrapping a safety cable around the top part of the cradle (marked “B” in drawings) and around the suspension
bar. Once the enclosure is suspended safely, adjust to the desired angle by loosening the plastic knurled knobs on
each side (marked “C”), positioning where required and retightening. Additional strength can be gained by
tightening the M5 locking bolt on each side (marked “D”) using an 8mm spanner. Rotate the enclosure to the
desired position and tighten the bolt securing the attachment device.