Assembly steps – Horton Legend Ultra Lite User Manual
Page 2
ASSEmBLy STEPS
1. Attach the cable saver to the cables.
Note: Do not attach the bow assembly to the stock
assembly without the cable saver – cable damage will occur and the crossbow will be
unsafe to shoot.
• When viewing the cable saver from the side, with its “dish” (concave surface) facing up,
notice that one of the two cable notches is positioned deeper into the cable saver (closer
to the “dish”) than the other.
• Because the cables cross, one rests on top of the other. The top cable goes into the deeper
of the two cable saver notches and the bottom cable goes into the shallower cable saver
notch (photo 2), allowing the cable saver to maintain a relatively level position on top of the
two cables.
• Before sliding the cable saver into the barrel’s cable slot,
apply a small amount of wax, such as Horton's String Wax
and Conditioner (HCA-11015-H), to the “dish”
(concave surface) or top of the cable saver (the part that
comes in contact with the underside of the barrel’s arrow
flight groove).
2. Attach the bow assembly to the stock assembly
as follows:
• Position the bowstring on top of the barrel’s flight deck
while you insert the cable saver (concave side up) and
the cables into the barrel’s cable slot. The cable
saver’s concave groove (“dish”) should mate with the
underside of the barrel’s arrow flight groove (photo 3).
• Ensure that the pre-installed VIBRA-CUSH is in place
with its cutout side facing the barrel (photo 4).
• Pull the bow assembly toward the trigger assembly until
the riser location rod, protruding from the front of the
barrel and through the VIBRA-CUSH, mates with the
hole in the riser. Do not twist or rock the bow assembly to
the extent that you rub the cables along the slightly sharp
edges of the barrel’s cable slot. You do not want to cut
any of your cable strands. Pulling up and back slightly
on the bowstring may assist you in seating the bow
assembly onto the stock assembly (photo 5).
• After you make sure the main assembly bolt’s locking
setscrew is loosened, insert the main assembly bolt.
You may need to use your free hand to lift the string off
the barrel (sometimes as much as an inch) until the hole
in the end of the riser rod and the assembly bolt hole in
the riser are perfectly aligned. Then, finger-tighten the
bolt at least a few turns.
• Finish tightening the bolt using your Allen wrench while
continuing to lift the string off the barrel (photo 6).
If the alignment is correct, you will have no difficulty.
Do not use a cheater-bar when tightening the main
assembly bolt.
3
The bow string sits on the barrel’s
flight deck while the cable saver
and cables slide into the cable slot.
4
The VIBRA-CUSH goes between
the riser and the barrel, cutout
side facing the barrel.
5
Pull up and back slightly on the bow string to seat the bow assembly.
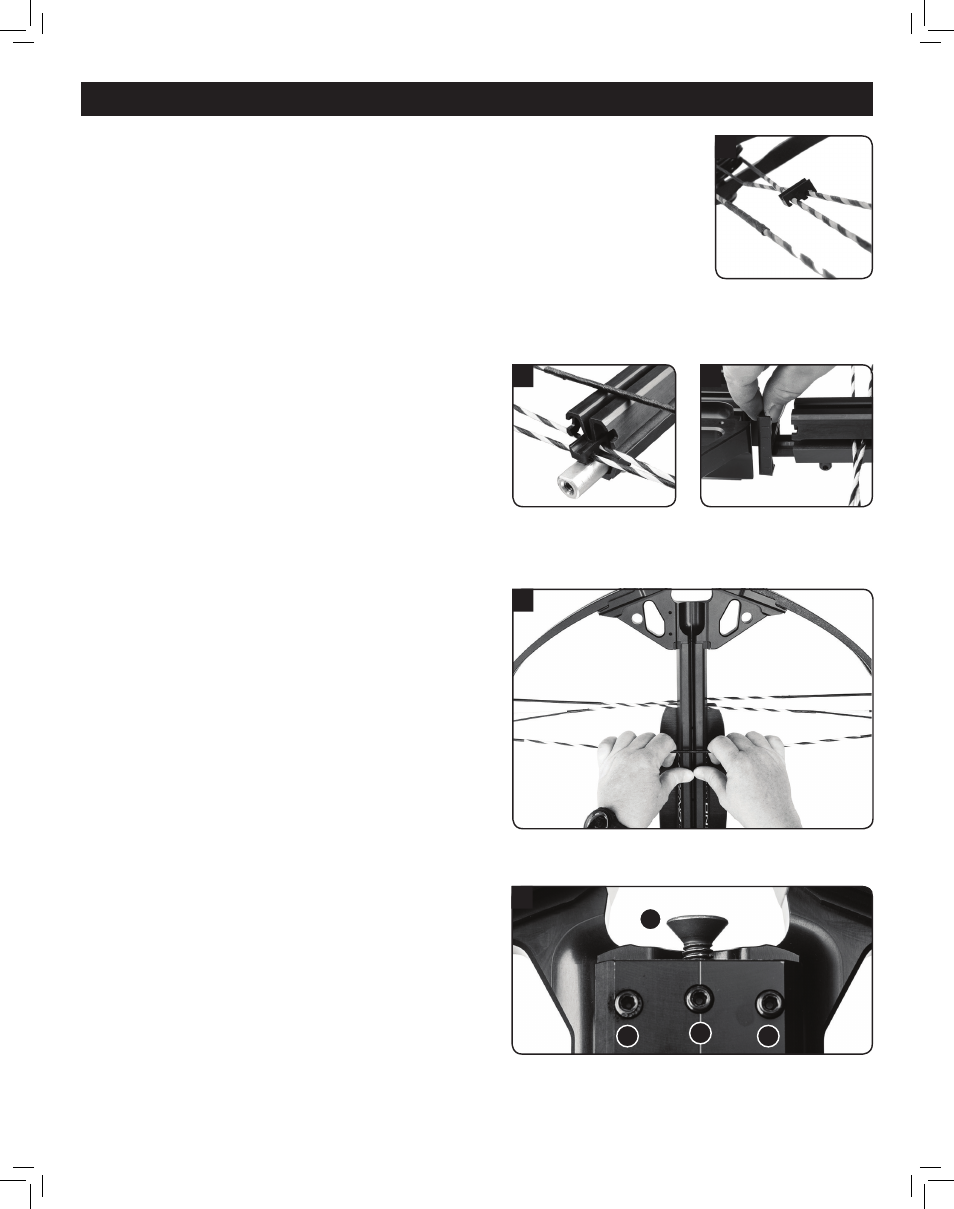
6
1. Main Assembly Bolt
2. Main Assembly Bolt’s Locking Setscrew
3. Foot Stirrup Locking Setscrew
1
3
3
2
2
Make certain your cables go
into the correct slots in your
cable saver.
1