Quiver mounting – Horton Legend Ultra Lite User Manual
Page 3
Note: To avoid excessive serving wear, you may need to tighten the bolt a bit
more until you relieve the excessive string pressure. If the main assembly bolt
is not tight enough, there will be excess serving wear on the string. You cannot
tighten the main assembly bolt enough by hand to break it!
• Insert the foot stirrup into the two receiving holes located at the front of the
riser. Make sure the “valley” in the stirrup’s foot-pad points down so that it
does not block the arrow’s flight path.
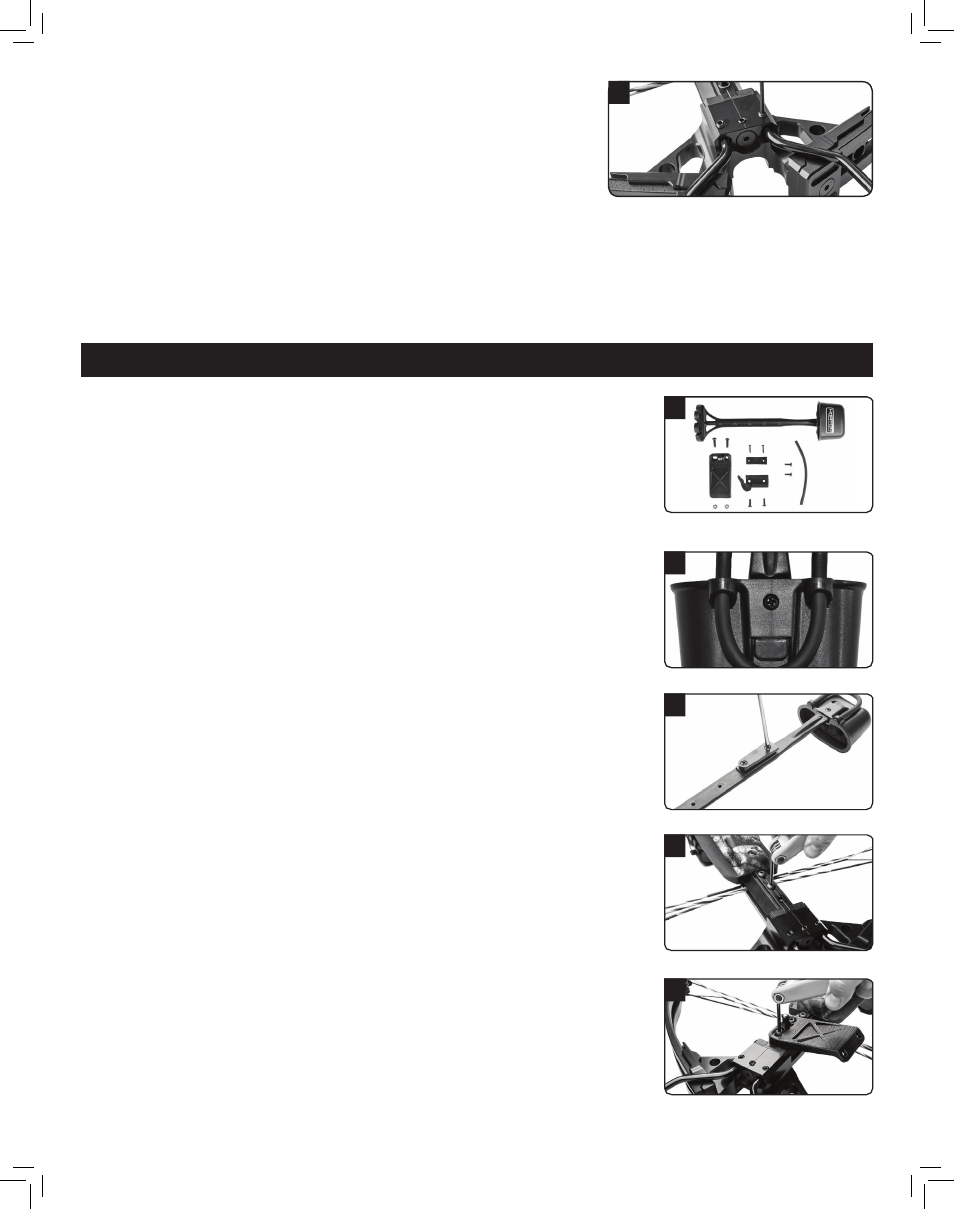
Tighten the setscrews located on the bottom of the riser to lock the main assembly bolt and the foot stirrup in place (photo 7).
• You are now ready to test-fire your crossbow and fine-tune your sights (See appropriate Cocking, Loading & Sighting
sections in the General Owner’s Instruction Manual).
QUIVER mOUNTING
1. The 3-Arrow Instant Detach Quiver Kit contains the following parts (photo 1):
• ONE (1) Quiver
• ONE (1) Quick disconnect (male) attachment
• TWO (2) ¾'' oval counter-sink Phillips screws
• ONE (1) Rubber hose (quiver hanger)
• TWO (2) Hose plugs
• ONE (1) Quick disconnect (female) attachment with lever
• TWO (2) Phillips pan-head machine screws
• ONE (1) Quiver mounting bracket with sling stud
• TWO (2)
7
⁄
16
'' Nylock nuts
• TWO (2) ¼ - 20 x ¾'' Pan-head screws
2. Attach the rubber hose to the quiver cup. First, from the bottom of the quiver’s cup,
insert both ends of the rubber hose approximately two-inches into each hole and
insert a hose plug into each end. Then, pull the hose back toward the bottom of the
quiver cup and seat the hose plugged ends into the counter-sunk holes (photo 2).
Note: Once inserted, the hose plugs cannot be removed.
3. Position the quick disconnect (male) attachment to the backside of the quiver post,
over the holes closest to the quiver cup. Insert the ¾'' oval counter-sink Phillips
screws and tighten (photo 3).
4. Remove the front sling stud and the ¼ - 20 x
3
⁄
8
'' pan-head screw directly below it,
from the bottom of the barrel (photo 4).
Note: Use a
5
⁄
32
'' Allen wrench to remove
the barrel screw.
5. Place the quiver’s mounting bracket over the two holes you just removed the sling
stud and pan-head screw from. Align the mounting bracket either facing the left or
right side of the crossbow, based on personal preference.
• Insert and tighten the two ¼ - 20 x ¾'' Pan-head screws into the same holes you
removed the sling stud and barrel screw from (photo 5). Use a
5
⁄
32
'' Allen wrench
to tighten.
Once the foot stirrup is in place, tighten all three
setscrews.
7
3
Attach quick detach (male) attachment.
4
Remove sling stud and
3
⁄
8
''
barrel screw.
5
Place the quiver bracket assembly over
the two barrel holes and insert ¾'' screws.
2
Attach rubber hose to quiver cup.
1
3-Arrow Instant Detach Quiver
Mounting Kit
2