Components in this package, If installing only new tank, If installing only new faucet – InSinkErator HWT-F1000S Tank and Filter System User Manual
Page 3: Wing nut fiber washer
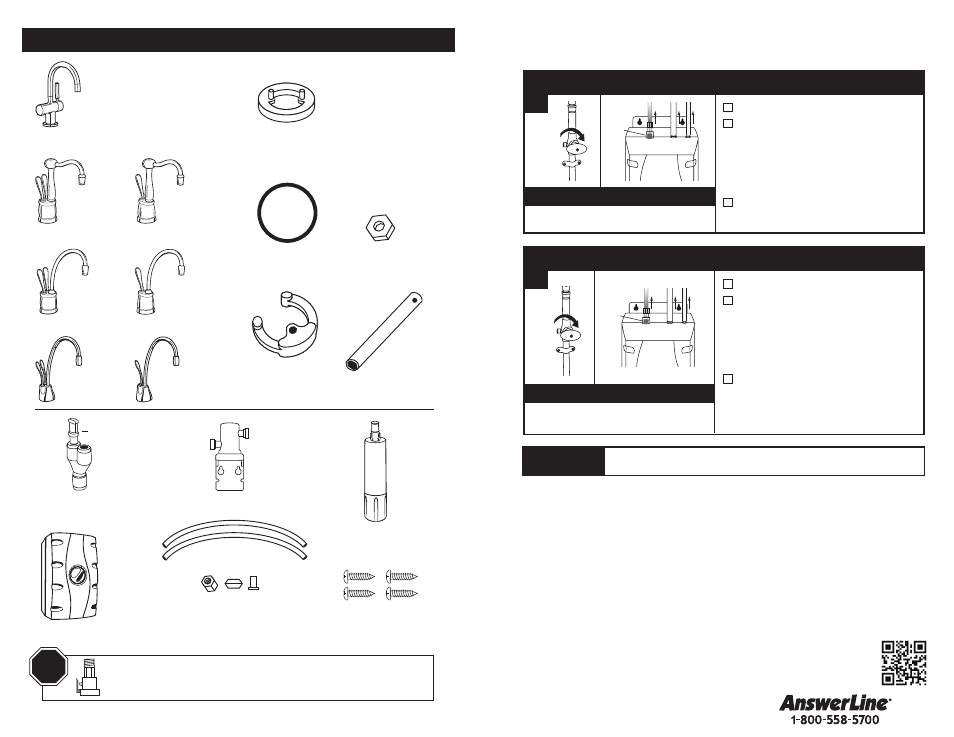
COMPONENTS IN THIS PACKAGE
HWT-F1000S
HWT-HP
HWT-00
(filtration system optional)
*
*
*
Filter Head
1/4" Tubes (2)
Filter Cartridge
Brass Nut/Ferrule/
Tube Insert
F-HC1100
F-GN1100
F-HC2215
F-GN2215
F-HC2200
F-GN2200
Semi-circular
Mounting Plate
Rubber O-Ring
Hex Nut
Brass Seat
(HC3300, H3300)
Hex Tool
3/4" Screws (4)
Y-Quick Connector
F-H3300
F-HC3300
Plug (1)
4
a
a
Turn off water supply.
Remove tubes from tank: At tank
top, depress gray release tab into
quick-connect fitting securing blue
or copper 1/4" tube and gently pull
line out of fitting. Pull white 7/16"
tube and clear 5/16" tube off fittings.
Remove existing faucet and continue
to page 6.
Turn off water supply.
Remove tubes from tank: At tank
top, depress gray release tab into
quick-connect fitting securing blue
tube and gently pull line out of fitting.
Pull white 7/16"
tube and clear 5/16" tube off fittings.
Remove existing tank and continue
to page 9.
Property Damage: Do not pinch or break copper
tubing. Do not distort the last 1 inch of tubing.
Property Damage: Unplug tank
before disconnecting tubing.
IF INSTALLING ONLY NEW TANK
Release
Tab
1/4"
blue
7/16"
white
5/16"
clear
Release
Ring
1/4"
blue or
copper
7/16"
white
5/16"
clear
Release
Tab
1/4"
blue
7/16"
white
5/16"
clear
Release
Ring
1/4"
blue or
copper
7/16"
white
5/16"
clear
IF INSTALLING ONLY NEW FAUCET
5
Brass Nut
Ferrule
Brass Insert
Wing Nut
Fiber
Washer
Brass Nut
Ferrule
Wing Nut
Fiber
Washer
1
2
3
Plastic
tube
Brass Nut
Ferrule
Brass Insert
Wing Nut
Fiber
Washer
Brass Nut
Ferrule
Wing Nut
Fiber
Washer
1
2
3
Plastic
tube
If installing
BOTH new faucet and new tank, skip to page 6.
Snap-connect fitting not included. Required when replacing tank manufactured
prior to January 2006. Call the
AnswerLine® 1-800-558-5700 to order.
STOP
STOP
Do not plug in the power to the hot water tank Until Step 6C. To avoid permanent
damage to the product, only operate the tank after it is filled with water.
NOTICE
NOTICE
NOTICE
To see a tutorial of this installation:
http://goo.gl/yYrfOA