Dry fitting the fairing, Bedding & installing the fairing – Airmar 2-3 kW—R99 User Manual
Page 3
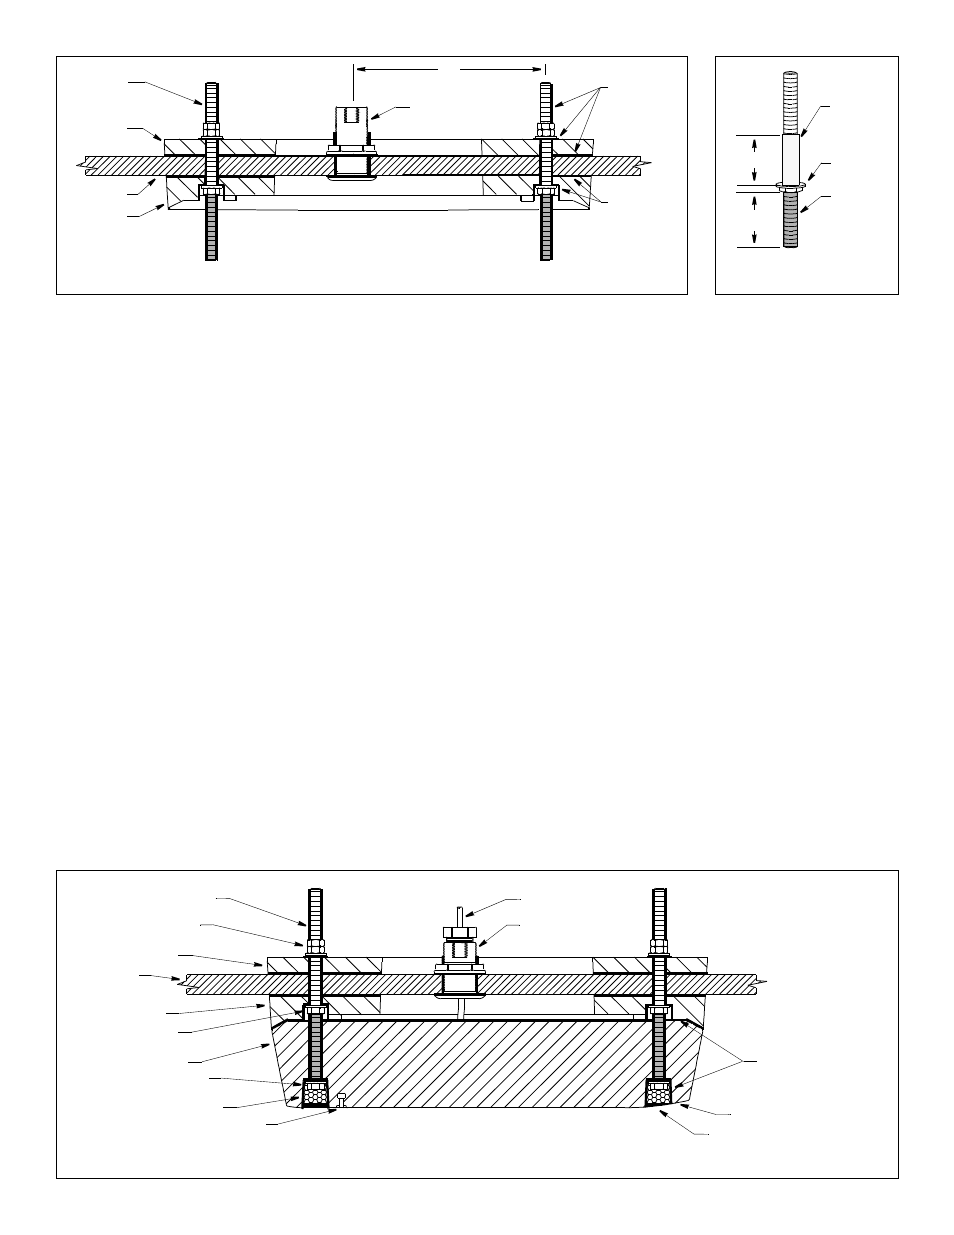
Figure 8. Threaded rod
102mm
color this
section of
rod with
permanent
marker
(4")
Copyright © 2007 Airmar Technology Corp.
sleeve for
installation
in aluminum
hull only
3
Figure 7. Bedding and installing the fairing and backing block
(non-metal hull shown)
fairing
backing
threaded
hull
marine
sealant on
marine
sealant on
washers (2),
backing block,
fairing,
recess
rod (2)
block
(uncolored)
Copyright © 2007 Airmar Technology Corp.
stuffing
tube
70mm
(2-3/4")
metal nut
& washer
A
Bow >
threaded
metal nut (4)
nylon locking nut (2)
marine sealant on
washer (2)
and washer (2)
metal nut (2)
transducer
hull
foam plug (2)
Bow >
Figure 9. Bedding and installing the transducer
(non-metal hull shown)
backing block
washer (2)
stuffing
cable
fairing
rounded bottom
temperature
tube
sensor
rod (2)
transducer that contacts
fairing and recess
Copyright © 2007 Airmar Technology Corp.
marine sealant
flush with hull
rods (2)
7. The remaining section of the fairing with the cutting guide will
be used as the backing block inside the hull. It will provide a
level surface for tightening the nuts on the threaded rods.
Dry Fitting the Fairing
1. To locate the hole for the forward threaded rod (nearest the bow),
measure the distance between the cable exit and the forward hole
in the transducer, center to center. (The rounded bottom is
forward and the temperature sensor is aft.) Being sure the
fairing will be parallel to the centerline of the boat (keel),
measure this distance A on hull and mark the hole (see Figure 7).
2. Drill a pilot hole at the marked location. Using the appropriate
size drill bit, drill the hole through the hull for one threaded rod.
Do not drill the second hole at this time.
3. Prepare the threaded rods (see Figure 8). Using a permanent
marker, draw a line on each threaded rod 102mm (4") from the
end and color this section. (The colored section will be used to
fasten the transducer to the fairing.) Screw a nut onto the colored
section of each threaded rod above the 102mm (4") line drawn.
4. Place the fairing against the hull. Push the uncolored end of the
threaded rod through the fairing and the hull until the nut rests
inside the recess in the fairing (see Figure 7). With a person
stationed inside the vessel, slide the backing block onto the rod.
Temporarily secure the rod with a stainless steel washer and nut.
5. Align the fairing parallel to the centerline of the boat (keel).
Using the aft hole in the fairing as a guide, drill a pilot hole.
Then drill the hole using the appropriate size drill bit.
6. Remove the fairing from the hull. Clean and sand the area
around the holes, inside and outside, to ensure that the marine
sealant will adhere properly. Remove any petroleum residue with
a mild household detergent or a weak solvent such as alcohol.
Metal hull—Remove all burrs with a file and sandpaper.
Bedding & Installing the Fairing
CAUTION: Be sure the surfaces to be bedded are clean and dry.
1. If there is any residue on the fairing and transducer, remove it
with a mild household detergent to ensure the marine sealant
will adhere properly.
2. Apply a 2mm (1/16") thick layer of marine sealant: (see Figure 7)
• To the surface of the backing block that will contact the hull
• To the surface of the fairing that will contact the hull
• To the recesses in the fairing for the washers and nuts
• To the threaded rods
• To the surface of the washers that will contact the backing block
NOTE: Be sure the rods have marine sealant on the threads under
the nuts. Back each nut off 13mm (1/2") and apply sealant to the
threads. Then return each nut to the marked location on the rod.
3. Slide a washer along the uncolored section of each threaded
rod until it rests against the nut (see Figure 8).
Aluminum hull—The stainless steel rods must be isolated from
an aluminum hull to prevent electrolytic corrosion. Cut the
sleeving 70mm (2-3/4"). Slide the isolation sleeve over the
uncolored section of each bedded rod as far down as possible.
Apply a 2mm (1/16") thick layer of the marine sealant to the
outside of the sleeving.