Airmar, Operation, Replacement transducer & parts – Airmar 2-3 kW—R199 User Manual
Page 4
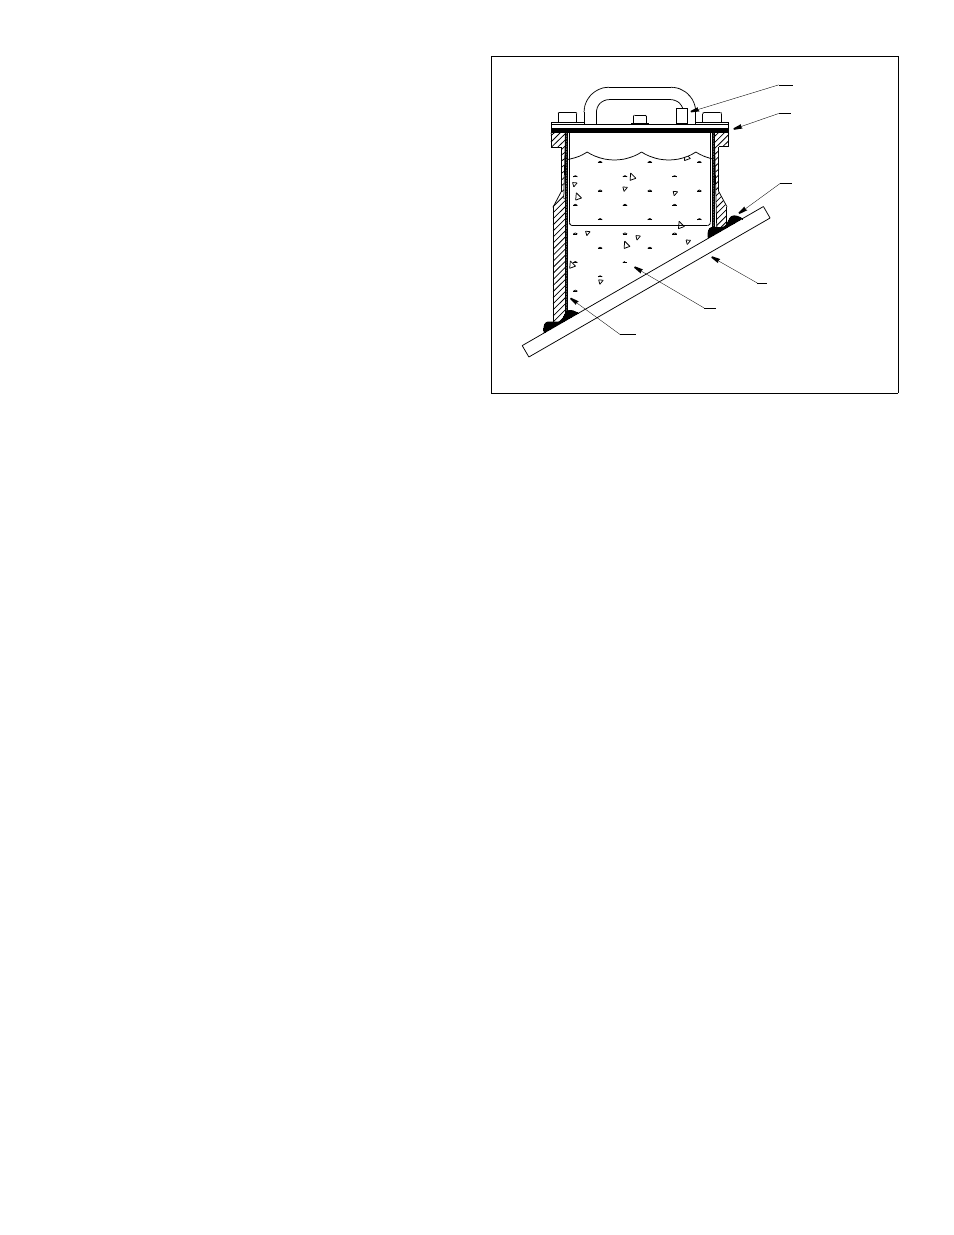
Bonding the Tank
CAUTION: The tank must be liquid-tight. To ensure a tight bond,
the hull surface under and around the tank must be smooth, free
of paint or any other finish, clean, and dry.
1. To ensure a tight bond, remove any paint or other hull finish. If
the surface is rough, use a disk sander to smooth an area slightly
larger than the tank. Clean any dust, grease, or oil from the hull
surface with a weak solvent, such as alcohol. Dry the effected
area.
2. Use 80 grit sand paper to sand the outside and inside of the
tank up 50mm (2") above the bottom edge. Remove the dust
with a weak solvent, such as alcohol. Dry the effected area.
3. Use an approved bonding material (see Tools & Materials on
page 1). Glass the tank to the hull with fiberglass resin, using
standard fiberglass technique. Alternatively, apply a generous
bead of marine putty/sealant to the bottom edge of the tank
following the manufacturer’s instructions (see Figure 8). Press
the tank firmly in place. Apply a second bead around the inside of
the tank. And apply a third bead around the outside of the tank.
4. Allow the bonding material to cure. The seal must be liquid-tight.
Installing the Transducer
CAUTION: Do not use sealant or adhesive on the gasket. To do
so may break the tank when the transducer is removed.
CAUTION: Do not over tighten the bolts to avoid cracking the tank.
1. After the bonding material has cured, insert the cork liner into the
tank (see Figure 8). Butt the edges along the center of the tallest
side. Note, there may be a gap, but this will not affect
performance.
2. Following the manufacturer’s directions for use, pour propylene
glycol into the tank until it covers the exposed hull.
3. Before installing the transducer, wipe it clean of any lubricant
that was used in testing the location.
4. Grasp the transducer by the handles and lower it into the tank.
There is no fore or aft to the transducer; it fits either way.
5. Attach the transducer to the tank. Use the six remaining 9/16"
hex-head bolts and six lock washers supplied. Tighten using a
torque wrench with a force not exceeding 85 in-lb. Do not over
tighten.
6. Top-off the propylene glycol in the tank. However, allow a small
air space to accommodate expansion with temperature
changes. Using a funnel, pour the fill-liquid through one of the
fill/vent holes until the tank is full. The second hole will act as a
vent. Plug both holes with the vent plugs supplied.
Cable Routing & Connecting
CAUTION: If the transducer came with a connector, do not
remove it to ease cable routing. If the cable must be cut and
spliced, use Airmar’s splash-proof Junction Box No. 33-035 and
follow the instructions supplied. Removing the water-proof
connector or cutting the cable, except when using a water-tight
junction box, will void the transducer warranty.
1. Route the cable to the echosounder being careful not to tear the
cable jacket when passing it through the bulkhead(s) and other
parts of the boat. Use grommets to prevent chafing. To reduce
electrical interference, separate the transducer cable from other
electrical wiring and the engine(s). Coil any excess cable and
secure it in place with cable ties to prevent damage.
2. Refer to your echosounder owner’s manual to connect the
transducer to the instrument.
Operation
Monitor the transducer ID line for the internal temperature of the
fill liquid within the tank. The transducer may fail if the fill-liquid
reaches temperatures above 60° C (140° F).
Replacement Transducer & Parts
The information needed to order a replacement Airmar transducer
is printed on the cable tag. Do not remove this tag. When ordering,
specify the part number, date, and frequency in kHz. For con-
venient reference, record this information at the top of page one.
Lost, broken, or worn parts should be replaced immediately.
In-Hull Mounting Kit
33-453-01
Obtain parts from your instrument manufacturer or marine dealer.
Gemeco (USA)
Tel: 803-693-0777
Fax: 803-693-0477
email: [email protected]
Airmar EMEA
Tel: 33.(0)2.23.52.06.48
(Europe, Middle East, Africa) Fax: 33.(0)2.23.52.06.49
Email: [email protected]
Figure 8. Cross section of installed transducer
gasket
fiberglass
propylene glycol
hull
in place
or apply
three beads
of marine
cork liner
4
Copyright © 2003 - 2013 All rights reserved.
(non-toxic antifreeze/coolant)
Copyright © 2006 Airmar Technology Corp.
fill/vent plug (2)
putty/sealant
transducer
AIRMAR
®
TECHNOLOGY CORPORATION
35 Meadowbrook Drive, Milford, New Hampshire 03055-4613, USA
www.airmar.com