Cycle parameters – HEIDENHAIN TNC 320 (77185x-01) Cycle programming User Manual
Page 384

Touch Probe Cycles: Automatic Workpiece Inspection
16.7 MEASURE RECTANGLE INSIDE (Cycle 423, DIN/ISO: G423)
16
384
TNC 320 | User's Manual Cycle Programming | 3/2014
Cycle parameters
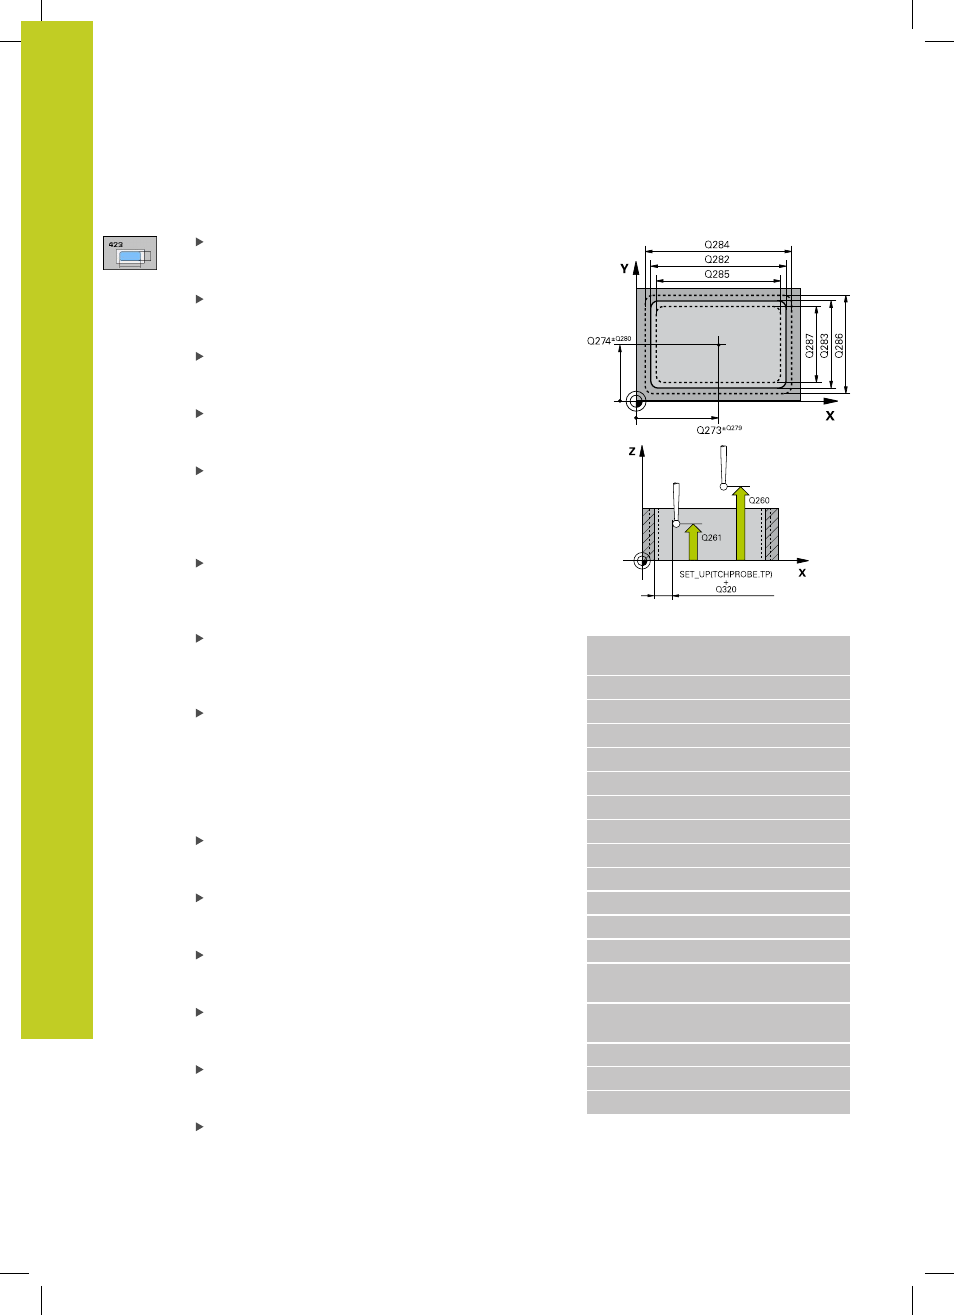
Center in 1st axis Q273 (absolute): Center of the
pocket in the reference axis of the working plane.
Input range -99999.9999 to 99999.9999
Center in 2nd axis Q274 (absolute): Center of the
pocket in the minor axis of the working plane. Input
range -99999.9999 to 99999.9999
1st side length Q282: Pocket length, parallel to the
reference axis of the working plane. Input range 0 to
99999.9999
2nd side length Q283: Pocket length, parallel to the
minor axis of the working plane. Input range 0 to
99999.9999
Measuring height in the touch probe axis Q261
(absolute): Coordinate of the ball tip center (=
touch point) in the touch probe axis in which
the measurement is to be made. Input range
-99999.9999 to 99999.9999
Set-up clearance Q320 (incremental): Additional
distance between measuring point and ball tip.
Q320 is added to
SET_UP (touch probe table). Input
range 0 to 99999.9999
Clearance height Q260 (absolute): Coordinate in
the touch probe axis at which no collision between
touch probe and workpiece (fixtures) can occur.
Input range -99999.9999 to 99999.9999
Traversing to clearance height Q301: Definition
of how the touch probe is to move between the
measuring points:
0
: Move at measuring height between measuring
points
1
: Move at clearance height between measuring
points
Max. size limit 1st side length Q284: Maximum
permissible length of the pocket. Input range 0 to
99999.9999
Min. size limit 1st side length Q285: Minimum
permissible length of the pocket. Input range 0 to
99999.9999
Max. size limit 2nd side length Q286: Maximum
permissible width of the pocket. Input range 0 to
99999.9999
Min. size limit 2nd side length Q287: Minimum
permissible width of the pocket. Input range 0 to
99999.9999
Tolerance for center 1st axis Q279: Permissible
position deviation in the reference axis of the
working plane. Input range 0 to 99999.9999
Tolerance for center 2nd axis Q280: Permissible
position deviation in the minor axis of the working
plane. Input range 0 to 99999.9999
NC blocks
5 TCH PROBE 423 MEAS. RECTAN.
INSIDE
Q273=+50
;CENTER IN 1ST AXIS
Q274=+50
;CENTER IN 2ND AXIS
Q282=80
;FIRST SIDE LENGTH
Q283=60
;2ND SIDE LENGTH
Q261=-5
;MEASURING HEIGHT
Q320=0
;SET-UP CLEARANCE
Q260=+10
;CLEARANCE HEIGHT
Q301=1
;MOVE TO CLEARANCE
Q284=0
;MAX. LIMIT 1ST SIDE
Q285=0
;MIN. LIMIT 1ST SIDE
Q286=0
;MAX. LIMIT 2ND SIDE
Q287=0
;MIN. LIMIT 2ND SIDE
Q279=0
;TOLERANCE 1ST
CENTER
Q280=0
;TOLERANCE 2ND
CENTER
Q281=1
;MEASURING LOG
Q309=0
;PGM STOP IF ERROR
Q330=0
;TOOL