Activa p.11 – Lindhaus Activa Single motor Multifunction Upright User Manual
Page 13
4.
Look inside the brush roll for
the end that has a hexagon
shape cut out. This is also the
end that will have a white dot
on the outside of the brush
roll. Put this end in first. Line
up the white dot with a flat
portion of the drive.
5.
Make sure the brush roll goes
all the way down over the
drive. Look to see that none
of the brush bristles are
caught between the metal
support and the brush ( the
metal support will not fit
properly if there are any
brush bristless sticking up
and out of the end, it will
also damage the bristles of
your brush roll)
6.
Reassemble the metal brush
support and then the side
cover.
4.
Inserire prima l’estremità della
spazzola con l’apertura
esagonale dell’apposito vano,
facendo combaciare una faccia
piana del trascinatore esagonale
con il punto bianco del rullo,
assicurandosi che scorra fino in
fondo raggiungendo il supporto
di trasmissione(parte n.24-
pag.14).
5.
Assicurarsi che il rullo sia
posizionato correttamente e che
le setole laterali siano all’interno
del supporto in metallo (il
supporto in metallo non entrerà
correttamente se ci sono ancora
setole fuoriposto e inoltre
danneggerà le setole del vostro
rullo).
6.
Rimontare il supporto rullo e poi
inserire lo sportello laterale.
4.
Schieben Sie die Bürste mit der
sechseckigen Öffnung voran in
das Gehäuse. Der Bezugspunkt
(Photo) besteht darin, eine flache
Seite des Mitnehmers mit dem
weißen Punkt der Rolle in Über-
einstimmung zu bringen.
Vergewissern Sie sich, daß die
Bürste bis ganz nach unten an die
Getriebshalterung geschoben ist.
(Teil n. 24-Seite 14).
5.
Sicherstellen, daß die Rolle
richtig eingefügt worden ist und
die Seitenborsten sich alle auf
der Innenseite der Aluminium-
halterung befinden (die Halterung
lässt sich nicht gut schliessen falls
noch Borsten herausschauen und
zudem werden die Borsten der
Rolle beschädigt)
6.
Bürstenhalterung wieder
aufmontieren und
Seitenabdeckung zuschieben
4.
Introduire d’abord l’extremité
de la brosse avec l’ouverture
hexagonale dans le boîtier, le
point référence (photo) consiste
à faire coincider un côté plein
du dispositif de traction avec le
point blanc de rouleau, en
vérifiant qu’elle soit bien
enfoncée jusqu’au bout du
support de transmission (pièce
n.24- page 14).
5.
Faire attention à ce que le
rouleau soit bien en place et
que les poils latéraux soient à
l’intérieur du support en métal.
(le support en métal n’entrera
pas correttamentte si les poils
sont sont pas bien en place et
en outre, il abimera votre
rouleau).
6.
Remplacer le support de la
brosse et insérer le couvercle
latéral
4. Introducir antes en su lugar la
extremidad del cepillo con la
abertura hexagonal, haciendo
encajar una cara llana del
dispositivo de tracción con el
punto blanco sobre el cepillo
(foto ), asegurándose de que se
inserte completamente en el
soporte (pieza n. 24–pag.14).
5.
Asegúrese de que el rodillo esté
bien instalado en su lugar y que
las cerdas laterales estén
internamente al soporte
metálico.(el soporte metálico
no entrará correctamente si la
cerdas no están bien puestas y
además irán a estropear las
cerdas del rodillo) :
6. Montar el soporte del rodillo y
luego insertar la porta lateral.
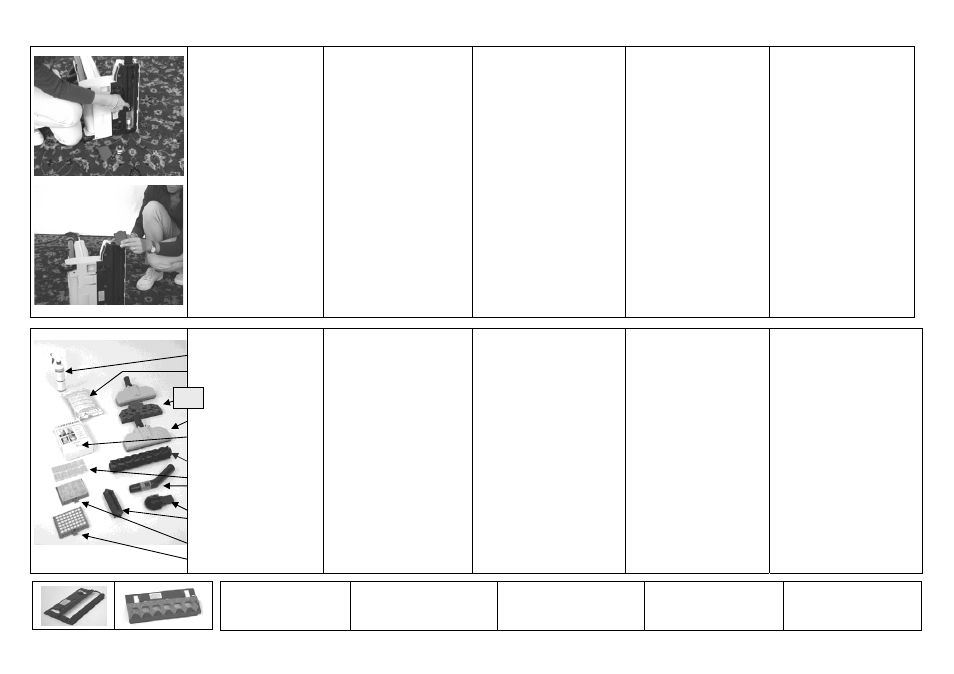
ACCESSORIES
(optional)
A. Lindhaus spotter
B. Lindhaus dry carpet
compound
C. Felt/bristle hard floor tool
M28F
D. Universal wheeled hard
foolr tool M28R
E. Box of 8 paper bags + 2
exhaust filter “A 4”
F.
DCS brush roller
G. Strip of 10 air freshener
H. Tube bent with air
control
I.
Radiator cleaning brush
J.
Dusting brush for
upholstery
K. Carbon/Active filter
L. Hepa filter
ACCESSORI
(optional)
A. Smacchiatore Lindhaus
B. Confezione microspugne
Lindhaus
C. Spazzola con setola e feltro
M28F
D. Spazzola universale con
ruote M28R
E. Conf. 8 sacchi filtro + 2
microfiltri “A 4”
F.
Srip 10 profumatori
G. Filtro a carboni attivi
H. Impugnatura con regolatore
I.
Pennello per termosifone
J.
Pennello per bocchetta
K. Filtro Hepa
ZUBEHÖR
(optional)
A. Lindhaus Teppich-flecklöser
B. Lindhaus granulat
C. Burstdüse mit Filz M28F
D. Universalstaubdüse M28R
E. Filterbeutel Packung 8+2
Microfilter “A 4”
F.
Duftfilter Strip (10 St.)
G. Aktikohle-Filter
H. Rohrbogen
I.
Heizkorperdüse
J.
Rundbürste für Polsterüse
K. Hepa Filter
ACCESSOIRES
(optional)
A. Lindhaus prédetachant pour
moquettes
B. Lindhaus poudre nettoyante
C. Suceur à poussière avec
soie et feutre M28F
D. Suceur à poussière
universel M28R
E. Sacs en papier 8 sacs + 2
microfilters “A 4”
F. Ganulés edorants, strip 10
piéces
G. Filtre à charbons actifs
H. Poignée avec régulateur
I.
Suceur pour radiateurs
J.
Suceur à fentes
K. Hepa filter
LISTA DE PIEZAS
(optional)
A. Lindhaus Quitamanchas
B. Lindhaus Detergente
C. Cepillo con cerdas y fieltro
M28F
D. Cepillo Universal con ruedas
M28R
E. Caja de 8 bolsas de papel + 2
microfiltros “A 4”
F.
Lámina de 10 ambientadores
(pastillas olorosas)
G. Filtro Carbón Activo
H. Mango con regulación de
aspiración
I.
Cepillo para limpiar
radiadores
J.
cepillo para cerdas
K. Filtro Hepa.
M
N
M. Squeegee shoe plate
N. Felt shoe plate
M. Cop. rullo con squeegee
N. Cop. Rullo con feltro
M. Rollenüberzug m. Squeegee
N. Rollenüberzug mit Filz
M. Cache-rouleau squeegee
N. Cache-rouleau en feutre
M. Cubrerodillo c. squeegee
N. Cubrerodillo con feltro
11