Visor replacement, Maintenance and care – Crivit V210 User Manual
Page 5
9
10
Cheek Pads
You will receive two different pairs of cheek pads for
individual size adjustment.
The thinner cheek-pads are already pre-mounted as
standard. The thicker cheek pad is enclosed with the
helmet separately.
If the helmet is too loose and therefore is not sitting
firmly on your head, you can replace the thin cheek
pad with the thicker ones.
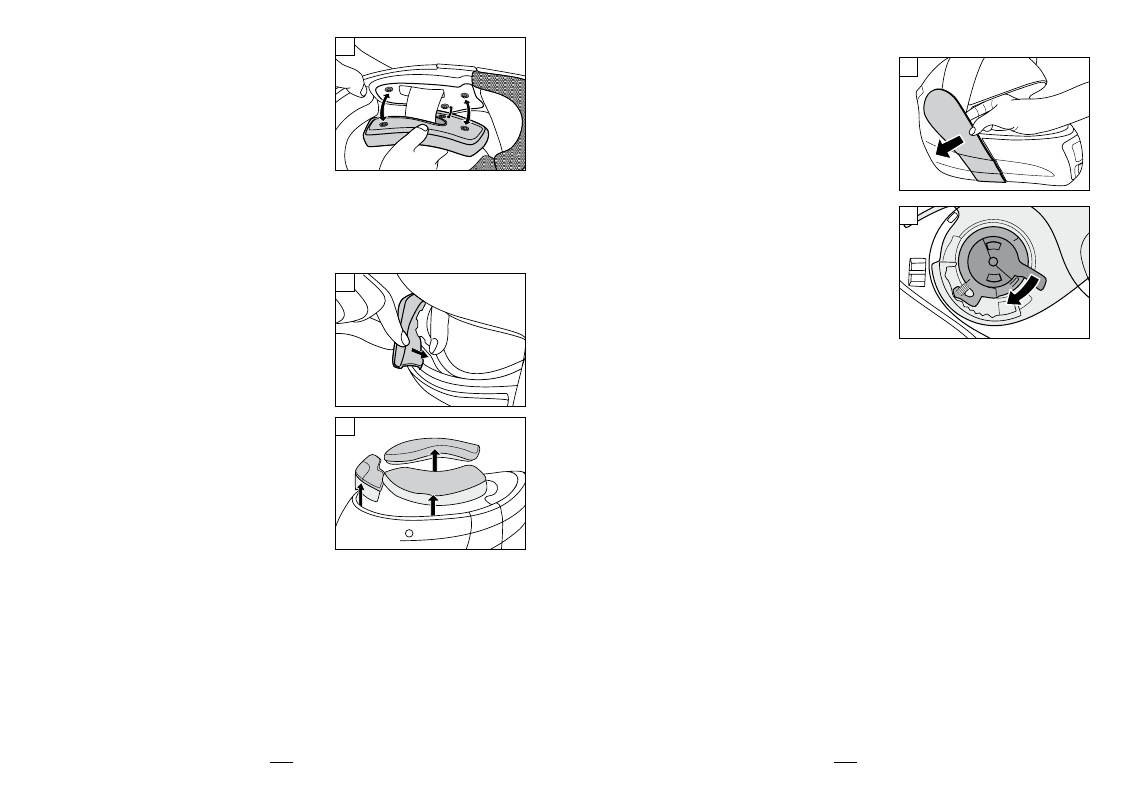
The cheek pads are affixed via three press-studs respectively in the helmet. You can easily
remove the pads ( see Fig. G ). The thicker cheek pads can now also be affixed in the helmet
with three press-studs. You need to be able to hear that each press-stud locks-in.
Air Deflector
The air deflector can reduce fogging-up of the visor
through breathable air.
Press the padding of the front edge of the helmet to
the back and slide the air deflector between the pad-
ding and the helmet shell ( see Fig. H ).
Winter Collar
To reduce the wind intake at the bottom side of the
helmet during extremely cold temperatures, the pre-
mounted helmet-collar can be replaced by the broad
winter collar which is included.
Removal of Helmet Collar
The three-piece collar is affixed to the helmet with a
strong Velcro-strip. Remove the three collar parts by
pulling them off ( see Fig. I ).
Inserting the Winter Collar
First attach the plastic clip in the centre at the back
part of the helmet in the groove between the outer
shell and the padding.
Once the plastic clip is completed locked-in, press the complete winter collar again firmly onto
the padding of the helmet.
H
I
G
Visor Replacement
If the pre-mounted visor is damaged or severely
scratched, you can exchange it with the replacement
visor.
Removal of the Visor
- Slide the visor into the highest position (fully opened).
- Pull the side protective covers off ( see Fig. J ).
- Push the visor safety lever down ( see Fig. K ), the vi-
sor hold-down device loosens and you can remove
the visor.
Inserting the Visor
- Place the replacement helmet on the hold-down de-
vice and observe the correct positioning in the pro-
cess (fully opened).
- Reinsert the visor hold-down device and the visor
safety lever and then slide it back into the highest
positioning to affix the visor.
- Reinsert the side protective covers. Here, press the
clamps firmly onto the openings in the helmet. You must be able to hear the clamps lock-in.
Maintenance and Care
Regular maintenance and care contributes to safety and maintaining the helmet.
Cleaning of the Helmet
- Never use solvents, petrol or other detergents when cleaning the shell and interior of your
helmet.
- Only use water and pH balanced soap.
Visor care and cleaning
- After using the helmet, with a soft cloth, lightly wipe off any grime (e.g. dead insects, dirt,
sand, dust etc.) from the visor and then fully wipe it clean using a dry soft cloth.
- When the visor gets wet (e.g. rainwater) it should always be wiped with a soft cloth.
- When cleaning the visor, never use any petroleum-based solvents or detergents containing
abrasives.
J
K