Operation – Sealey AK4561D User Manual
Page 3
4.1
Place a 205ltr drum onto the trolley, locate the drum using the drum holder
support (fig1.2) and secure with knob (fig.1.1).
4.2
Installing the pump
4.2.1 Remove the bung from the 2"BSP opening of the drum.
4.2.2 Slacken off the locking nut on the pump probe and insert the pump into
the drum until the probe bottoms out, tighten the barrel nut and then
tighten the locking nut to fix the pump to the drum.
4.3
Setting up the pump
4.3.1 Ensure that the air regulator valve is fully wound anti-clockwise and then
connect the air supply onto the quick release connector on the air
regulator.
4.3.2 Lift the knob on the regulator and slowly turn clockwise until the
recommended operating pressure of 70psi is reached, push down on the
regulator knob to lock the position.
Note: check the system for leaks, should an air leak be discovered, release the
pressure, disconnect the air line and repair the joint or seal before
continuing.
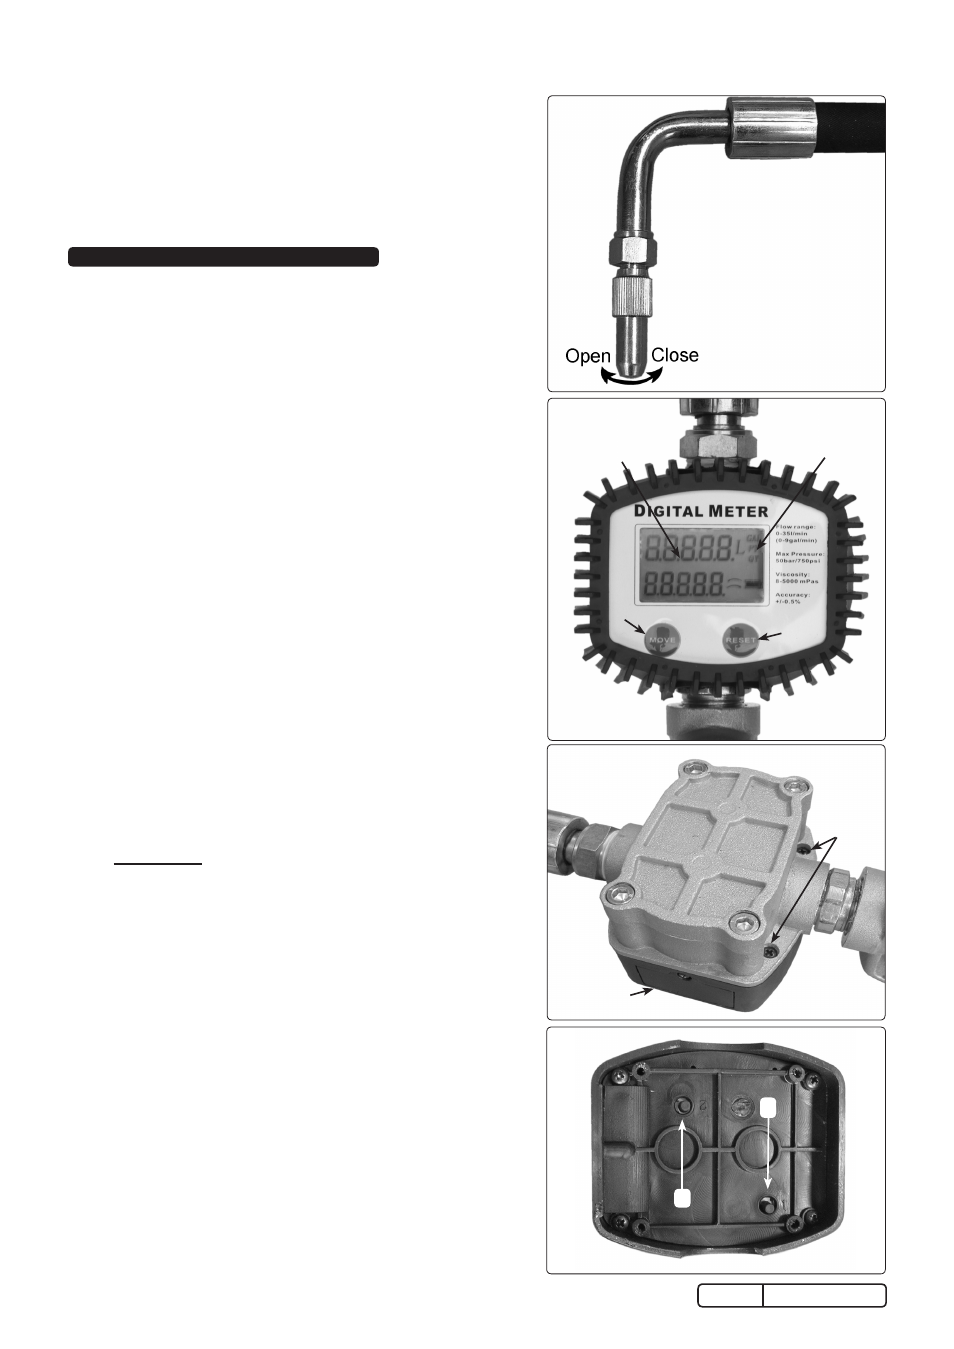
4.4
Operating the gun
❐
WARNING! Ensure that the trigger is not depressed before opening the
nozzle valve.
4.4.1 Press the Reset button for 1 sec to zero the display.
4.4.2 With the nozzle pointing into the receiving container, open the nozzle valve
as shown in fig.4.
4.4.3 Depress the trigger and dispense the liquid the amount dispensed is
shown on the display (fig.5.4).
4.4.4 Release trigger and close the nozzle valve.
4.5
Determining the Correction Factor
4.5.1 Dispense at least 1 litre of liquid into a calibrated container.
4.5.2 Record the quantity of liquid in the container and record the quantity of
liquid dispensed as indicated on the meter display. Press the Move +
Reset buttons (fig.5.1 and fig.5.2) simultaneously to display the current
correction factor.
Qty Dispensed
Qty Indicated
x Current Correction Factor = New Correction Factor.
4.6
Programming the Correction Factor
4.6.1 Remove the rubber protective cover from the meter and unscrew the four
phillips screws (fig.6) holding the digital meter, remove from the gun.
4.6.2 Press button "2" on the rear of the meter (fig.7.2) for 1 sec to enter the
correction Factor mode.
4.6.3 Press the Move button to select the digit to be changed, each press of the
Move button will select the next digit.
4.6.4 Press the Reset button to add 1 on the digit, press as many times as
required until the correct number is reached.
4.6.5 Press "2" for 1 sec to quit the correction Factor mode.
4.6.6 Press the Move + Reset buttons simultaneously to display the new
correction factor.
4.7
Changing the Units
Note: The meter is pre-set to display litres.
4.7.1 Press button "2" on the rear of the meter for 1 sec to enter the correction
Factor mode.
4.7.2 Press the Move button five times to select the units (fig.5.3).
4.7.3 Press the Reset button to scroll through the Units (L/Gal/PT/QT), select
the Unit required.
4.7.4 Press "2" for 1 sec to quit the correction Factor mode.
4. OpeRATION
AK4561D
Issue no: 1 - 14/11/08
fig.5
3
4
1
2
fig.7
2
1
fig.4
fig.6
Meter
Screws
Battery cover
3.3
Pre-Operation
3.3.1 Lift up the knob (fig.2A) on the air regulator and ensure that the knob is
wound fully anti-clockwise.
3.3.2 Remove the filler plug (fig.2B) from the lubricator and fill the lubricator with
a quality air tool oil (Sealey ATO1000S), refit the filler plug.
3.3.3 The lubricator feed is set when the unit is running, adjust the feed knob
(fig.2C) the drip rate can be seen through the sight glass of the dome. The
rate of oil feed will automatically increase or decrease inline with the air
flow.