Conversion to mig (gas) welding, Gasless operation 5. control panel – Sealey MIGHTYMIG150 User Manual
Page 4
7. CONVERSION TO MIG (GAS) WELDING
4.1.4 Push lightly down on the top of the reel of wire and screw the pressure disc (4) onto the end of the spindle and
down onto the top of the wire reel. The reel take off pressure should be set to provide a mild braking effect to
prevent overrun where loose coils of wire form on the reel. Do not overtighten the pressure disc as too much
braking will conflict with the wire tension set on the wire drive unit. Lock the position of the pressure disc by
screwing the butterfly nut (5) down on top of it.
4.1.5 Referring to fig.3 turn the knob on the wire lock screw (C) anti-clockwise and lift it up and away from the pressure
roller moulding. Swing the pressure roller moulding (D) away from the drive roller.
4.1.6 Release the wire from the spool (do not allow wire to uncoil) and straighten 40-50mm of wire and gently push
through the flexible plastic guide and through the 0.9mm feed roller groove and into the torch liner. Refer to
maintenance section 9.3 on how to reverse or change the roller for driving other wire diameters.
4.1.7 Referring to fig.4, move the pressure roller moulding back round onto the grooved drive wheel and swing the
wire lock screw back down to lock it in place. See section 4.2 regarding wire tension.
4.1.8
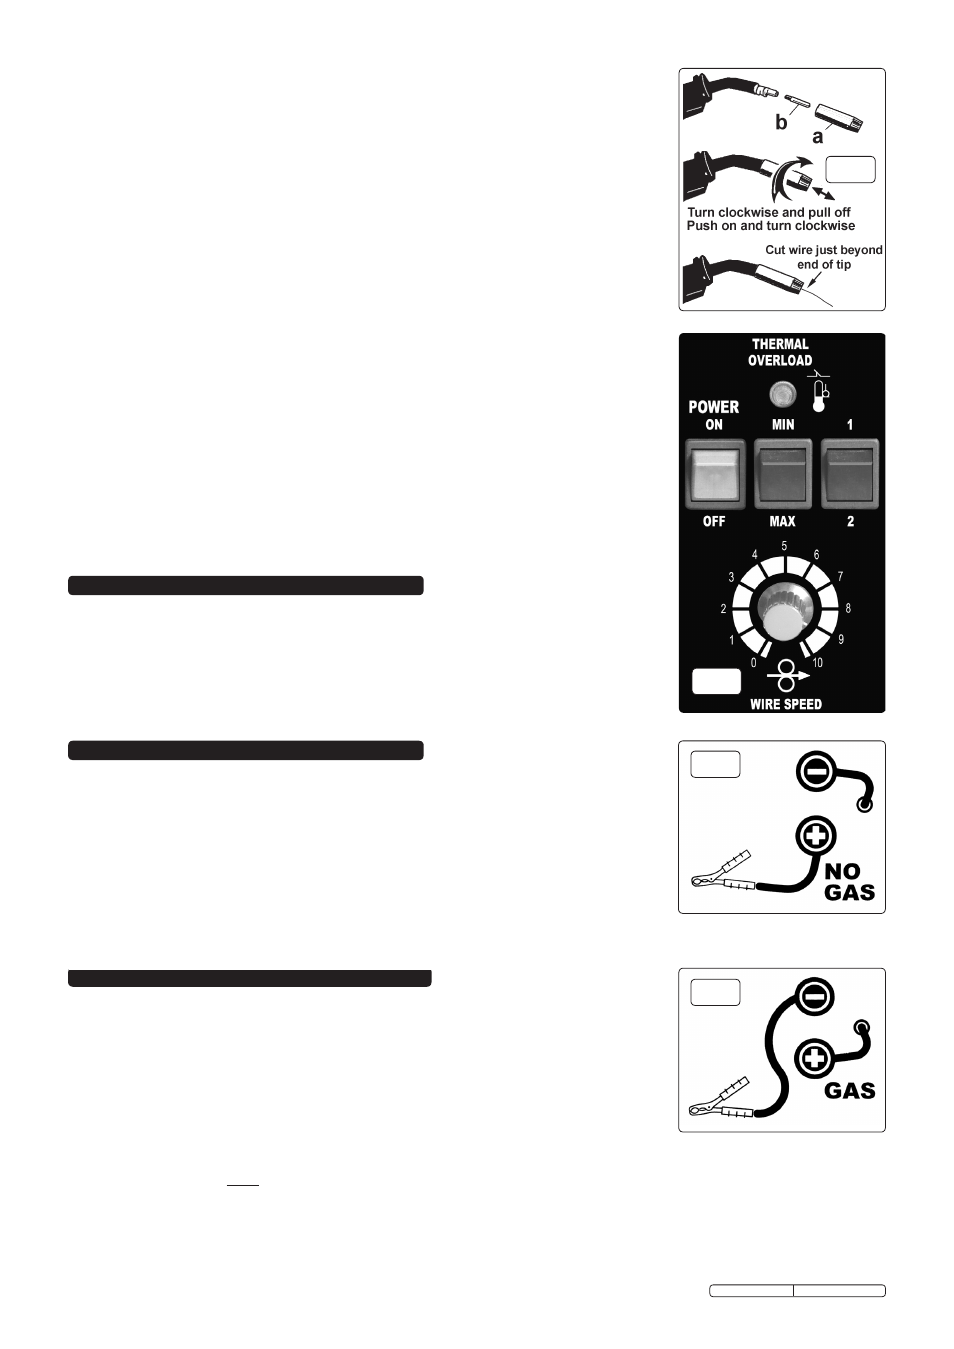
Feeding the wire through to the torch. (See fig.6) Remove gas cup (a) and contact tip (b) from end of torch as
follows:
a) Take torch in left hand with the torch tip facing to the right.
b) Grasp gas cup firmly in your right hand.
c) Turn gas cup clockwise only and pull cup out to the right.
WARNING! do not turn gas cup anti-clockwise, as this will damage internal spring.
d) Unscrew the copper contact tip (right hand thread) to remove.
4.1.9 Check welder is switched “OFF” and that the earth clamp is away from the torch tip. Connect the welder to the
mains power supply and set the current switch to MAX.
4.1.10 Set the wire speed knob to position 5 or 6. See fig.7. Switch welder on. Keeping the torch cable as straight as
possible and press the torch switch. The wire will feed through the torch.
4.1.11 When wire has fed through, switch welder off,
unplug from mains.
a) Take torch in left hand, slide the contact tip over the wire and screw it back into place.
b) Grasp gas cup in right hand, push onto torch head and turn clockwise only.
WARNING! do not turn gas cup anti-clockwise, as this will damage internal spring.
c) Cut wire so that it is just protruding from the cup.
4.2. Setting wire tension.
IMPORTANT: You must set the correct tension, too little or too much tension will cause problematic wire feed
and result in a poor weld. Turn the wire lock screw clockwise to increase the tension and anticlockwise to
decrease the tension as shown in fig.4.
4.2.1 Correct tension between the rollers is checked by slowing down the wire between gloved fingers. If the pressure
roller skids the tension is correct. Try to use the lowest tension possible as too high a tension will deform the wire.
When you have completed welding allow the welder to cool before storing in a safe, dry place. Note: Damaged
torches and cables are not covered under warranty.
fig.6
WARNING! ENSURE THAT YOU READ, UNDERSTAND AND APPLY SAFETY INSTRUCTIONS BEFORE
OPERATING THE WELDER. IF WELDING A VEHICLE, DISCONNECT THE BATTERY OR FIT AN
ELECTRONIC CIRCUIT PROTECTOR.
6.1
Polarity check: Ensure that the welder is disconnected from the main power supply, open the side panel and
check that the polarity is correctly set up for gasless operation. The earth clamp wire must be connected to the
POSITIVE (+) terminal and the power (torch) lead must be connected to the NEGATIVE (-) terminal as shown in fig.8.
6.2
To ensure a complete circuit, the earth clamp must be securely attached to the workpiece.
a) The weld area must also be free of paint, rust, grease, etc.
b) Obtain the best connection by grinding the point of contact on the workpiece before connecting the clamp.
6.3
If welding a vehicle, disconnect the battery or fit a “Electronic Circuit Protector” (available from your Sealey dealer).
6.5
Set up the current switches to give the required power setting and adjust the wire speed accordingly.
6.6
During the welding process, wire drawn from the spool is automatically fed through an insulated liner in the torch
cable to the torch tip. The torch switch activates the wire feed roller (to stop wire feed release the switch). As wire comes into contact with the workpiece an
arc is struck. The arc melts the wire which is deposited into the weld.
6. GASLESS OPERATION
5. CONTROL PANEL
5.1 Thermal overload light. (see fig.7) If the duty cycle is exceeded as a result of welding too long with a high
current the yellow overload light will illuminate and the welder will turn off. When the welder has cooled down
(approx. 5 to 10 minutes) the power will be restored and welding can recommence.
5.2 Power ON/OFF switch. (see fig.7) When the power is ON the green switch will be illuminated. When the
welder is no longer required it should be switched to the OFF position and the power plug should be
disconnected from the mains supply.
5.3 Current switches MIN, MAX & 1, 2. (see fig.7) Used together these two switches provide 4 increasing power
levels as follows: MIN/1, MIN/2, MAX/1, MAX/2.
5.4 Wire speed control knob. (see fig.7) As a general rule, a higher current requires a higher wire speed.
fig.7
fig.8
For welding stainless steel or aluminium, this welder can be converted to a conventional mig welder. To convert
to gas, order a reel of regular wire, a bottle of suitable gas, tips and nozzles and a conversion kit. Kit 120.802032
contains a regulator plus connection hoses, hose adaptor and jubilee clips (see fig.10).
7.1
Check Polarity: Ensure that the welder is disconnected from the mains power supply and open the side
panel and check that the polarity is correctly set up for gas operation. The earth clamp wire must be connected
to the NEGATIVE (-) terminal and the power (torch) lead must be connected to the POSITIVE (+) terminal as
shown in fig.9.
7.2
Check wire feed roller: If necessary, change and/or turn the wire feed roller (See maintenance section.9) so
that the appropriately sized groove is in line with the drive path i.e. in the groove nearest to you.
7.3
Fit required wire: Fit a reel of steel or aluminium wire (either 0.6 or 0.8mm).
7.4
Set the wire tension as described in section 4.2.
7.5 Mount the gas cylinder: Strap the gas cylinder to the back of the machine. Two nylon straps are provided to hold small cylinders in place. Thread the
straps through the raised metal fixing loops on the back of the welder. Stand the gas cylinder on the rear platform and fix the straps around it as shown in fig.10.
7.5.1 Close the flow regulator before screwing it onto the cylinder. Screwing down the regulator will automatically open the cylinder valve. When the sound of gas
escaping is heard screw the regulator one further turn only. This will be sufficient to seal the cylinder.
WARNING! Excessive tightening of the flow regulator will over-compress the rubber sealing washer and allow the gas to escape slowly without being detected.
7.6
Connect gas cylinder to welder gas input. (Kit 120.802032) Push the small adaptor into one end of the larger diameter hose. Push the other end of the
hose onto the ribbed gas input connector on the back of the welder. Secure both ends of the hose with the jubilee clips provided. Push one end of the
smaller diameter gas hose into the open end of the adaptor and push the other end into the regulator outlet, it will seal automatically. See fig10. To release
the gas hose, press the collet inwards on the quick couplers and pull the hose out.
fig.9
Original Language Version
MIGHTYMIG150 Issue: 2 - 26/02/10