Introduction & specification, Preparation, Fig.1 fig.2 – Sealey MIGHTYMIG100 User Manual
Page 3
2. INTRODUCTION & SPECIFICATION
IMPORTANT: These instructions contain the information you require to prepare your machine for welding, together with a maintenance and a troubleshooting
section. The instructions are not intended to teach you how to weld. If you have no experience, we recommend that you seek training from an expert source. MIG
welding is relatively easy, but does require a steady hand and supervised practice on scrap metal, as it is only with continued practice that you will achieve the
desired results.
INTRODUCTION: Our professional range of MIGHTYMIG welders all feature a heavy-duty high output transformer and forced air cooling to maximise duty cycle
performance. MIGHTYMIG100 is supplied with a comfort grip non-live torch, 1.8mtr earth cable, 0.45kg flux cored wire and 1.0mm contact tip.
3. PREPARATION
Model No: . . . . . . . . . . . . . . . . . . . . . . . . . . . . . . . . . . . MIGHTYMIG100
Maximum Current . . . . . . . . . . . . . . . . . . . . . . . . . . . . . . . . . . . . . . .100A
Wire Capacity - steel . . . . . . . . . . . . . . . . . . . . . . . . . . . . . . . . . . . . 0.9kg
Duty Cycle . . . . . . . . . . . . . . . . . . . . . . . . . . . . . . . 60%@55A,20%@90A
Cooling System . . . . . . . . . . . . . . . . . . . . . . . . . . . . . . . . . . . . .Forced Air
Torch . . . . . . . . . . . . . . . . . . . . . . . . . . . . . . . . . . . . . . . . . . . . . . Non-live
Power Input . . . . . . . . . . . . . . . . . . . . . . . . . . . . . . . . . . . . . . . . 230V 1ph
Absorbed power. . . . . . . . . . . . . . . . . . . . . . . . . . . . . . . . . . . . . . . . . 3kW
Weight . . . . . . . . . . . . . . . . . . . . . . . . . . . . . . . . . . . . . . . . . . . . . . 14.5kg
Flux cored wire (0.9kg x Ø0.9mm) . . . . . . . . . . . . . . . . . . . . . . . TG100/1
Replacement tips (Pack of 5). . . . . . . . . . . . . . . . . . . . . . . . . . . . TG100/3
3.1. Fitting a reel of wire:
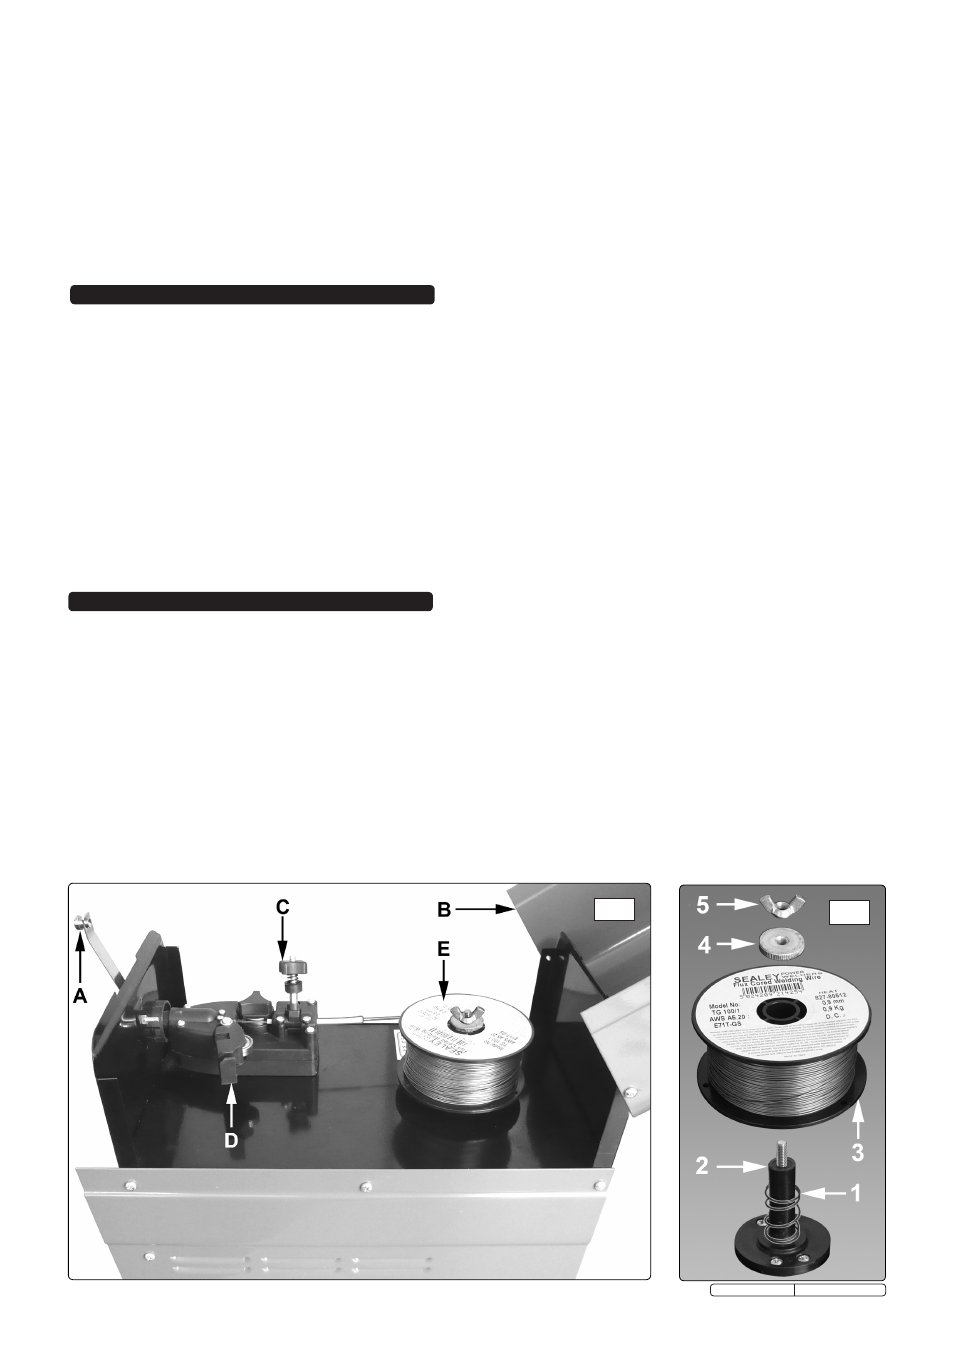
3.1.1 Depress the silver button in the front of the handle and open the top compartment. See A & B in fig.1. The welder is supplied with a mini spool containing
0.45kg of flux cored wire.
3.1.2 Referring to fig.2, rotate the butterfly nut (5) anti-clockwise and remove it from the threaded spindle together with the pressure disc (4). Leave the spring (1)
on the spindle (2).
3.1.3 Place the wire reel (3) over the spindle and down onto the spring ensuring that the wire will withdraw from the spool in a forwards direction and on the
same side of the compartment as the wire feed unit.
3.1.4 Push lightly down on the top of the reel of wire and screw the pressure disc (4) onto the end of the spindle and down onto the top of the wire reel. The reel
take off pressure should be set to provide a mild braking effect to prevent overrun where loose coils of wire form on the reel. Do not overtighten the
pressure disc as too much braking will conflict with the wire tension set on the wire drive unit. Lock the position of the pressure disc by screwing the
butterfly nut (5) down on top of it.
3.1.5 Referring to fig.1 turn the knob on the wire lock screw (C) anti-clockwise and lift it up and away from the pressure roller moulding. Swing the pressure roller
moulding (D) away from the drive roller.
3.1.6 Release the wire from the spool (do not allow wire to uncoil) and straighten 40-50mm of wire and gently push through the flexible plastic guide and through
the 0.9mm feed roller groove (fig.3) and into the torch liner.
DO NOT operate the welder if it or the cables are damaged and DO NOT attempt to fit any unapproved torches or other components to the welder.
DO NOT get welder wet or use in damp or wet locations or areas where there is condensation.
DANGER! DO NOT weld near flammable solids, liquids or gases and DO NOT weld containers or pipes which have held flammable materials.
Avoid welding materials which have been cleaned with chlorinated solvents or welding near such solvents.
DO NOT stand welder on a metal workbench, car bodywork or similar.
DO NOT touch any live metal parts of the torch or electrode while the machine is switched on.
DO NOT pull the welder by the cable, or the torch. Protect cables from sharp or abrasive items. DO NOT bend, strain or stand on cables or leads.
Protect from heat. Long lengths of slack must be gathered and neatly coiled.
DO NOT place cables where they endanger others.
DO NOT touch the torch or workpiece immediately after welding as they will be very hot. Allow to cool.
DO NOT operate welder while under the influence of drugs, alcohol or intoxicating medication, or if tired.
When not in use store the welder in a safe, dry, childproof area.
fig.1
fig.2
Original Language Version
MIGHTYMIG100 Issue: 2 - 26/02/10