Fig.5 fig.6, Unpacking & contents 5. assembly & installation – Sealey POWERMIG3525 User Manual
Page 4
4. UNPACKING & CONTENTS
5. ASSEMBLY & INSTALLATION
4.1
UNPACKING
Due to the weight of these welders it is a four man job to unpack them
and some form of mechanical lifting device may be required. Open the
carton and remove all the accessories and other loose items of packing.
We recommend cutting away one end of the carton so that the welder
can be wheeled out of the pack directly onto a hard concrete surface.
4.2
CONTENTS
4.2.1
MAIN WELDING UNIT.
Wire Feed Roller 0.8mm/1.0mm x 1
4.2.2
TORCh & CABLE with Euro connector.
Welding Tips 0.8 x 2
Welding Tips 1.0 x 2
Torch maintenance spanner
4.2.3
EARTh CLAMP CABLE
4.2.4
GAS REGULATOR
4.2.5
GAS BOTTLE RETAINING ChAIN
5.1. WELDER ASSEMBLY
5.1.1 The welder comes with wheels and handles fully assembled.
5.2
CONNECT WELDER TO ThE MAINS POWER SUPPLY.
5.2.1 Before making any electrical connections, ensure that the mains
voltage
and frequency of the supply matches the electrical specification
of the welder as stated on the welder’s rating plate.
5.2.2 The welder must only be connected to a three phase power supply
with the neutral conductor connected to earth.
5.2.3 Refer to the section on electrical safety at the start of these instructions
for information on the correct connection of the mains power plug.
5.3. CONNECT TORCh “Euro Connection”.
Your welder is fitted with a “Euro Connection” quick release torch.
Line up the pins in the torch connector with the appropriate holes in
the socket on the front panel connector (fig.3), push in, engage and
tighten the locking nut (fig.4).
5.5 CONNECTING ThE GAS CYLINDER (fig.7 & 8).
5.5.1 Stand the gas cylinder on the platform at the rear of the welder and
secure with chain supplied. The platform is designed to support bottles
up to a maximum weight of 20kg.
5.5.2 If using Argon or Argon mixtures, you will need to use the “bull nosed
adaptor” supplied. (If you intend to use CO² gas the regulator will fit
directly onto the cylinder). If using the bull nosed adaptor, fit it to the
cylinder first and tighten with a spanner.
5.5.3 Remove regulator from box and screw it to the bull nosed adaptor (or
CO² cylinder). Slide a small jubilee clip over one end of the gas pipe
supplied and push it onto the regulator gas outlet and secure it with the
pipe clip supplied (fig 8). Tighten the jubilee clip.
Note: The regulator
supplied may differ from that illustrated.
5.5.4 Slide a jubilee clip over the other end of the gas pipe and push it onto
the gas inlet fitting on the rear of the welder and secure it with the
pipe clip supplied (fig 8). Tighten the jubilee clip.
5.5.5 Close the regulator by turning the adjusting knob anti-clockwise to
relieve the pressure on the diaphragm before opening the cylinder
valve. If this is not done, pressure from the cylinder can damage the
diaphragm and render the regulator inoperative.
5.5.6 Set the regulator flow rate to 4litres/min depending on the material to be
welded, also taking into consideration any draughts which are strong
enough to disturb the gas flow.
fig.5
fig.6
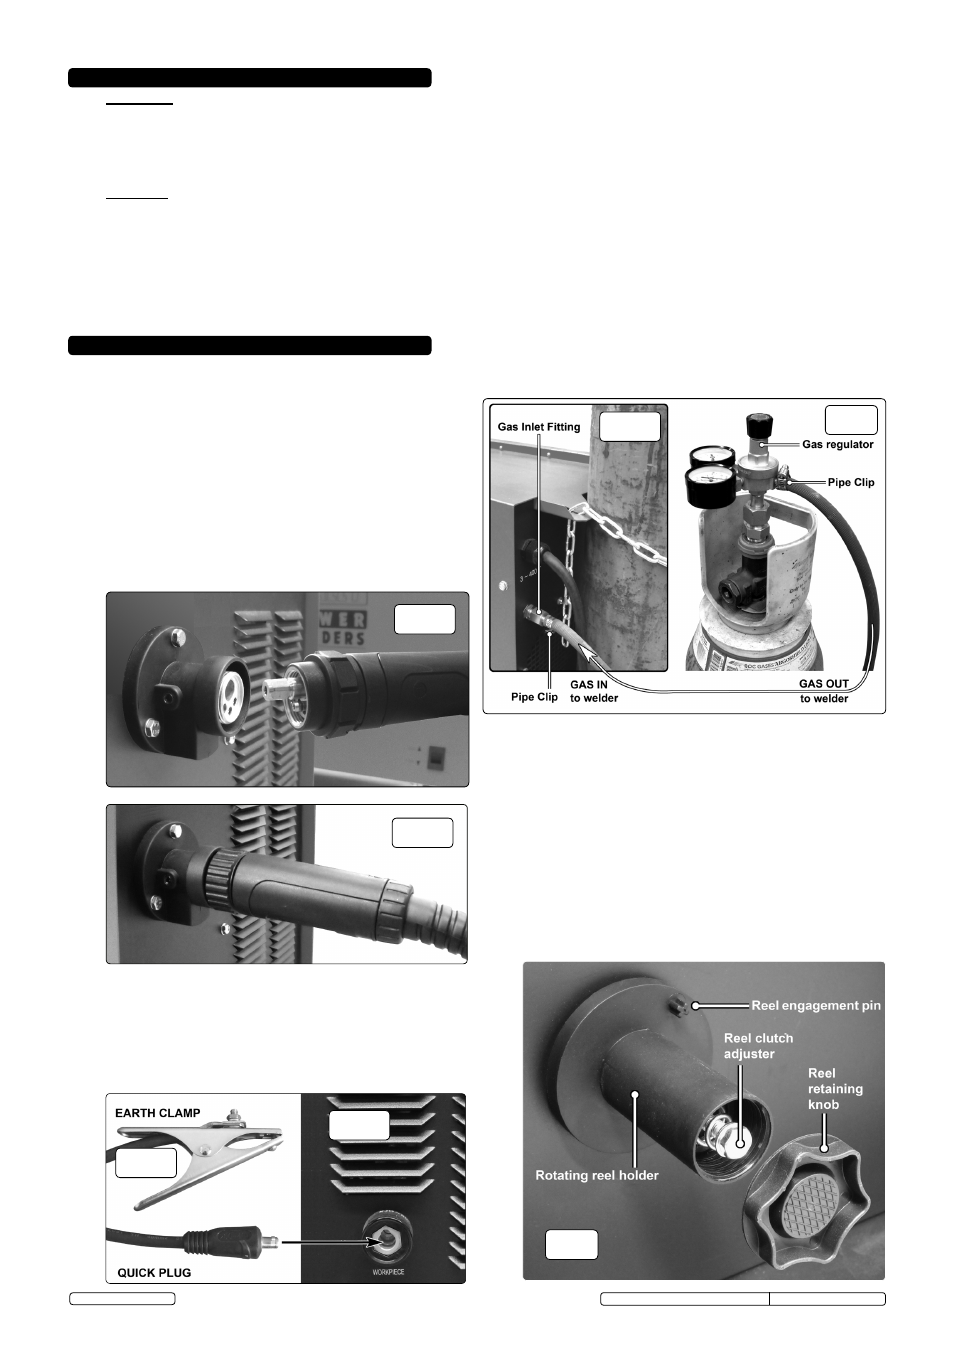
5.6
FIT A REEL OF WIRE. Ensure the welder is unplugged from the
mains power. The wire feed reel holder will accept reels of wire up to
15kg as shown in fig.15.
5.6.1 Referring to fig.9, open the side of the wire feed compartment, and
unscrew the reel retaining knob from the end of the rotating reel holder.
Push the reel of wire onto the holder ensuring that the spool is rotating
clockwise with the wire drawing off the top of the reel towards the
flexible wire guide on the wire drive unit. The larger spools of wire have
a 'moulded in' guide tube which must be located over the reel
engagement pin on the rotating reel holder flange (See fig.9 below). The
pin, in conjunction with the reel tension clutch adjuster will stop
heavy reels of wire from free wheeling on the reel holder. See also
'setting wire tension' in section 6.4.
5.6.2 Retain the reel of wire on the holder by screwing the reel retaining knob
back into place as indicated in fig.15.
Original Language Version
© Jack Sealey Limited
5.4
CONNECTING ThE WELDING CURRENT RETURN CABLE (fig.6).
5.4.1 The earthing clamp (fig.5)
should be firmly attached to the piece being
welded ( or to a metal bench supporting it ), as close as possible to
the joint being made.
5.4.2 The quick connector at the other end of the cable will be connected to
the socket identified with a minus symbol ( - ) on the lower part of the
front panel.
fig.3
fig.4
fig.7
fig.8
fig.9
POWERMIG3525, POWERMIG3530 Issue: 3 (SP) -18/07/13