頁面 3 – Mpman XRM34 User Manual
Page 3
UK-2
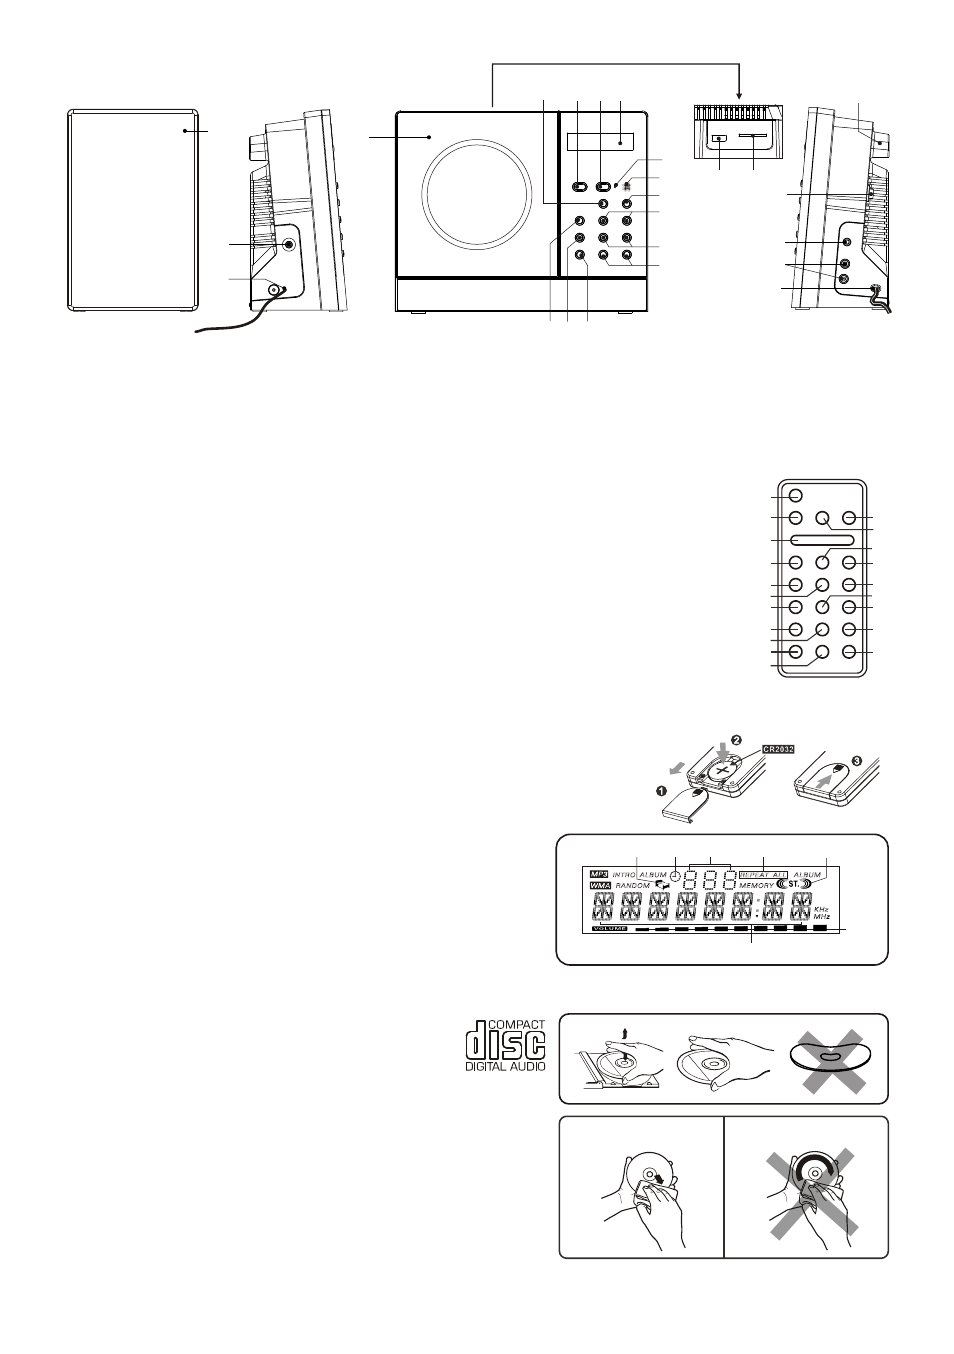
1. SPEAKER
2. LINE IN JACK
3. FM ANTENNA
4. CD DOOR
5. FUNCTION BUTTON
6. MEM/C-ADJ. BUTTON
7. TIMER
8. VOLUME (+ or -) BUTTON
9. PRESET/FOLDER
BUTTON
USB DEVICE IN PORT
SD/MMC MEMORY CARD IN SLOT
20. AC POWER MAIN SWITCH
HEADPHONES JACK
22. SPEAKER OUT
23.
HITCHING HOLE
17. STOP BUTTON
18.
19.
21.
AC CORD
24.
(L & R) JACK
FEATURES AND CONTROLS
1
2
3
4
5 6 7
8
9
10
11
12
13
14
15
16
17
18
19
20
21
23
22
(UP or DOWN) BUTTON
10. SKIP/TUNE SEARCH
(UP or DOWN) BUTTON
11. PLAY/PAUSE BUTTON
12. IR SENSOR
13. STANDBY LED INDICATOR
14. LCD DISPLAY
15. STANDBY/ON BUTTON
BUTTON
16. OPEN/CLOSE
REMOTE CONTROL
MO./
.
1. STANDBY/ON BUTTON
2. ID3/
ST BUTTON
3. OPEN/CLOSE BUTTON
4. TIMER BUTTON
5. FUNCTION BUTTON
6. MEM/C-ADJ. BUTTON
7. SLEEP BUTTON
8. SKIP/TUNE SEARCH DOWN BUTTON
9. INTRO BUTTON
10.EQ BUTTON
PUTTING THE BATTERY INTO THE REMOTE CONTROL UNIT
Press down the compartment cover, and slide the cover off to open it. Place
the button battery (CR2032) into it according to the polarity markings with
the “+” sign facing up. Place the cover over the compartment, push it
upward until it snaps on.
Note :Do not mix normal batteries with rechargeable battery. When the
batteries become weak, remote control will not function and replace with
new batteries.
11.REPEAT BUTTON
12.MUTE BUTTON
13.VOLUME “-” BUTTON
14.VOLUME “+” BUTTON
15.RANDOM BUTTON
16.PRESET/FOLDER UP BUTTON
17.PRESET/FOLDER DOWN BUTTON
18.SKIP/TUNE SEARCH UP BUTTON
19.PLAY/PAUSE BUTTON
20.STOP BUTTON
1
2
3
4
5
6
7
8
9
10
11
12
13
14
15
16
17
18
19
20
**BUTTON BATTERY INCLUDED**
Please remove safety strip before using the unit
Change the button
battery
LCD DISPLAY WINDOW
A. SLEEP INDICATOR
B. TIMER INDICATOR
C. ALBUM/RADIO MEMORY NUMBER INDICATOR
D.
INDICATOR
E. STEREO INDICATOR
F. VOLUME HIGH/LOW INDICATOR
G. TRACK/NUMBER/TIME INDICATOR
REPEAT 1 & ALL
COMPACT DISC
1. Always use a compact discs bearing the mark as shown.
2. Notes on handling discs
Removing the disc from its storage case and
loading it.
* Do not touch the reflective recorded surface.
* Do not stick paper or write anything on the surface.
* Do not bend the disc.
3. Storage
* Store the disc in its case.
* Do not expose discs to direct sunlight or high temperatures,
high humidity or dusty places.
4. Cleaning a disc
* Should the disc become soiled, wipe off dust, dirt and
fingerprints with a soft cloth.
* The disc should be cleaned from the center to the edge.
* Never use benzene, thinners, record cleaner fluid or anti static
spray.
* Be sure to close the CD door so the lens is not contaminated
by dust.
* Do not touch the lens.
FROM THE CENTRE
TO THE EDGE
INCORRECT
CORRECT
24
A
B
C
D
G
F
E