Reach: rear panel features, Mackie connect app, Power connector – MACKIE Reach User Manual
Page 11: Power switch, Xlr and 1/4" combo inputs, Owner’ s manual
Owner’
s Manual
11
Owner’s Manual
Reach: Rear Panel Features
Mackie Connect App
Reach is designed to be used in conjunction with
the Mackie Connect App. With it, all of the hardware
features listed here – and more! – may be controlled
remotely via Bluetooth connection. The only thing the
Mackie Connect App can’t do is turn the unit on and off
or pair a Bluetooth device.
More information about the Mackie Connect App may
be found by visiting the Mackie Connect App Reference
Guide.
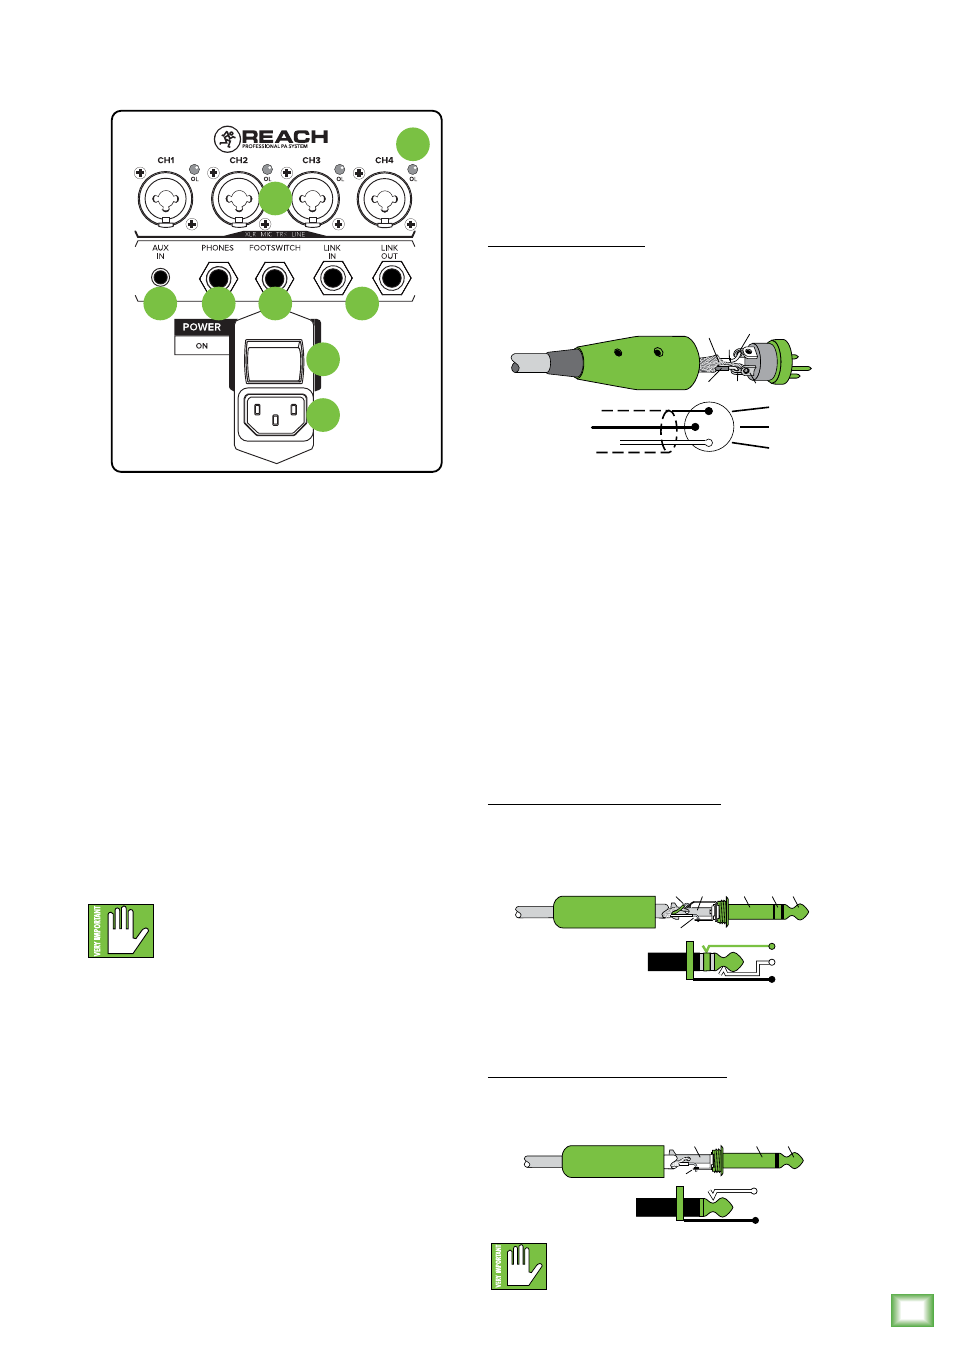
1. Power Connector
This is a standard 3-prong IEC power connector.
Connect the detachable linecord (included in the box)
to the power receptacle, and plug the other end of the
linecord into an AC outlet. .
Warning: Disconnecting the plug’s ground
pin is dangerous. Don’t do it.
2. Power Switch
Press the top of this rocker switch inwards to turn
Reach on. The front panel Running Man logo will glow
with happiness...or at least it will if Reach is plugged
into a suitable live AC mains supply.
Press the bottom of this rocker switch inwards to put
Reach into standby mode. It will not function, but some
circuits are still live. To remove AC power, either turn
off the AC mains supply, or unplug the power cord from
Reach and the AC mains supply.
3. XLR and 1/4" Combo Inputs
The four input channels may accept a balanced
mic signal using an XLR connector. They are wired
as follows, according to standards specified by the
AES (Audio Engineering Society).
XLR Balanced Wiring:
Pin 1 = Shield (ground)
Pin 2 = Positive (+ or hot)
Pin 3 = Negative (– or cold)
In addition to accepting a balanced mic signal using
an XLR connector, these input channels may also accept
1/4" line-level signals driven by balanced or unbalanced
sources.
Additionally, all four input channels may accept Hi-Z
sources (such as guitars) via the 1/4" input without the
need for a separate DI box.
To connect balanced lines to these inputs, use
a 1/4" Tip-Ring-Sleeve (TRS) plug. “TRS” stands for
Tip-Ring-Sleeve, the three connection points available
on a stereo 1/4" or balanced phone jack or plug. TRS
jacks and plugs are used for balanced signals and are
wired as follows:
1/4" TRS Balanced Mono Wiring:
Sleeve = Shield
Tip = Hot (+)
Ring = Cold (–)
To connect unbalanced lines to these inputs, use
a 1/4" mono (TS) phone plug, wired as follows:
1/4" TS Unbalanced Mono Wiring:
Sleeve = Shield
Tip = Hot (+)
NEVER connect the output of an amplifier
directly to a Reach’s input jack. This could
damage the input circuitry!
2
3
1
SHIELD
COLD
HOT
SHIELD
COLD
HOT
3
2
1
SLEEVE
TIP
SLEEVE
TIP
RING
RING
TIP
SLEEVE
RING
SLEEVE
TIP
TIP
SLEEVE
TIP
SLEEVE
1
2
3
7
5
6
8
4