Bushnell 6x24 Prime 1300 Laser Rangefinder (Black) User Manual
Page 3
3
2
1
3
6
7
4
8
5
9
10
11
12
13
14
15
16
Battery Level Indicator Icon (3):
Full charge
3/4 battery level remaining
1/2 battery level remaining
1/4 battery level remaining
Battery icon blinks - battery needs to be replaced and unit will not be operable.
BASIC OPERATION
• While looking through the laser rangefinder, press and release the Power/Fire button to activate the display.
• If the display appears blurry, rotate the rubber eyecup/diopter adjustment in either direction until the display is sharp
for your vision.
• Placing the aiming circle (located in the center of the display) on a target at least 5-6 yards away, depress and hold the
Fire button down until the range reading is displayed below the aiming circle.
• Once a range has been acquired, you can release the Fire button. The four “crosshairs” just outside the aiming circle
will go out, indicating the laser is no longer being transmitted. The display will remain on and display the last distance
measurement for about 15 seconds, until the display automatically switches off to extend battery life.
• You can press the Fire button again at any time to check the range to a new target. To re-fire, press the button again.
• To scan the laser across an area and get continuously updated range readings, simply continue to hold the Fire button
down and sweep the rangefinder over multiple targets. The crosshairs outside the aiming circle will flash to indicate scan
operation.
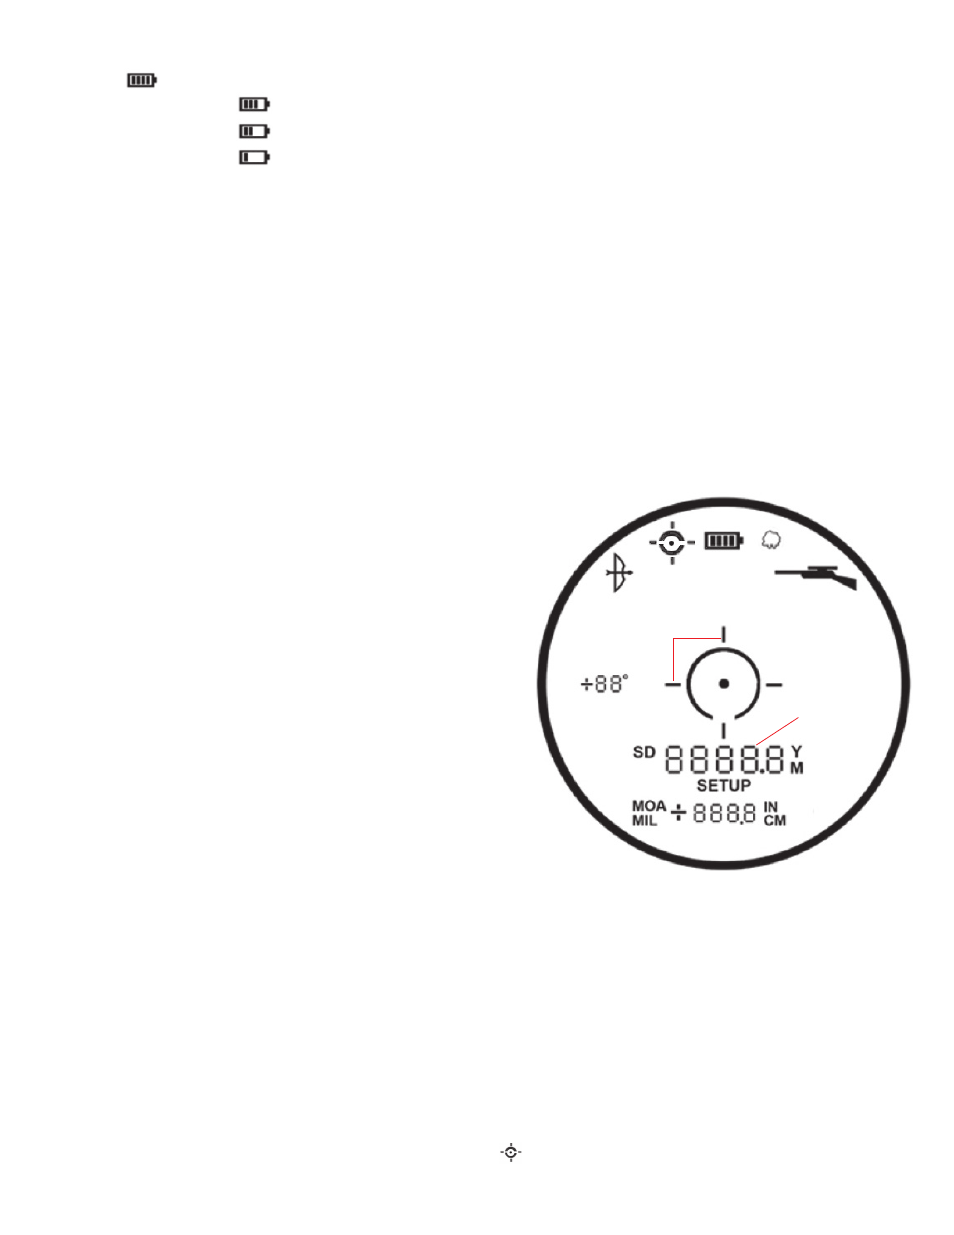
DISPLAY INDICATORS/ICONS
The Prime rangefinder’s display incorporates the following illuminated indicators:
Angle Range Compensation Modes
• Bow Mode (1)
• Rifle Mode (2)
Battery Level Indicator (3)
Aiming Circle/Dot (4)
Active/Scan Laser Indicator (5)
Targeting Modes
• BullsEye Mode (6)
• Brush Mode (7)
Primary Numeric Display displays Line-of-sight Distance (8)
Holdover / Bullet-drop Horizontal Distance indicators for Rifle Mode
• MOA holdover units selected (9)
• MIL (holdover units selected (10)
• IN (inch) or CM (centimeter) holdover units selected (11)
• SD = Variable Sight-In Distance (12)
Range (Distance) Units (13): Y=Yards, M=Meters
Secondary Numeric Display (14)
(Holdover / bullet drop for Rifle mode, True Horizontal Distance for Bow Mode)
SETUP Mode (15)
Angle Indicator (16)
TARGETING MODES
The Prime laser rangefinder can be operated in one of three available targeting modes, with Standard mode as the default.
To select a different targeting mode, press the Mode button briefly until the desired indicator (BullsEye or Brush) appears.
To return to Standard mode, press Mode one more time after the Brush mode indicator is seen. The targeting modes are:
• Standard Mode
with Automatic SCAN
(LCD Indicator – none) This setting allows most targets to be ranged, up to
1700 or 1300 yards (depending on model). Used for moderately reflective targets that are typical of most distancing
situations. The minimum distance in the standard mode is 5 yards. To use the Automatic SCAN feature, simply press
and hold the Fire button, then move the rangefinder from object to object while keeping the Fire button depressed.
Automatic SCAN will allow the range to be continuously updated as multiple objects are targeted. Crosshair lines flash
while scanning.
• BullsEye
™
Mode
with Automatic SCAN
(LCD Indicator (6) - ) This advanced mode allows easy acquisition of small
targets and game without inadvertently getting distances to background targets that have stronger signal strength.