Pilz PMCprimo DriveP.01/AA0/4/0/0/208-480VAC User Manual
Page 3
- 3 -
X6E
1
CNTR-P (RTS)
PROFIBUS RTS/PROFIBUS RTS/PROFIBUS RTS
3
GND
Masse/Earth/Masse
4 *)
CAN2_H
CAN High-Signal/CAN high signal/Signal haut CAN
RxD/TxD-N
PROFIBUS A-Leitung/PROFIBUS A-line/Câble A
PROFIBUS
5 *)
CAN2_L
CAN Low-Signal/CAN low signal/Signal bas CAN
RxD/TxD-P
PROFIBUS B-Leitung/PROFIBUS B-line/Câble B
PROFIBUS
6
GND
Masse/Earth/Masse
7
CAN1_H
CAN High-Signal/CAN high signal/Signal haut CAN
8
CAN1_L
CAN Low-Signal/CAN low signal/Signal bas CAN
1303453323
*) Je nach Gerätevariante CANopen- oder
PROFIBUS-Signale.
**) Nur bei PMCprimo DriveP.CAN-PROFI-Ad-
apter.
***) Nur bei PMCprimo DriveP.CAN-CAN-Ad-
apter.
*) CANopen or PROFIBUS signals, depending
on the unit type
**) Only on the PMCprimo DriveP.CAN-PROFI
Adapter.
***) Only on the PMCprimo DriveP.CAN-CAN
Adapter.
*) en fonction du modèle de l'appareil : signaux
CANopen ou PROFIBUS.
**) uniquement pour les adaptateurs
PMCprimo DriveP.CAN-PROFI.
***) uniquement pour les adaptateurs
PMCprimo DriveP.CAN-CAN.
Funktion der DIP-Schalter
Function of the DIP switches
Fonction des contacts DIP
Schalter/Switch/Com-
mutateur
Stellung/Position/Po-
sition
Bedeutung/Key/Signification
1
1
CAN1: Abschlusswiderstand ist zugeschaltet/Terminating resistor is selected/la résistance
de terminaison est activée
0
CAN1: Abschlusswiderstand ist abgeschaltet/Terminating resistor is de-selected/la rési-
stance de terminaison est désactivée
2 *)
1
CAN2 oder/or/ou PROFIBUS: Abschlusswiderstand ist zugeschaltet/Terminating resistor is
selected/la résistance de terminaison est activée
0
CAN2 oder/or/ou PROFIBUS: Abschlusswiderstand ist abgeschaltet/Terminating resistor is
de-selected/la résistance de terminaison est désactivée
3
1
CANP_H (PMCprotego D) ist zugeschaltet/CANP_H (PMCprotego D) is selected/CANP_H
(PMCprotego D) est activée
0
CANP_H (PMCprotego D) ist abgeschaltet/CANP_H (PMCprotego D) is de-selected/
CANP_H (PMCprotego D) est désactivée
4
1
CANP_L (PMCprotego D) ist zugeschaltet/CANP_L (PMCprotego D) is selected/CANP_L
(PMCprotego D) est activée
0
CANP_L (PMCprotego D) ist abgeschaltet/CANP_L (PMCprotego D) is de-selected/
CANP_L (PMCprotego D) est désactivée
1303454731
*) Je nach Gerätevariante CANopen oder
PROFIBUS.
INFO: Default-Einstellung: Alle DIP-Schaltern
stehen in Stellung "1".
*) CANopen or PROFIBUS, depending on the
unit type.
INFORMATION: Default setting: All DIP
switches are set to "1".
*) en fonction du modèle de l'appareil :
CANopen ou PROFIBUS.
INFORMATION : Réglage par défaut : tous les
contacts DIP sont en position « 1 ».
Montage
1278614027
Bei der Montage des Adapters gehen Sie wie
folgt vor:
Schalten Sie die Netzspannungen und die
24 V-Versorgungsspannung aus!
Stecken Sie den 9-pol. Sub-D-Buchsenstek-
ker X6D auf den Stiftstecker X6 des Servo-
verstärkers.
Drehen Sie die Schrauben in die Gewinde
des Gehäuses.
Installation
To install the adapter, follow the instructions
below:
Switch off the mains voltages and 24 V sup-
ply!
Connect the 9-pin female D-Sub connector
X6D to the male connector X6 on the servo
amplifier.
Turn the screws into the thread on the hous-
ing.
Montage
Procédez comme suit pour le montage de
l'adaptateur :
Coupez les tensions du secteur et la tension
d'alimentation 24 V !
Raccordez le connecteur femelle Sub-D à 9
broches X6D au connecteur mâle X6 du va-
riateur de puissance.
Vissez les vis dans le filet du boîtier.
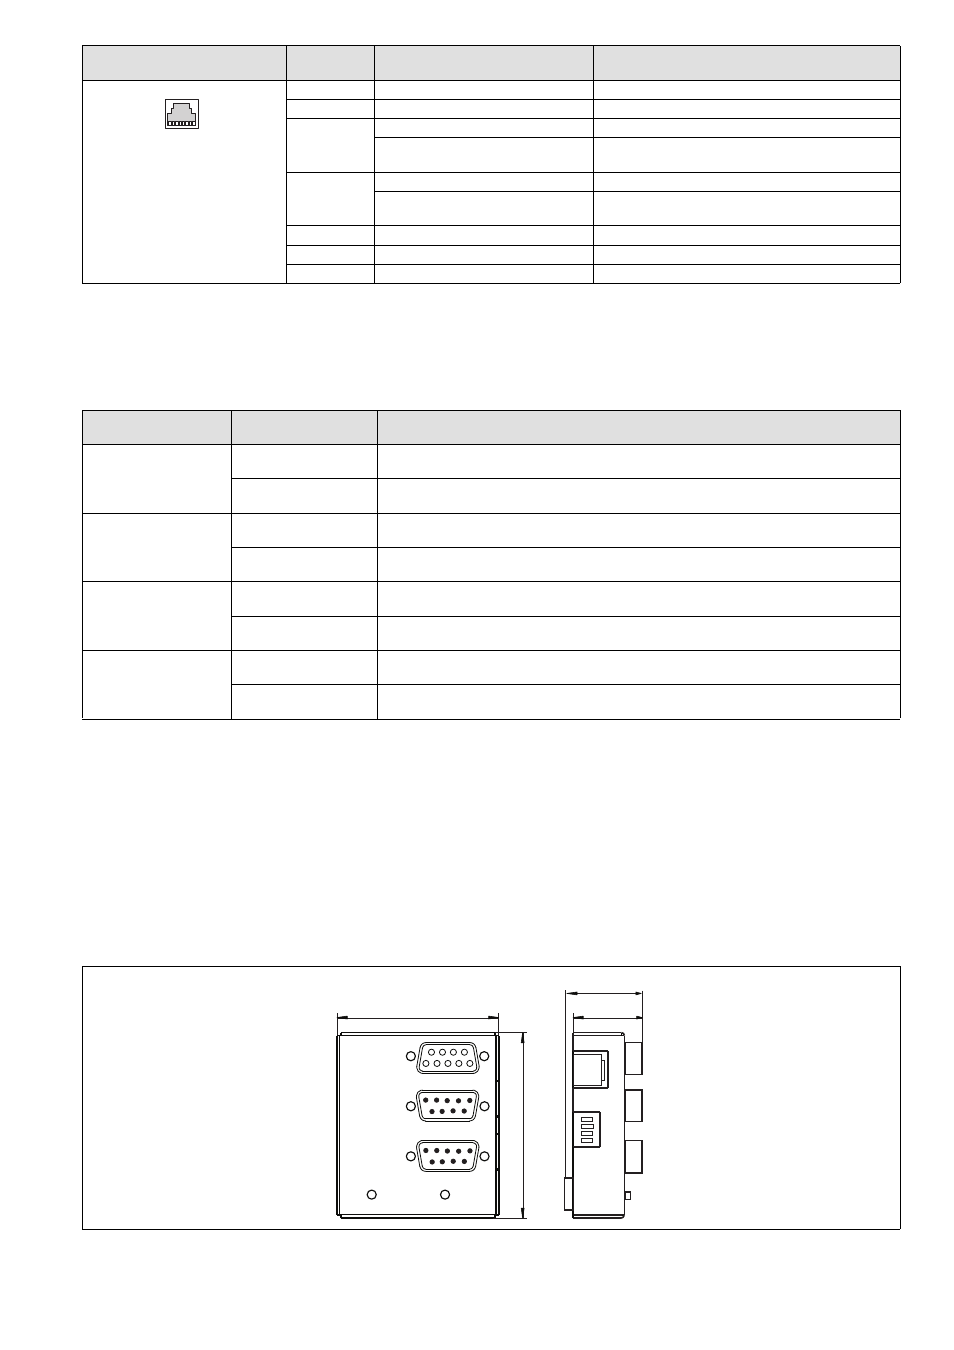
Abmessungen
Dimensions
Dimensions
Stecker/Connector/ Connec-
teur
Pin/Pin/Bro-
che
Bezeichnung/Designation/Dési-
gnation
Beschreibung/Description /Description
1
8
24.7 (0.97")
26.2 (12.03")
63 (2.48")
55 (2.17")
- PMCprimo DriveP.01/AA0/5/0/0/208-480VAC PMCprimo DriveP.12/AA0/4/0/0/208-480VAC PMCprimo DriveP.12/AA0/4/P/0/208-480VAC PMCprimo DriveP.03/AA0/4/0/0/208-480VAC PMCprimo DriveP.06/AA0/4/0/0/208-480VAC PMCprimo DriveP.24/ABB/4/0/0/208-480VAC PMCprimo DriveP.03/AB0/5/0/0/208-480VAC PMCprimo DriveP.06/AB0/2/0/0/208-480VAC PMCprimo DriveP.03/AB0/3/0/0/208-480VAC PMCprimo DriveP.06/AB0/3/0/0/208-480VAC PMCprimo DriveP.12/AB0/2/0/0/208-480VAC PMCprimo DriveP.12/ABC/4/P/0/208-480VAC PMCprimo DriveP.12/AB0/3/0/0/208-480VAC PMCprimo DriveP.03/AB0/2/0/0/208-480VAC PMCprimo DriveP.12/AAC/4/0/0/208-480VAC PMCprimo DriveP.24/AA0/5/0/0/208-480VAC PMCprimo DriveP.12/AA0/2/0/0/208-480VAC PMCprimo DriveP.CAN-PROFI-Adapter 01-24 PMCprimo DriveP.CAN-CAN-Adapter 01-24 PMCprimo DriveP.CAN-CAN-Adapter 48-72 PMCprimo DriveP.CAN-PROFI-Adapter 48-72 PMCprotego D.01/000/0/0/2/208-480VAC PMCprotego D.03/000/0/0/2/208-480VAC PMCprotego D.06/000/0/0/2/208-480VAC PMCprotego D.12/000/0/0/2/208-480VAC PMCprotego D.24/000/0/0/2/208-480VAC PMCprotego D.12/000/0/P/2/208-480VAC PMCprotego D.01/200/0/0/2/208-480VAC PMCprotego D.01/100/0/0/2/208-480VAC PMCprotego D.01/010/0/0/2/208-480VAC PMCprotego D.06/010/0/0/2/208-480VAC PMCprotego D.06/100/0/0/2/208-480VAC PMCprotego D.06/200/0/0/2/208-480VAC PMCprotego D.03/010/0/0/2/208-480VAC PMCprotego D.03/200/0/0/2/208-480VAC PMCprotego D.03/100/0/0/2/208-480VAC PMCprotego D.12/010/0/0/2/208-480VAC PMCprotego D.12/200/0/0/2/208-480VAC PMCprotego D.12/100/0/0/2/208-480VAC PMCprotego D.12/010/0/P/2/208-480VAC PMCprotego D.12/200/0/P/2/208-480VAC PMCprotego D.12/100/0/P/2/208-480VAC PMCprotego D.24/200/0/0/2/208-480VAC PMCprotego D.24/100/0/0/2/208-480VAC PMCprotego D.24/010/0/0/2/208-480VAC