Lenco iPD-1003 User Manual
Page 2
2 3
MAIN UNIT
1. iPod/iPhone DOCKING
2. CLOSE BUTTON
3. iPad DOCKING OPEN AREA
4. iPad DOCKING
5. SPEAKERS
6. STANDBY BUTTON
7. LCD DISPLAY
8. REMOTE SENSOR
9. VOL- BUTTON
10. FUNCTION BUTTON
11. PLAY/PAUSE BUTTON
12. VOL+ BUTTON
13. AC SOCKET
14. POWER BUTTON
15. VIDEO OUT JACK
16. LEFT & RIGHT LINE IN JACKS
17. AUX IN JACK
18. COAXIAL IN JACK
REMOTE CONTROL
1. VIDEO ON/OFF BUTTON
2. iPhone BUTTON
3. iPad BUTTON
4. PLAY/PAUSE BUTTON
5. PREVIOUS BUTTON
6. FAST FORWARD BUTTON
7. FAST BACKWARD BUTTON
8. BASS+/- BUTTON
9. SLEEP BUTTON
10. MUTE BUTTON
11. STANDBY BUTTON
12. COAXIAL IN BUTTON
13. AUX IN BUTTON
14. NEXT BUTTON
15. LINE IN BUTTON
16. RAN BUTTON
17. REP BUTTON
18. TREBLE+/- BUTTON
19. VOL+/- BUTTON
POWER SUPPLY
Connect the AC cable to the AC SOCKET on the rear of the unit and the main power.
SLEEP FUNCTION
During playback, press SLEEP button repeatedly to cycle through the sleep time options. When your
desired sleep time shows on the screen, release the SLEEP button. When the sleep time is expired, the
unit will switch off automatically.
MUTE THE UNIT
During playback, press MUTE button to switch off the audio. Press the button again to resume the
audio.
TREBLE/BASS EFFECT ADJUSTING
During playback, press TREBLE+/- button or press BASS+/- button on the remote to adjust the effect of
treble/bass respectively.
VOLUME LEVEL
Press VOL+/- button to adjust the volume level accordingly.
iPod/iPhone/iPad OPERATING
PLAYING AN iPod/iPhone/iPad
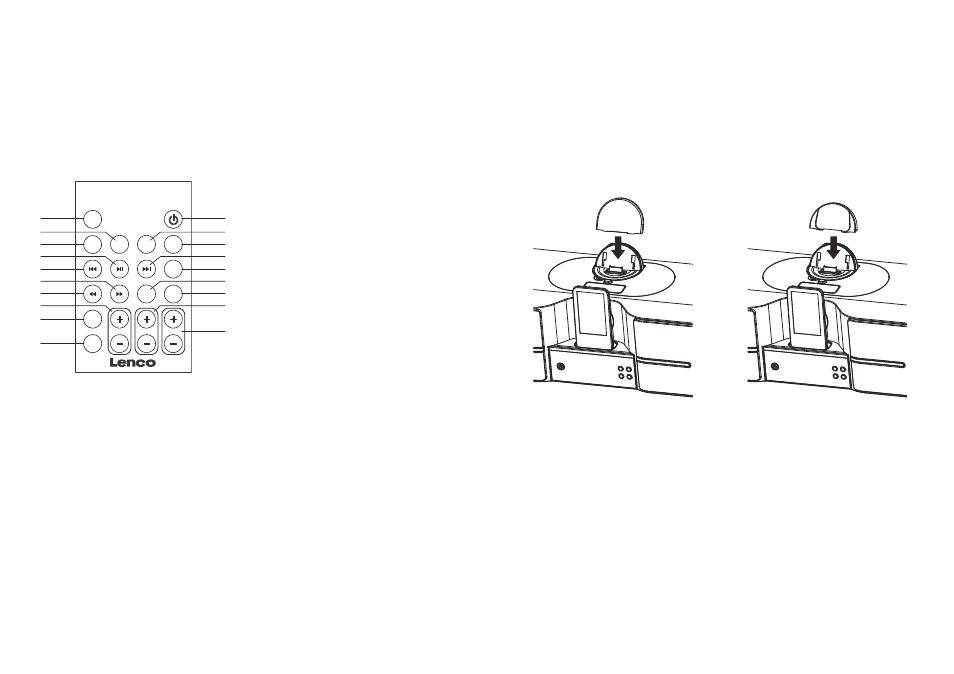
1. Lifting up the iPad docking.
(Note:
To close the iPad docking, press CLOSE button first, then press down the iPad docking by
hand. User can press CLOSE button together with lifting up the iPad docking, but make sure the lock
is in correct position so that iPad dock is opened and locked securely before use.)
2. The iPad pin connector is also compatible with iPod or iPhone. Before docking an iPad or iPhone to
iPad pin connector, please install the iPad/iPhone’s back plate (be supplied) to the unit first. In the
absence of such iPad back plate, this pin connector will be damaged during use if iPad is directly
docked (Slide down a corresponding back plate for locking it to the iPad bracket behind the iPad pin
connector properly as below).
3. Dock iPad/iPod/iPhone onto the unit at respective docking location.
4. Press the POWER button on the rear of the unit and then press STANDBY button to turn the unit on.
5. Press the FUNCTION button on the unit continuously or press iPhone button/iPad button on the
remote to toggle the unit to iPhone or iPad mode. The unit will play the inserted device automatically.
6. Press PLAY/PAUSE button to pause or start the iPod/iPhone playback.
7. During normal playback, Press PREVIOUS/NEXT button on the remote to skip the track/chapter
ahead or backward.
8. Press and hold FAST FORWARD or FAST BACKWARD button on the remote to search through the
current track/chapter forward or backward at a high speed.
9. Press RAN button on the remote to enable or disable random playback.
10. Press REP button on the remote repeatedly to repeat a single track/chapter, repeat all
tracks/chapters or disable the repeat function.
NOTE:
During playback, the connected iPod/iPhone may skip to another song accidently. Once the problem
occurs, please set the iPod/iPhone to shake off.
3D FUNCTION
In case the speaker cut off on the chipset protection, please turn OFF and ON as reset to resume the
3D function.
1
2
3
4
5
6
7
8
9
10
11
12
13
14
15
16
17
18
19
STANDBY
VIDEO
ON/OFF
LINE
IN
RAN
REP
SLEEP
BASS
TREBLE
VOL
MUTE
iPad
iPhone
AUX
IN
COAXIAL
IN
iPad back plate
iPhone back plate