MIPRO ma101a User Manual
Page 3
2
3
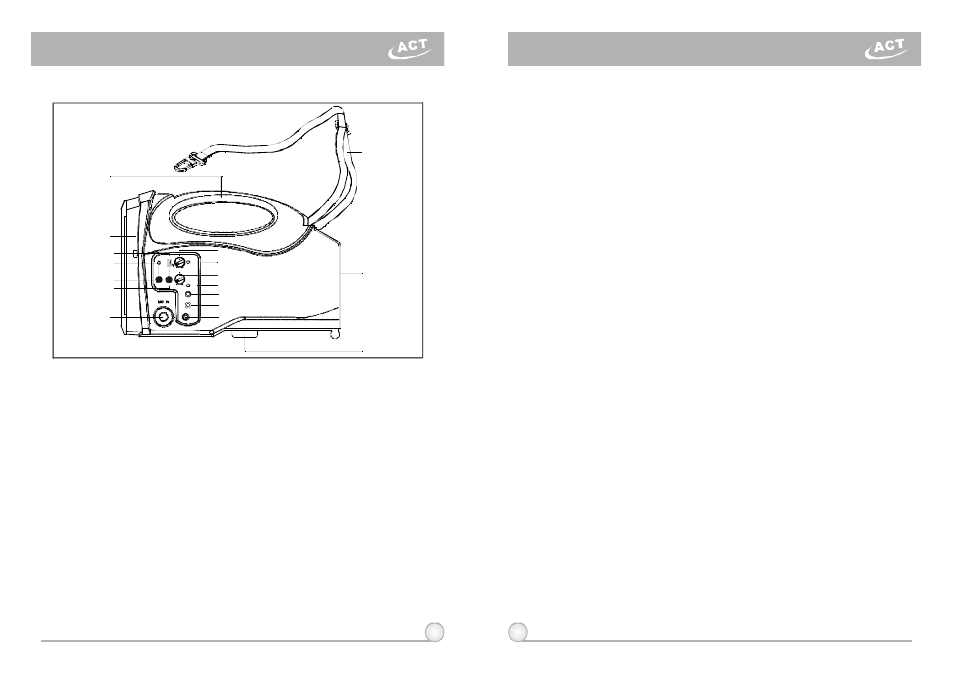
(1)
Fixed Handle: For convenient carrying by hand.
(2)
Speaker: Soundprojects in thedirection it is pointed.
(3)
Mic-In Jack: Accepts a 6.3mm (1/4" plugwired microphone.
(4)
Power Switch/Volume Control: Turn clockwise pasttheclickforpower-on and
volume control for the wireless microphone.
(5)
Power Indicator: Red light illuminates whenpower is turned ontodenote normal
power status. Green light indicates a RF link (it is receiving signalfromthe
wireless microphone).
(6)
Microphone Volume Control: Volume controlforthewiredmicrophone.
(7)
Charging Indicator:
(1)
Personal Wireless PASystem
(2) BatteryCharging Procedures:
(11) LED Channel Screen: Displays current channel.
(12) ACT Port
(13) ACT Button: To lock receiver channel automatically to the transmitter channel.
(14) Scan Button: To autoscanforaclearandinterference-free receiver channel.
(15) Body: Houses all electronic components.
(16) Shoulder Carry Belt: May be storedinside the Battery Compartment.
(17) Battery Compartment: The rechargeablebattery is locatedbehindthe battery
compartment door.
(18) Microphone Stand Mount: For convenient mounting onastandard 35mm threaded
microphone stand.
(8)
Line Out: Allows you t o s e n d a u d i o s i g n a l (AF) toanexternal amplifier.
(9)
Auxiliary Input Jack: Uses a 3.5mm (1/8""minijack" plug. Accepts external audio
inputs, such as portable cassette/CD/MP3player.
(10) DC Power Input Jack: Plug into DCcharger (supplied) for battery charging. The
inner conductor is positive and shouldbeconnectedto18VDC 10%, +2.5A.
a )
Red light indicatesthe battery i s w e a k a n d needs charging.Charging takesaminimum
of 4 hours.
b )
Greenblinking light indicates chargingis inprogress.
c )
Solidgreenlight indicatesthe batteryisfullycharged.
d )
T h i s systemis equippedwith anautocut-offcharger. When thebatteryis weak (red
light),powerwillcutoff automatically to a v o i d a n y d a m a g e t h a t c o u l d be caused b y a
powerover-drain.
a)
Turn onPower Switch / Volume Control(4). Redlight(5)shouldilluminate.
b)
Turn onwirelesstransmitter. Greenlight (5) should illuminate.
c)
Adjustvolumelevel(4) clockwisetodesired loudness.
d)
One wirelessmicrophone cansimultaneously transmit t o multiple MA-101a units
receiving on the same frequency. However, multiplewireless microphones o f the
same frequency cannottransmitto an MA-101a receiver onthatsame frequency. For
example,ifyouhavebothahand-heldwirelessmicrophoneand a body-pack
transmitter o n t h e s a m e frequency, be sure t o s w i t c h o f f o n e o f the t w o toavoid
severeinterference between them!
a)
Please make sure thebuilt-in rechargeable batteries arefully charged before
andafter use. The battery itself will gradually self-discharge o v e r a l o n g
period of time. Therefore, if t h e s y s t e m w i l l n o t b e u s e d f o r a l o n g p e r i o d o f
time, please make surethebatteries arefully charged before storingthem
properly. The Company warranty DOES NOT apply to over-discharged
batteries; hence, please ensure thebatteries are recharged every 3 months.
b)
Simply plug the connector ofthesupplied DC adapter to the DC 18V Power
Input Jack (10) and plug theother end into any available AC socket.
c)
Charging begins immediately, and will be indicated byaflashing green L E D .
I f t h e g r e e n L E D i s n o t f l a s h i n g , it may duetoexcessive power over-drain
a n d i t m a y t a k e l o n g e r f o r t h e g r e e n L E D t o f l a s h . This is normal and not
faulty. If, after a while,there is still no flashinggreen LED, the rechargeable
battery may be faulty.
d)
I f a battery replacement is needed, open the battery compartment and
exchangethefaultybattery for a new one. Be sure to insertthebatterywith
the right polarity connection.
e)
The battery is an expendable item. Under normal operation, MIPRO offers a
one-year limited w a rranty.
f)
Ifyouexperience a short operatingtime after the batteries arefully charged,
it is often an indication of aging batteries. Therefore, the rechargeable
battery shouldbereplaced as soonaspossibleatyourearliestconvenience.
DCIN18V
L I N E I N
L I N E O U T
CHARGE
ON
POWER
WIRELESSLEVEL
M I N
MAX
OFF
MAX
M I C I N L E V E L
(1)
(15)
(16)
(17)
(18)
(4)
(5)
(6)
(7)
(8)
(9)
(10)
(2)
(3)
SCAN
A C T
CHANNEL
(13)
(14)
(11)
(12)
1. PARTS NAME AND FUNCTIONS
Wireless Portable PAAmplifier
Wireless Portable PA Amplifier
2. OPERATING INSTRUCTIONS