Connection to external audio sources – MIPRO ma101a User Manual
Page 4
(3)
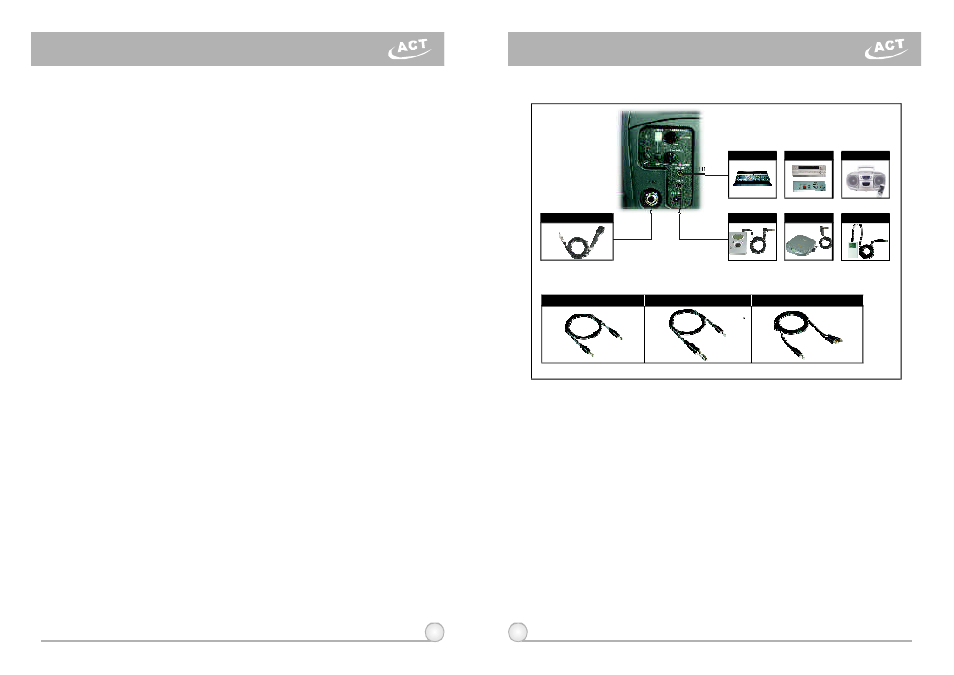
AuxiliaryIn
a)
Connectaline-levelsource,suchasportablecassette/CD/MP3playerintothe
Auxinputjack(9).
b)
TurnonthePAsystem(4)andadjustvolumeasdesired.
4
5
(4)
Installation
(6)
AFOutput
(5)
WiredMicrophoneInstructions
a)
Hand Carrying: Remove the shoulder belt (16) and store i n t h e Battery
Compartment (17) directly above the battery. UsetheFixedHandlefor
transport.
b)
Shoulder Carrying: Remove the shoulder belt (16) from the Battery
Compartment (17) andhook the connector around t h e r o d o n top of theunit,
between theFixed Handle and the Speaker.
c)
Mic Stand Mounting: The MA-101awill fit directly on top o f a m i c s t a n d
using the threaded mount (18) with noadditional hardware. Simply align the
hole withtheprotruding end of the mic stand and thread it o n t h e stand.
Allows the user to connect the MA-101a t o a n e x t e r n a l amplifier withhigh
power output. Connect t o t h e M i c I n p u t o r L i n e I n p u t o n t h e a m p l i f i e r . Usethe
Power Switch / Volume Control (4) to control the volumelevel.
a)
Turn on Power Switch / Volume Control (4). Red light (5) should illuminate.
b)
Plug a wired microphone i n t o the Mic In Jack (3). Turn ontheWired
Microphone Volume Control (6).
c)
Turn clockwise for desiredloudness (6).
d)
The MA-101a allows simultaneous usageofbothwiredandwireless
microphones.
Wireless Portable PAAmplifier
Wireless Portable PA Amplifier
I-POD
CDPLAYER
MP3PLAYER
LINEOUT
LINEIN
MICIN
3. CONNECTION TO EXTERNAL AUDIO SOURCES:
AVAILABLE CABLE FROM MIPRO:
Cableno:2FA031
CableMic.(6.3 Connector)
φ
Amplifier
Mixer
CassetteRecorder
MIPRONO:2FA071
6.3φ
3.5φ
3.5φ
3 . 5φ
3 . 5φ
RCA
MIPRONO:2FA072
MIPRONO:2FA073