CRU RAX210-3QR User Manual
Page 5
PMS 711
2 cyan
85 magenta
76 yellow
10.25.12
CRU Mark
Page 5
7 Usage with Mac and Windows Operating
Systems
7.1 Usage with Mac OS X
7.1.1 Formatting a Drive
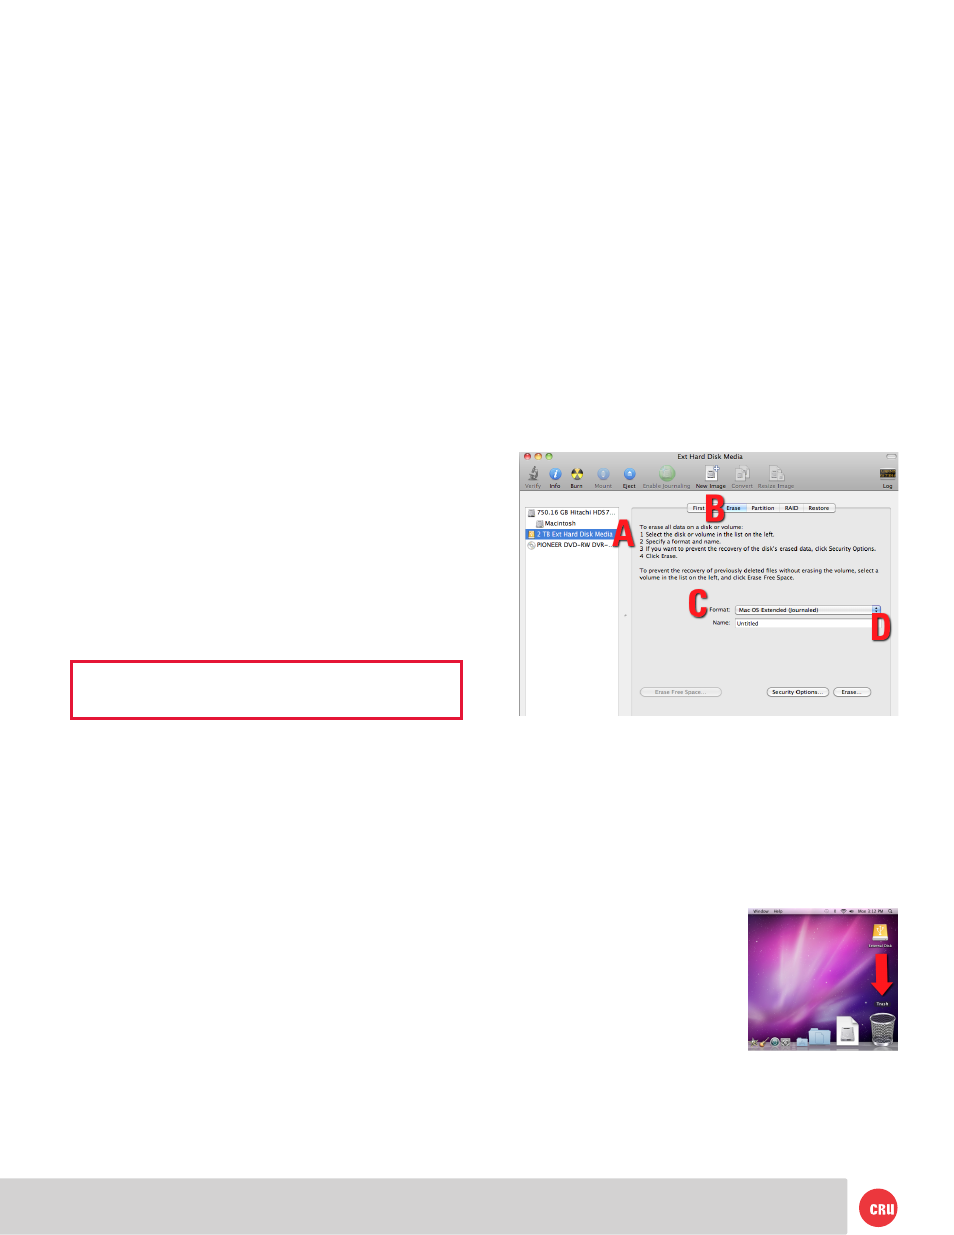
To format, use Disk Utility (pictured below), which can be
found in the Applications folder.
a. Click on the drive in the window to the left.
b. Click the Erase tab in the window to the right.
c. Select the format type. Most users prefer Mac OS
Extended with Journaling (HFS+), which is
required for compatibility with Time Machine (OS
10.5 or newer). If you need to use your RAX 3QR unit
with both Mac and Windows computers, select MS-
DOS File System instead.
d. Enter a name for the new volume and then click
Erase to start the process.
7.1.2 Mounting and Unmounting Volumes
If the hard drive installed in the RAX 3QR unit is already
formatted, an icon representing the drive’s volume will
appear (mount) on the desktop. You can begin using
the volume right away. If the drive is unformatted, a
message will appear on the desktop saying that the disk
is unreadable. Use OS X’s Disk Utility to easily format the
drive (see section above).
Unmount the volume before
powering down the unit by
dragging the volume’s icon to the
Trash, or by selecting the volume
then pressing Command-E.
Disconnecting the unit without
first unmounting the volume can
result in data loss.
7.1.3 Creating a Boot Drive
To activate this feature, you must first install OS X on the
hard drive in your carrier. The easiest way to do this is
to clone an existing system drive using a utility such as
Pressing Enter will result in the loss of all data
on the drives. Ensure all data is backed up, then
press Enter.
g. The new configuration will be selected and the RAX
3QR unit will reboot. The RAID is now created.
6.2 Changing the RAID Type
a. Disconnect the RAX 3QR unit from the computer.
b. Press the Up button to cycle the LCD menu to the
“Change RAID Mode” screen and press the Enter
button.
c. The LCD will display “Select RAID Type”. Press Up or
Down to cycle through the available options to your
desired RAID type and press Enter.
d. The screen will display “Will Erase all Data OK?”
Pressing Enter will result in the loss of all data
on the drives. Ensure all data is backed up, then
press Enter.
e. The new configuration will be selected and the RAX
3QR unit will reboot. The RAID is now created.
The RAX 3QR unit has been configured and is ready for
operation. Follow the instructions for the appropriate
operating system usage instructions to initialize and format
the drives.
6.3 Adding a New Drive to a RAID
NOTE: Any data on the new hard drive will be
destroyed when the drive is added to the RAID
RAID 0
Never remove a drive from a RAID 0 as this will cause the
loss of all data. In the event of a disk failure for a RAID 0, the
RAID will be destroyed. Add a drive and then press the Up
button to create a new RAID. Follow the display prompts to
build a new array.
RAID 1
In the event of a disk failure or removal, the RAID will
continue to function in a degraded state. Add a new disk to
the RAX 3QR unit to rebuild the RAID. After the new drive
has been detected, the RAX 3QR unit will ask to add a new
disk. Press the Enter button to do so. The disk will be added
to the RAID and the RAID will begin to rebuild. The LCD
screen will display the percent complete for the rebuild.
Rebuild times vary, but a 1TB hard drive typically takes just
over 3 hours to rebuild. You can toggle to the approximate
time remaining by pressing Enter on the front panel.