Diagnostic leds, Replacing a driver – Daktronics BB-2102 Tuff Sport Four-Sided Basketball LED Scoreboard User Manual
Page 44
38
TNMC Maintenance & Troubleshooting
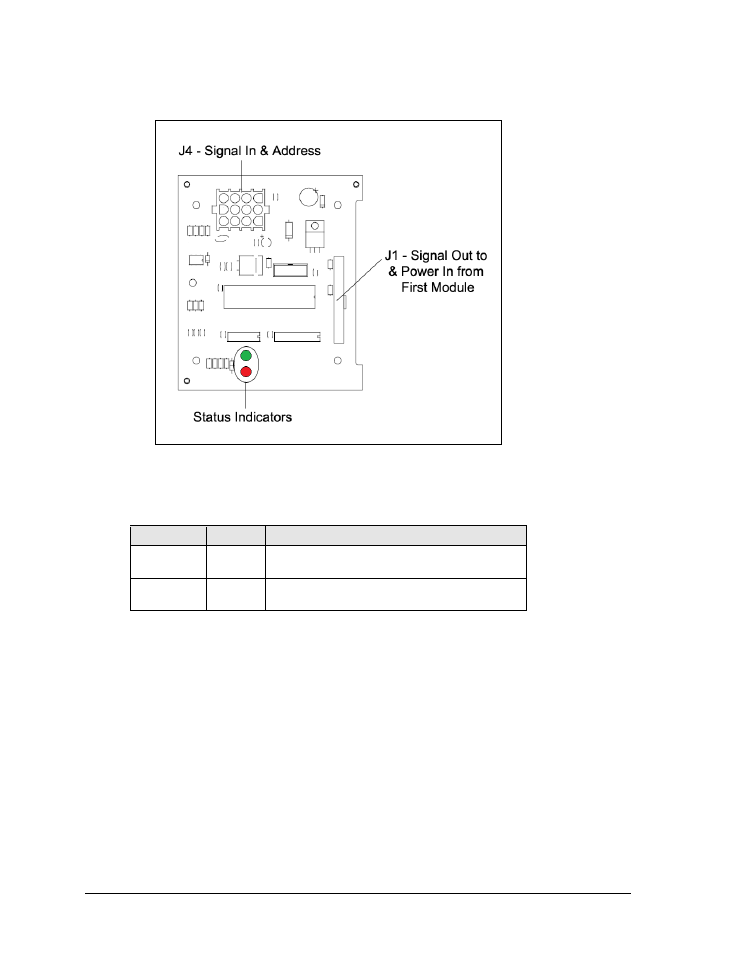
Figure 17 illustrates some of the primary jacks and indicators of a display driver.
Diagnostic LEDs
The following table explains the functions of the primary diagnostic LEDs on the drivers:
LED Name
Color
Illumination Summary
DS1 PWR
Green
Steady on or blinking when the driver has power
DS2 RX
Red
Steady on or blinking when the driver is receiving
and off when there is no current loop (CL) signal
Replacing a Driver
1. Access the internal components as described in Section 7.5.
2. Disconnect all power and signal connectors from the driver by squeezing together the
locking tabs and pulling the connectors free.
Note: It may be helpful to label the cables to know which cable goes to which
connector when reattaching a driver.
3. Remove the four screws securing the driver to the module. This will be the right-most
module, when viewing the display from the front.
4. Position a new driver over the standoffs on the module and tighten the screws.
5. Reconnect all power/signal connectors.
6. Power up and test the scoreboard/display to see if the problem has been resolved.
Refer to Figure 18 for an overview of driver (and module) replacement.
Figure 17: Display Driver
- BB-2104 Tuff Sport Four-Sided Basketball LED Scoreboard BB-2106 Tuff Sport Four-Sided Basketball LED Scoreboard BB-2108 Tuff Sport Four-Sided Basketball LED Scoreboard BB-2124 Tuff Sport Four-Sided Basketball LED Scoreboard BB-2156 Tuff Sport Four-Sided Basketball LED Scoreboard BB-2154 Tuff Sport Four-Sided Basketball LED Scoreboard BB-2147 Tuff Sport Four-Sided Basketball LED Scoreboard BB-2146 Tuff Sport Four-Sided Basketball LED Scoreboard BB-2126 Tuff Sport Four-Sided Basketball LED Scoreboard BB-3102 ColorSmart Four-Sided Basketball LED Scoreboard BB-3104 ColorSmart Four-Sided Basketball LED Scoreboard BB-3106 ColorSmart Four-Sided Basketball LED Scoreboard BB-3108 ColorSmart Four-Sided Basketball LED Scoreboard BB-3147 ColorSmart Four-Sided Basketball LED Scoreboard BB-3146 ColorSmart Four-Sided Basketball LED Scoreboard BB-3124 ColorSmart Four-Sided Basketball LED Scoreboard BB-3126 ColorSmart Four-Sided Basketball LED Scoreboard TN-2501 Tuff Sport Indoor Tennis LED Scoreboard TN-2503 Tuff Sport Indoor Tennis LED Scoreboard TN-2504 Tuff Sport Indoor Tennis LED Scoreboard TN-2505 Tuff Sport Indoor Tennis LED Scoreboard TN-2550 Tuff Sport Indoor Tennis LED Scoreboard TN-2551 Tuff Sport Indoor Tennis LED Scoreboard TN-2552 Tuff Sport Indoor Tennis LED Scoreboard TN-2553 Tuff Sport Indoor Tennis LED Scoreboard TN-2560 Tuff Sport Indoor Multi-Court Tennis LED Scoreboard TN-2561 Tuff Sport Indoor Multi-Court Tennis LED Scoreboard TN-2562 Tuff Sport Indoor Multi-Court Tennis LED Scoreboard TN-2563 Tuff Sport Indoor Multi-Court Tennis LED Scoreboard H-2101 Tuff Sport Hockey LED Scoreboard H-2102 Tuff Sport Hockey LED Scoreboard H-2103 Tuff Sport Hockey LED Scoreboard H-2104 Tuff Sport Hockey LED Scoreboard H-2106 Tuff Sport Hockey LED Scoreboard H-2115 Tuff Sport Hockey LED Scoreboard H-2114 Tuff Sport Hockey LED Scoreboard H-2111 Tuff Sport Hockey LED Scoreboard H-2108 Tuff Sport Hockey LED Scoreboard H-2105 Tuff Sport Four-Sided Hockey LED Scoreboard H-2107 Tuff Sport Four-Sided Hockey LED Scoreboard H-2109 Tuff Sport Four-Sided Hockey LED Scoreboard H-2112 Tuff Sport Four-Sided Hockey LED Scoreboard VB-2101 Tuff Sport Volleyball LED Scoreboard