Replacing the belt – DR Power 9 HP Pro (March 2010 - June 2012) User Manual
Page 15
CONTACT US AT www.DRpower.com 15
2.
Position the machine so the Frame and Engine are level and place a Waste
Oil Container under the Oil Drain Plug (Figure 17).
3.
Remove the Oil Drain Plug with a 14mm Wrench and let the Oil drain into
the Container.
4.
Replace the Oil Drain Plug and remove the Oil Fill/Dipstick.
5.
Initially add 16 oz. of SAE 30 High Detergent oil (recommended by the
Engine Manufacturer) into the Oil Fill and wait one minute for the oil to
settle.
6.
Check the Dipstick and continue adding a few ounces of oil at a time,
rechecking the Dipstick until the oil reaches the fill mark. Be careful not to
overfill.
7.
Replace the Battery Bracket for electric start machines and reconnect the
Battery.
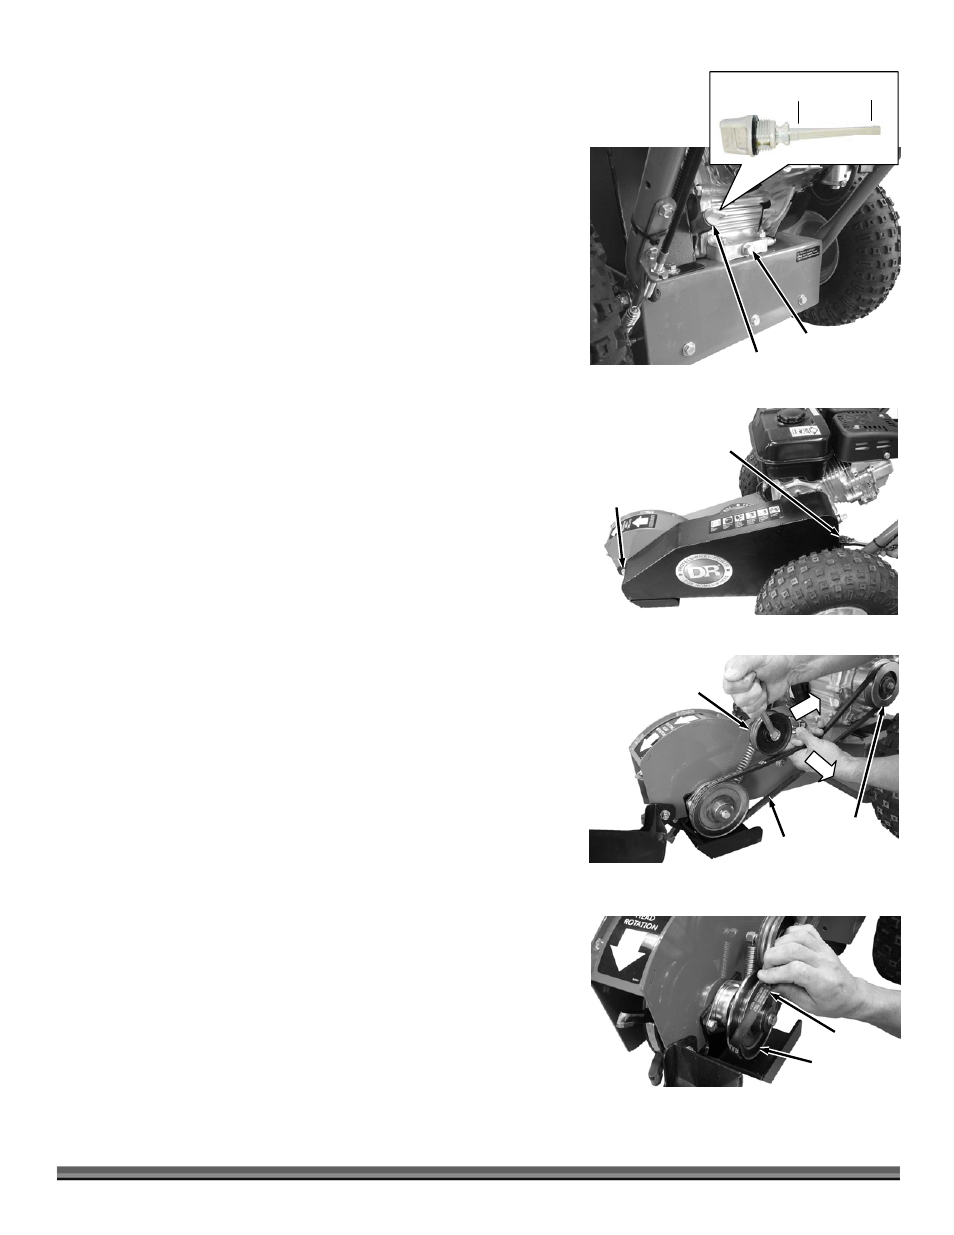
Replacing the Belt
Tools and Supplies needed:
Two 1/2" Wrenches
9/16" Wrench
New DR Drive Belt (see chapter 6 for part numbers)
Gloves
1.
Remove the Bolt, Lock Washer and Flat Washer from the rear of the Belt
Guard with a 1/2" Wrench (Figure 18).
2.
Slightly loosen the Bolt, Washers and Lock Nut at the front of the Belt Guard
with two 1/2" Wrenches and rotate the Guard forward.
NOTE: You may need to pull out on the bottom edge of the Guard as you rotate the
Belt Guard to clear the Frame.
3.
You should wear Gloves as you position a 9/16" Wrench onto the Idler
Pulley Bolt and inline with the Pulley Bracket (Figure 19). Pull the Wrench to
rotate the Belt Tensioner away from the Belt and then remove the Belt from
under the Idler Pulley.
4.
Roll the Belt off the top of the Clutch Pulley by rotating the Cutting Head in
the reverse direction as you guide the Belt off to the side at the top of the
Pulley (Figure 19). Remove the Belt from around the Cutting Head Pulley
(Figure 20).
5.
Reverse the previous steps to install the new Belt and reinstall the Belt
Guard.
NOTE: When installing the Belt onto the Clutch Pulley, Start the Belt onto the
bottom of the Pulley and rotate the Cutting Head forward as you guide the
Belt up over the top of the Pulley.
Oil Fill/Dipstick
Figure 17
Full
Low
Oil Drain Plug
Idler
Pulley
Figure 19
Belt
Clutch
Pulley
Figure 18
Bolt, Lock
Washer and
Flat Washer
Bolt, Flat
Washers and
Locknut
Cutting Head
Pulley
Figure 20
Belt