DR Power 9 HP Pro (March 2010 - June 2012) User Manual
Page 17
CONTACT US AT www.DRpower.com 17
Replacing the Cutting Teeth
Tools and Supplies needed:
Two 7/16" Wrenches
Gloves
CAUTION! Wear Gloves when working near the teeth. Without Gloves your
hands could suffer cuts from the sharp Teeth.
1.
Block the front end of the Stump Grinder so the Cutter Head is just off the
ground.
2.
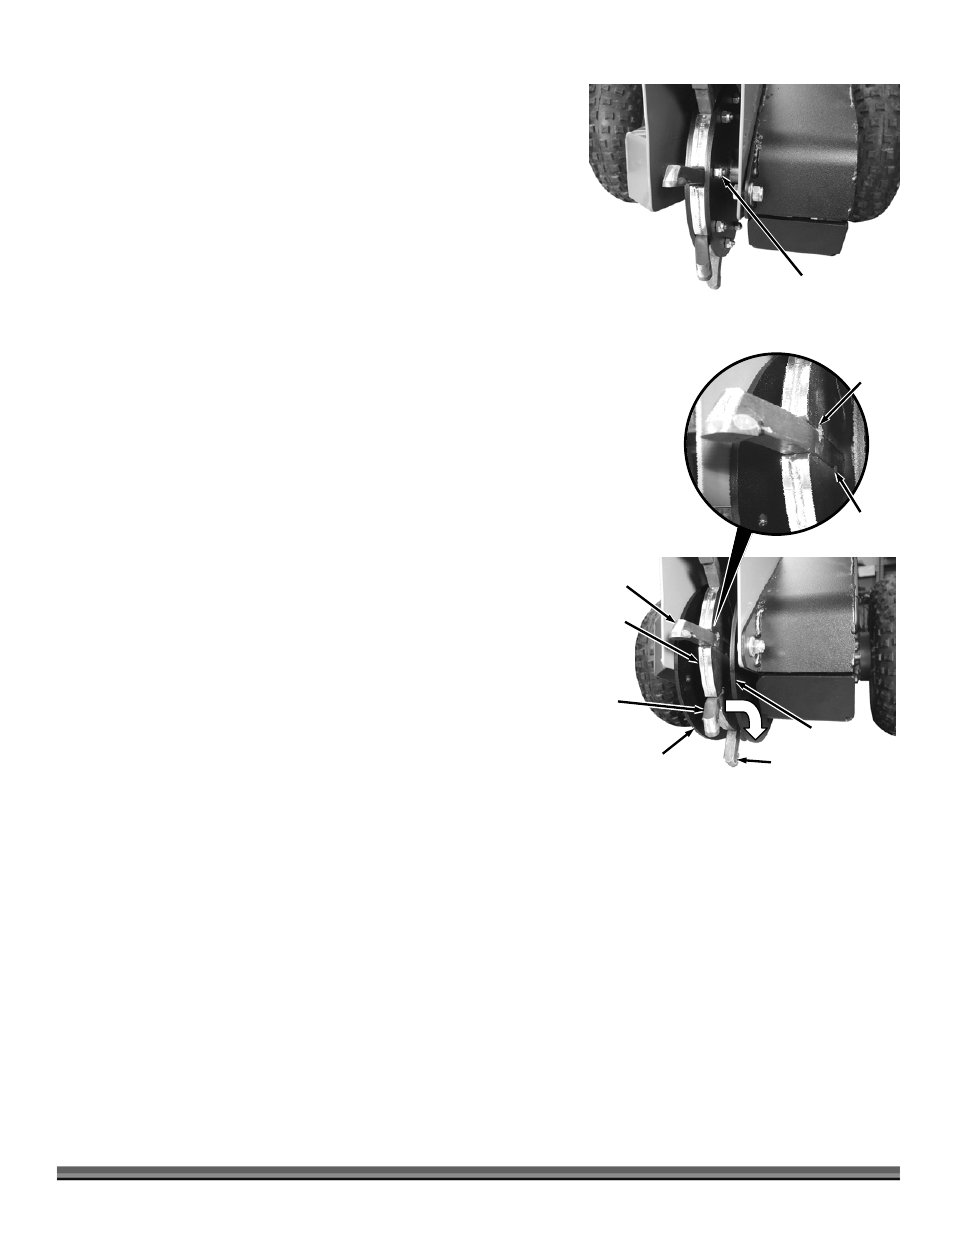
Remove the nine Bolts and Locknuts from the Cutter Head with two 7/16"
Wrenches (Figure 22).
3.
Move the Side Plates away from the Cutter Head Base to gain access to the
Teeth (Figure 23).
4.
Remove a Cutter Tooth by sliding the Tooth to the side and pulling it away
from the Cutter Head. Install a new Cutter Tooth that is the same as the one
you removed (straight, left bend or right bend).
5.
Continue removing and adding Teeth until they all are replaced.
NOTE: The Teeth must be installed in the correct order - straight Tooth, left bend
Tooth and then right bend Tooth, straight, left bend and then right bend
etc.
6.
When all the Cutter Teeth are in place, slide the Side Plates back against the
Cutter Head.
7.
Secure the Teeth by fastening the Side Plates to the Cutter Head the new
nine Bolts and Locknuts that came with your Cutting Teeth Kit.
CAUTION! Check wear of the Head Assembly each time the Teeth are replaced.
Replace the Head Assembly if it is damaged or worn.
Be sure to use the new Bolts and Locknuts provided with the
replacement teeth.
Failure to replace the Head Assembly when damaged or worn may
result in Cutting Teeth coming loose and damaging the machine.
Replacement Teeth Mounting Bolts must pass through the slot in
the Teeth. Some Head Assemblies may have additional holes in
between the Teeth that are not used.
Do not over tighten the Bolts. They should be snug, about 100 inch-
pounds (8 foot-pounds). If Bolts are over tightened they may crack
or break.
The Teeth should fit securely and when pulled out straight towards
the front of the machine (not rocking side to side) should not move
more than 1/32". If it moves more than 1/32" the Cutter Head
Tooth Key is worn and the Cutter Head should be replaced.
Figure 22
Bolt and
Locknut
Right Bend
Tooth
Figure 23
Side Plate
Side Plate
Cutter
Head
Base
Left
Bend
Tooth
Straight
Tooth
Bolt
Hole
Tooth
Slot