Mark 100 – Flowserve Valtek Mark 100 Control Valve User Manual
Page 10
Flow Control Division
Mark 100
10
Mark 100 Installation, Operation and Maintenance Instructions
FCD FCAIM0100-02
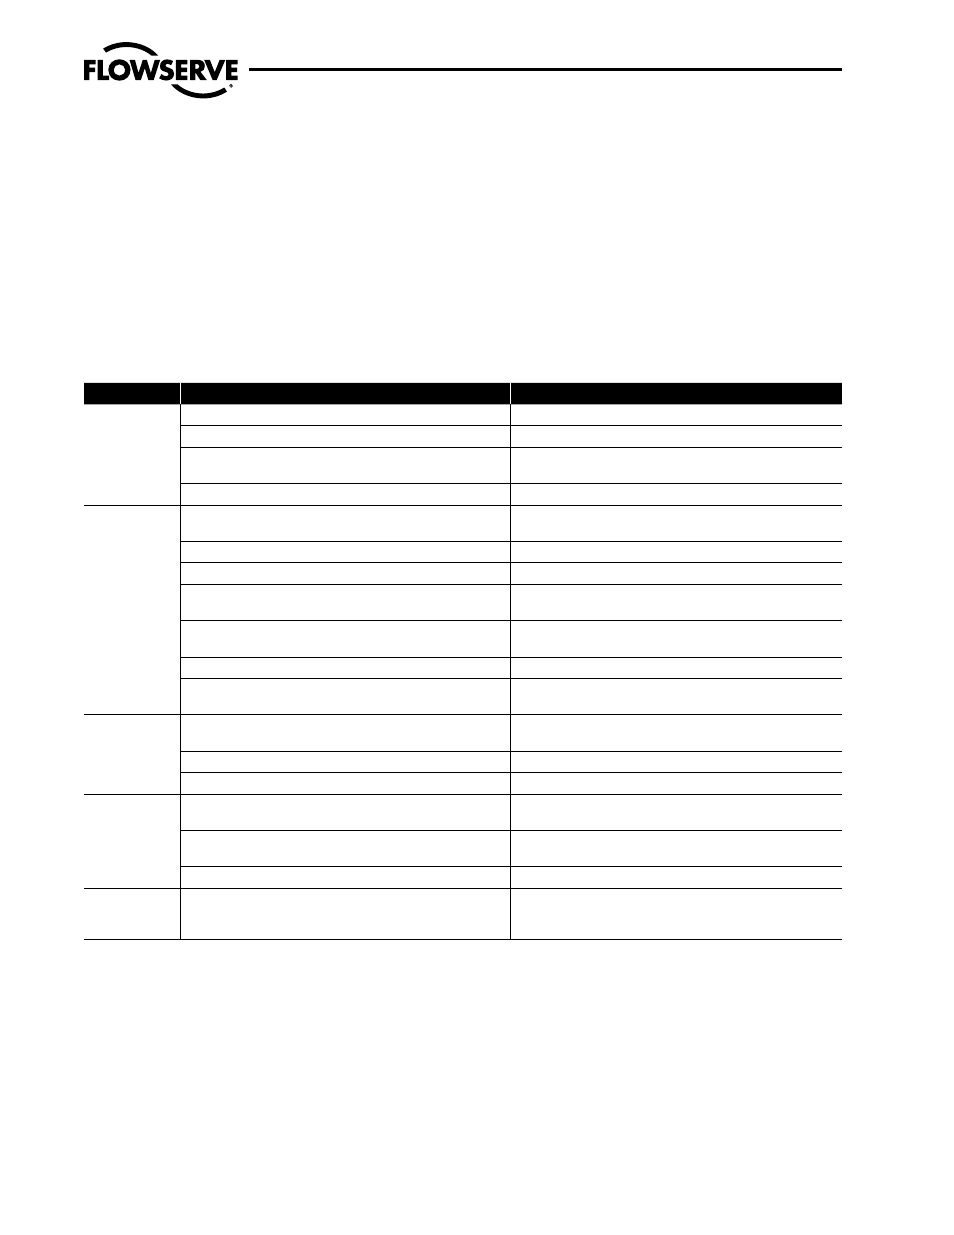
Troubleshooting Chart
Problem
Possible Cause
Corrective Action
Stem motion
impeded
1. Overtightened packing.
1. Refer to proper maintenance instructions and readjust.
2. Service temperature is beyond operating limits of trim design.
2. Reconfirm service conditions and contact factory.
3. Inadequate air supply.
3. Check for leaks in air supply or instrument signal system;
tighten loose connections and replace leaky lines.
4. Malfunctioning positioner.
4. Refer to positioner maintenance instructions.
Excessive
leakage
1. Improperly tightened bonnet flange bolting.
1. Refer to step 11 of “Reassembling the Body” section for correct
tightening procedure.
2. Worn or damaged seat ring.
2. Disassemble valve and replace or repair seat ring.
3. Worn or damaged seat or bonnet gasket.
3. Disassemble and replace gaskets.
4. Inadequate actuator thrust.
4. Check for adequate air supply to actuator; if air supply is
adequate, reconfirm service conditions and contact factory.
5. Incorrectly adjusted plug.
5. Refer to step 9 of “Reassembling the Body” section for correct
plug adjustment.
6. Improper flow direction.
6. Refer to original specifications or contact factory.
7. Improper handwheel adjustment; handwheel acting as a limit-
stop.
7. Adjust handwheel until plug seats properly.
Inadequate flow
1. Improper plug adjustment, limiting stroke.
1. Refer to step 9 of “Reassembling the Body” section for correct
plug adjustment.
2. Malfunctioning positioner.
2. Refer to positioner maintenance instructions.
3. Service conditions exceed trim design capacity.
3. Verify service conditions and consult factory.
Plug slams
1. Incorrect plug adjustment allowing improper cushion of air
between actuator piston and yoke.
1. Refer to step 9 of “Reassembling the Body” section for correct
plug adjustment.
2. Inadequate air supply.
2. Check air supply to actuator; repair leaks and remove any
restrictions in supply line.
3. Trim sized too large for flow rate.
3. Install reduced trim.
Valve does not
fail in correct
position
1. Incorrect flow direction.
1. Reconfirm direction and, if necessary, correct flow direction
through valve.
10. Using the actuator, seat the plug two or three times to center the
seat ring using pressure on the top of the actuator.
11. Tighten the body bolting, following the bolting sequence
outlined in Figure 5. Use a minimum of four steps to reach the
suggested bolt torque values shown in Table 2. Never exceed
more than 30% of the suggested bolt torque value in a single
step.
12. Slowly stroke the plug up and down to check the alignment of
the plug with the sleeve.
a
CAUTION: If binding or sticking is observed, discon-
tinue stroking the valve and reassemble using the above
steps. Failure to do so could cause serious valve dam-
age. Contact your Flowserve representative if binding
cannot be resolved.
13. Perform a Quick Check as described in section 4.1.