Geist Watchdog 15 Quick Start User Manual
Page 2
2
Watchdog 15/100 quick-setup pack-in sheet, rev150213A
http://www.geistglobal.com/support
“QUICK-START” NETWORK SETUP:
By default, the Watchdog unit’s IP address is set to
192.168.123.123
from the factory. To access the unit for
the first time, you will probably need to temporarily change your computer’s network settings to match the
192.168.123.xxx subnet.
To set up the Watchdog unit, connect it to your PC’s Ethernet port (note that some PC’s may require a special
“crossover” Ethernet cable to make this type of direct connection), connect the 6V power supply, then follow the
appropriate instructions for your PC’s operating system:
●
F
OR
W
INDOWS
2000 / XP / S
ERVER
2003:
Click the Start button,
choose
Settings
, then
Network Connections
.
●
F
OR
W
INDOWS
7 / S
ERVER
2008:
Click the Start button, then choose
Control Panel
→
Adjust Your Computer’s Settings
→
Network & Sharing
Center
→
Change Adapter Settings
.
Locate the entry under
LAN or High-Speed Internet
which corresponds to the
network card (or “NIC”) which the Watchdog unit is connected to. (Most PCs
only have a single NIC installed, but a WiFi connection will also show as a
NIC, so be sure to choose the correct entry.) Double-click on the network
adapter’s entry in the
Network Connections
list to open its status dialog box,
then click the
Properties
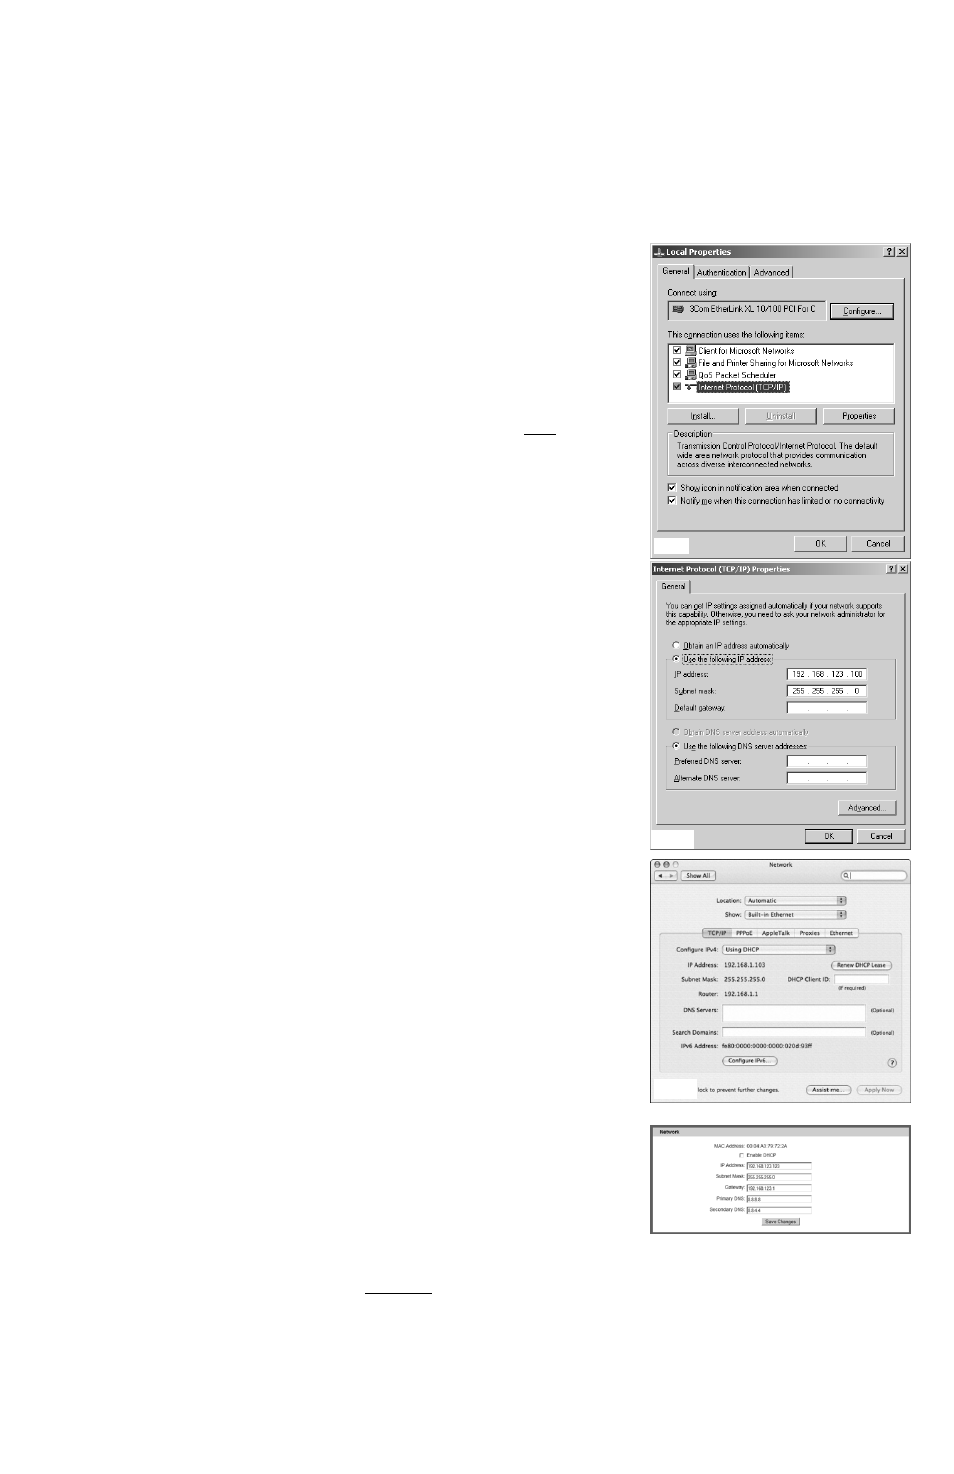
button to open the Local Properties window (fig.1).
Find the entry titled “Internet Protocol (TCP/IP)” in the list, then click the
Properties
button to open the Internet Protocol Properties window (fig.2).
If you see more than one TCP/IP entry, the PC may be configured for IPv6
support as well as IPv4; make sure to select the entry for the IPv4 protocol.
Make sure you write down any settings shown here before changing them!
Choose the
Use the following IP address
option, then set
IP address
to
192.168.123.100
and
Subnet Mask
to
255.255.255.0
. For this initial
setup,
Default Gateway
and the
DNS Server
entries can be left blank. Select
OK
, then
OK
again to close both the Internet Protocol Properties and Local
Properties windows.
●
F
OR
M
AC
OS X:
Click the
System Preferences
icon on the Dock, and
choose
Network
. Select
Built-in Ethernet
from the
Show
drop-down list to
display the Mac’s Ethernet card (“NIC”) settings, then choose the
TCP/IP
settings, as shown in (fig.3). Make sure you write down any settings shown
here before changing them!
Select
Manually
from the
Configure IPv4
drop-down list, then set
IP address
to
192.168.123.100
and
Subnet Mask
to
255.255.255.0
. (The
Router
and
DNS Servers
can be left blank for this initial setup.) Click
Apply Now
to
make the settings take effect.
Once the NIC settings are configured properly, you should be able to access
the Watchdog unit by typing
http://192.168.123.123
into the address bar
of your web browser. The unit’s Overview page will come up by default; click
the
Config
button on the left-hand side of the web page to bring up the
configuration-settings page, then set the Network parameters (fig.4) as
needed. The unit’s
IP Address
,
Subnet Mask
,
Gateway
, and
DNS
settings
can either be assigned manually, or acquired via DHCP. (For more
information, refer to “Assigning an IP Address” in the User’s Manual for your
particular Watchdog model, available for download from our web site at
http://www.geistglobal.com/support
)
Note that the new settings will take effect instantly when
Save Changes
is clicked, so the browser will no longer
be able to reload the web page from the 192.168.123.123 address and will probably display a “page not found”
or “host unavailable” message. This behavior is normal. Once you have finished configuring the Watchdog
unit’s IP address, simply repeat the steps above, and change the PC’s NIC card settings back to the ones you wrote
down prior to changing them, to restore the PC’s normal network and internet settings.
(fig.1)
(fig.2)
(fig.4)
(fig.3)