Geist Watchdog 15 Quick Start User Manual
Page 3
3
Watchdog 15/100 quick-setup pack-in sheet, rev150213A
http://www.geistglobal.com/support
SETUP EXAMPLES TO TEST YOUR WATCHDOG MONITORING UNIT:
Note: The following instructions assume that you have successfully connected the unit to a network, assigned it
an IP address, and have been able to bring up its Overview page in your web browser using the “Quick-Start
Network Setup” instructions on the preceding page. Since the Watchdog 15 and 100 models share the same user
interface, only the Watchdog 15’s web pages are shown here.)
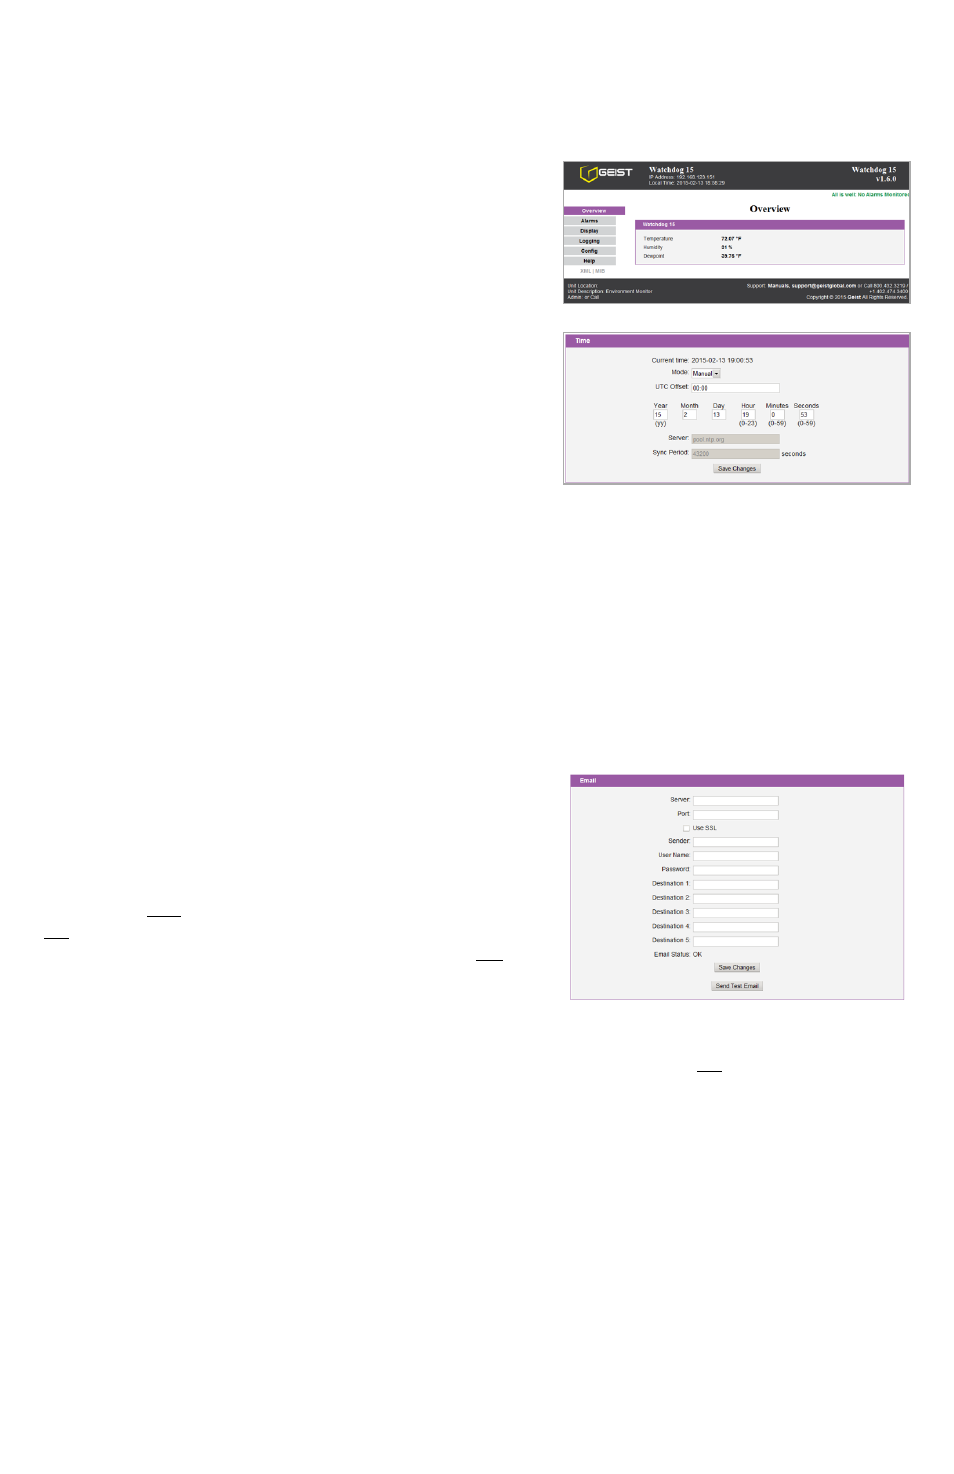
Before the Watchdog unit can log data, its real-time clock must be
set to the correct time. The Time settings are on the Config page;
click the
Config
tab on the left-hand side of the web page to bring
up the configuration-settings page, then scroll down the page until
you find the time-settings block, as shown here.
The clock can either be set manually, or it can be automatically
synced to an NTP time server. By default,
Mode
is set to
Manual
;
just fill in the
Year
,
Month
,
Day
,
Hour
,
Minutes
, and
Seconds
fields, as shown here. Note that the unit uses a 24-hour clock
format; i.e. 8AM would be represented as
08:00:00
, while 8PM
would be
20:00:00
.
The unit’s time is always set in UCT (Coordinated Universal
Time). To convert this to your local time, set the appropriate
UTC
Offset
(specified as + or – the appropriate amount in hours and minutes, i.e.
–05:00
for U.S Eastern Standard
Time,
+10:00
for East Australia Time, etc.) for your particular time zone. Then click
Save Changes
, and the
clock will be set. If Daylight-Saving Time is in effect in your area, be sure to add +1 to the offset, as appropriate
(i.e. use
–04:00
for U.S Eastern Daylight Time instead of
–05:00
.)
To have the unit set the time automatically via NTP, change
Mode
to
NTP
, then click
Save Changes
. Note,
however, that for this to work, you will need to have correctly set the
Gateway
and
DNS Servers
in the Network
settings block, so that the unit is able to reach the outside internet to look up the NTP server’s address and
communicate with it. If these settings are not correct, or if the network’s firewall settings are not set up to allow
the unit to access the outside internet, NTP mode will not work.
Next, the Email settings need to be configured for the Watchdog
unit to be able to send alerts. If you plan to use an external SMTP
server or a “hosted” service such as Gmail or AOL, you will need
to obtain the correct SMTP settings for your account from those
services.
The unit will only work with a standard SMTP mail server. It does
not support IMAP, or the proprietary MAPI/RPC protocol used by
Microsoft Exchange and Outlook. (The Watchdog unit can use an
Exchange server to send e-mails, if the Exchange server is set up to
allow SMTP connections; however, this may require some
additional configuration of the Exchange server to allow the unit to connect to it properly. Please consult
Appendix B of the User’s Manual for more information on this.) Therefore, if you need to contact your service
provider to get the correct settings, you may need to explicitly mention that you are not setting up Outlook, or a
browser-based e-mail client, on a Windows or Mac computer, in order to get the correct “generic” SMTP settings
from them.
To send e-mails through a Gmail account, for example, the settings would be programmed as follows:
Server:
smtp.gmail.com
Port:
465
Use SSL:
■ enabled (checkboxset)
Sender:
complete Gmail e-mail address (i.e.
)
Username:
complete Gmail e-mail address (i.e.
)
Password:
Gmail login password
Then put the e-mail addresses you want to have e-mail alerts sent to into the
Destination
fields. Only one address
can be entered into each
Destination
field; you cannot “stack” a list of recipients, i.e. “[email protected];
[email protected]; [email protected]”, within a single
Destination
entry.